Telegram bot
On the 24th of June 2015 Telegram got bots, or, to be specific, Telegram Bot API. So, now my other problem about receiving server status can be solved much easier.
Initially I wrote this article in russian 🇷🇺, but having noticed that it’s one of the most visited pages in my blog, I decided to translate it to english.
Bot is not a “user account”, it doesn’t require a phone number, and most importantly - there is no need to install a Telegram client application on server (or wherever). Telegram bot is an API - web-requests to Telegram servers. And you need to implement those requests sending and processing.
Official documentation can be found here: https://core.telegram.org/bots
Create a bot
Send a message to the bot of all bots - BotFather:
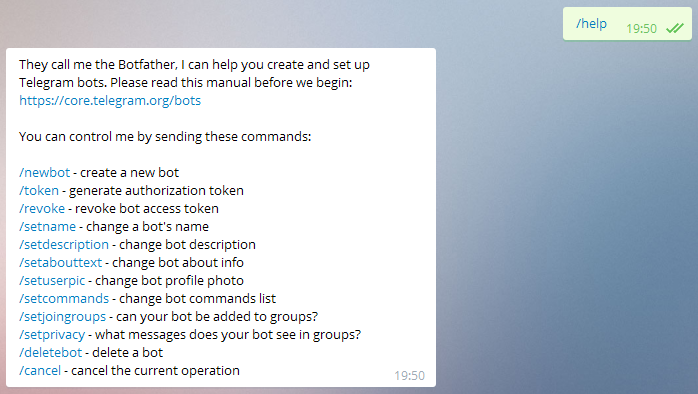
…and ask him (with respect) to create a new bot:
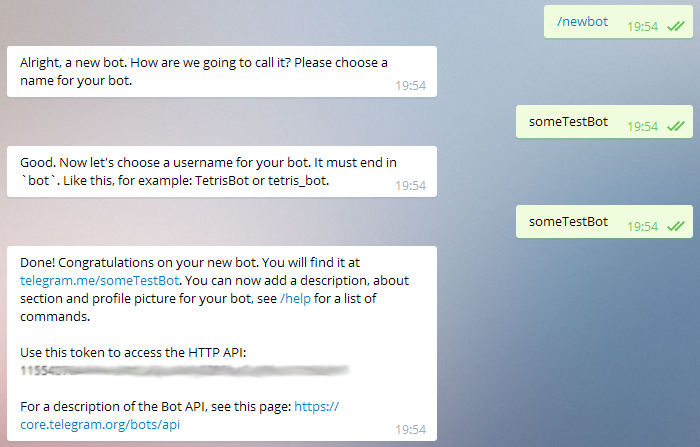
After that your bot will be created. Pay attention to the token - it is used for accessing the bot, so don’t make this token publicly available, or someone could get your bot’s messages (and also send his own requests).
Now, when you have your bot created and got your token, I can demonstrate, what exactly I meant by saying that bot is an API. Open your web-browser and go to this address: https://api.telegram.org/botYOUR-TOKEN-HERE/getMe
Browser will get you the following:
{"ok":true,"result":{"id":ID,"first_name":"someTestBot","username":"someTestBot"}}`Here’s even a screenshot for you:

So, that’s the Telegram bot. You send a web-request and get a JSON-response.
But of course, you need to automate sending requests as well as processing JSON-responses, so you need an implementation for your bot, that will work somewhere at some server (or at your home PC, but then obviously your bot will be available only when your PC is on). For this you can take any programming language that has web-requests (as it’s basically the only functionality you need).
Implementation
I chose Python. And not by an accident - there is a ready-made implementation: pyTelegramBotAPI. It has everything we need, so the only thing left is to implement commands that your bot will be able to process. Although, everything is covered, I recommend you to read the documentation about API: https://core.telegram.org/bots/api
So, you need to install Python and some IDE (but you can of course use any Notepad). Here’s what I have:
Okay, you have Python and pip, now install pyTelegramBotAPI:
pip install pyTelegramBotAPICreate someTestBot.py file, that will be your implementation. I declared two required commands /start and /help, and also command for sending server status /server:
import telebot # pyTelegramBotAPI
import logging # logging
# for executing scripts
from subprocess import call
# log settings
logger = logging.getLogger('log')
logger.setLevel(logging.INFO)
fh = logging.FileHandler('someTestBot.log')
fh.setLevel(logging.DEBUG)
formatter = logging.Formatter("%(asctime)s | %(levelname)-7s | %(message)s")
fh.setFormatter(formatter)
logger.addHandler(fh)
# create a bot
bot = telebot.TeleBot("YOUR-TOKEN-HERE")
# help text
help_string = []
help_string.append("Just a *test* bot.\n\n")
help_string.append("/start - says hello;\n")
help_string.append("/help - shows help;\n")
help_string.append("/server - sends server status.")
# --- commands
@bot.message_handler(commands=['start'])
def send_start(message):
# send a simple message
bot.send_message(message.chat.id, "Hi, I'm a test bot! Send me /help to get help.")
@bot.message_handler(commands=['help'])
def send_help(message):
# send a message with Markdown
bot.send_message(message.chat.id, "".join(help_string), parse_mode="Markdown")
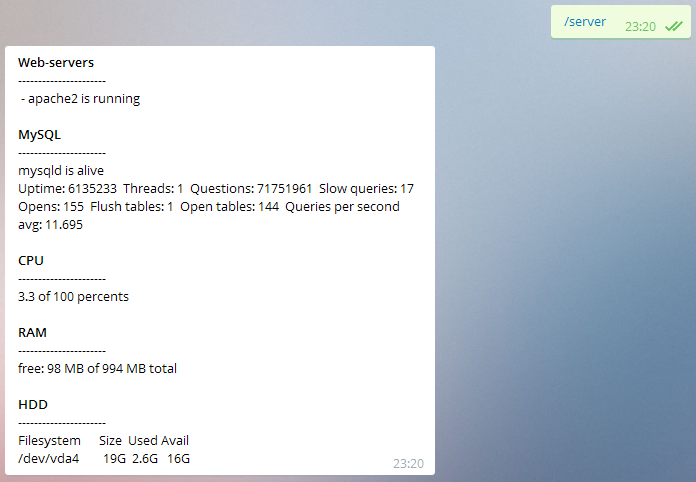
@bot.message_handler(commands=['server'])
def send_server(message):
try:
# path to script that gathers server info
call(["/root/scrps/status.sh"])
# read the file with results
status = open("/root/scrps/status.txt", "rb").read()
bot.send_message(message.chat.id, status, parse_mode="Markdown")
except Exception as e:
logger.exception(str(e))
bot.send_message(message.chat.id, "Error while getting a server status. Check the log for details.")
# start message receiving
bot.polling()Script for gathering server status info status.sh I took from last article and changed it a bit:
#!/bin/bash

scrps_path=/root/scrps

info_web="*Web-servers*
----------------------
$(service apache2 status | sed -r "s/[*]+/-/g")
$(service nginx status | sed -r "s/[*]+/-/g")

"

info_mysql="*MySQL*
----------------------
$(mysqladmin ping)
$(mysqladmin status)

"

info_cpu="*CPU*
----------------------
$(top -bn1 | grep "Cpu(s)" | sed "s/.*, *\([0-9.]*\)%* id.*/\1/" | awk '{print 100 - $1" of 100 percents"}')

"

info_ram="*RAM*
----------------------
free: $(free -m | grep Mem | awk '{print $4}') MB of $(free -m | grep Mem | awk '{print $2}') MB total

"

info_space="*HDD*
----------------------
$(df -h --output=source,size,used,avail | head -n2)
"

text=$(printf "$info_web$info_mysql$info_cpu$info_ram$info_space")
printf '%s\n' "$text" > ${scrps_path}/status.txt
Put this file on server to /root/scrps/status.sh (or anywhere you want, but reflect this in bot settings).
Your bot is now implemented.
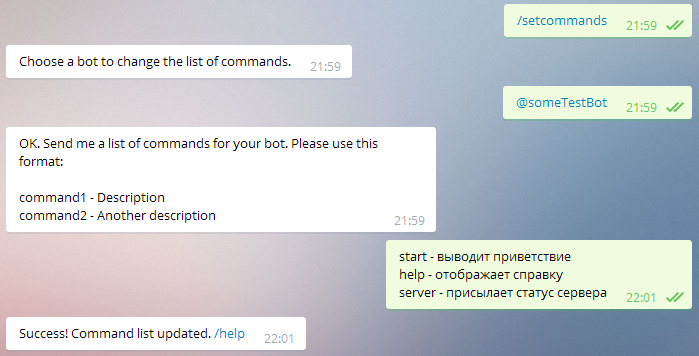
Go back to BotFather and set the commands for your bot:
Deployment
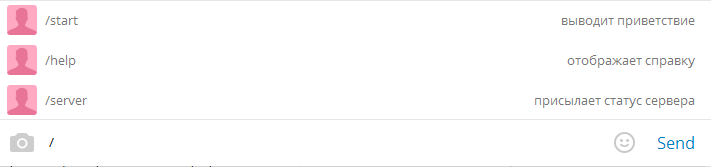
Actually, you can already run the bot on your PC - open terminal, go to the folder with someTestBot.py and run python someTestBot.py.Find in Telegram user with name @someTestBot (yours will have another name, obviously) and send something to him:
Notice how Telegram application shows tips about bot commands (which we added with BotFather):
Now you need to make it so bot runs 24/7. Go to your Linux server and create directory /usr/local/bin/someTestBot/. Put there your someTestBot.py. By the way, you need to install pyTelegramBotAPI on server too (and Python with pip, obviously).
I’ll show you 2 ways how to launch script as a service: Supervisor and systemd.
Supervisor
Install Supervisor:
sudo apt-get install supervisorCreate config (/etc/supervisor/conf.d/someTestBot.conf):
[program:someTestBot]
directory=/usr/local/bin/someTestBot
command=python someTestBot.py
autostart=true
autorestart=true
One would assume, that with sush config bot will run with root privileges, which is not cool. You should definitely change that.
Meanwhile, we are launching:
supervisorctl update
supervisorctl restart someTestBot
systemd
Or, of your system has systemd, then there is no need in Supervisor.
Create a config:
vi /etc/systemd/system/telegram-bot-sometestbot.serviceWith this content:
[Unit]
Description=Telegram bot someTestBot

[Service]
WorkingDirectory=/usr/local/bin/someTestBot
ExecStart=/usr/bin/python3 /usr/local/bin/someTestBot/someTestBot.py
Restart=always
RestartSec=10
SyslogIdentifier=python-someTestBot
User=someTestBot

[Install]
WantedBy=multi-user.target
In User=someTestBot you can set root, but I recommend to create a new user for that. But then you need to give him access to mysqladmin, otherwise your scripts will fail.
Enable our new service:
systemctl enable telegram-bot-sometestbot.service
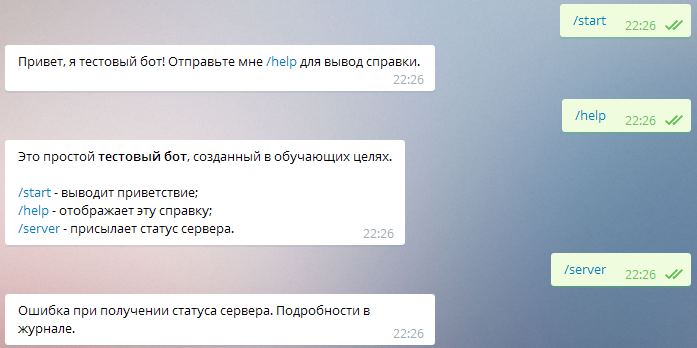
systemctl start telegram-bot-sometestbot.serviceThat’s it, bot is running, check it:
What else can be dine here? Well, this line - bot.polling() - means endless loop with request to Telegram servers, which is totally not cool in terms of performance and resource consumption on both sides. Better to do it so you bot will expect messages from Telegram. You can do it implementing webhook. I will get there eventually and add this to the article.
P.S. I have deleted @someTestBot. If someone will take this username in future - that’s not me.
Finally, I’ve dealt with webhook. I decided to create a new article about it.