Boot to Qt
Попробовал на днях Boot to Qt и был слегка шокирован. Сейчас расскажу, почему.
Couple a days ago I discovered Boot to Qt and was quite shocked. I want to tell you why.
На русском 🇷🇺
В дополнение к официальному манулу решил написать своё руководство по установке и настройке Qt for Device Creation для Windows, а также резкий пример использования. Для Linux, в общем-то, должно быть всё то же самое.
О том, что это вообще всё такое, можно посмотреть здесь. Если вкратце, то это подготовленный загрузочный образ Линукса для embedded устройства плюс весь необходимый инструментарий для запуска приложения прямо из IDE Qt Creator. При включении девайс загрузит не рабочий стол Линукса, а сразу Qt приложение. То есть, написал что-то в Qt Creator - можешь сразу запустить это на подключённом девайсе не отходя от кассы.
Хочу предупредить, что для возможности вести разработку с Qt for Device Creation (а именно такой требуется пакет) у вас должна быть соответствующая лицензия, так как этот пакет не доступен для Open Source лицензий (GPL, LGPL). Точнее, доступны не все компоненты, например интересующий нас Boot to Qt. Ну и если у вас коммерческий проект, то Open Source вам не подходит (в большинстве случаев). Лицензию можно приобрести тут: https://www.qt.io/contact-us/
Большей частью инструкция повторяет эти шаги, но с моими комментариями и скриншотами. И хотя шаги для Linux пропущены, для них должно быть всё примерно то же самое.
И да, на Mac OS это всё (возможность работать с устройством) пока недоступно, можно только в Linux (x64) и Windows.
Предварительная подготовка
Итак, для начала я поставил на всякий случай и JRE, и JDK. Затем поставил Android Studio (в основном, нужен Android Debug Bridge) и VirtualBox (для эмулятора).
Теперь можно ставить Qt. Если вы ставите его впервые, то сначала нужно загрузить установщик через Qt Account:
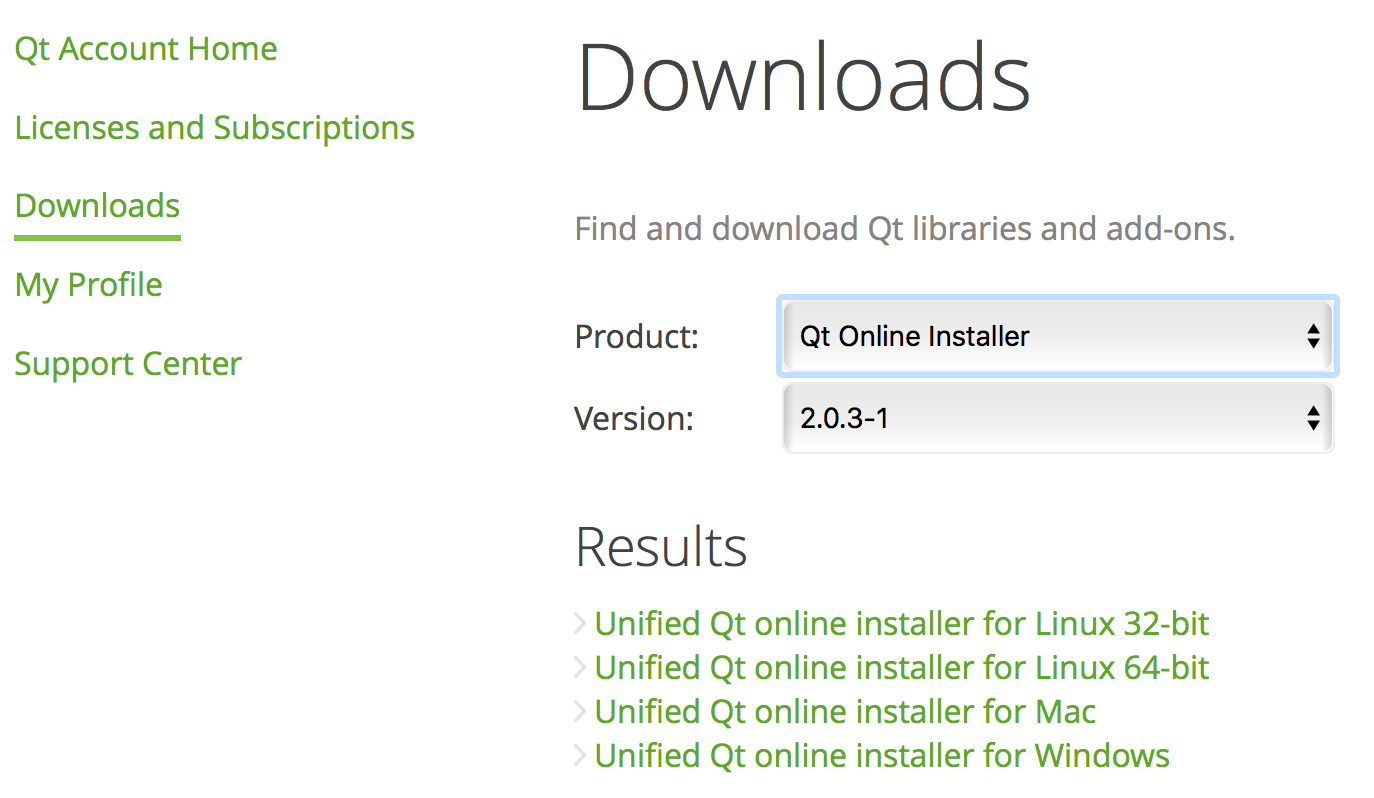
Я бы рекомендовал онлайн-установщик, но можно выбрать и оффлайн вариант.
Если Qt у вас уже установлен, весь заново ставить не нужно, потребуется только доставить новые компоненты через Qt Maintenance Tool (установщик Qt, должен лежать в том же каталоге, имя файла: MaintenanceTool.exe).
Итак, запускаем установщик (или Maintenance Tool), вводим данные своего Qt Account и выбираем Add or remove components.
Помимо прочих нужно развернуть ветку Qt Embedded и выбрать интересующий девайс. У меня под рукой устройство типа такого, потому я выбрал соответсвующий пункт:
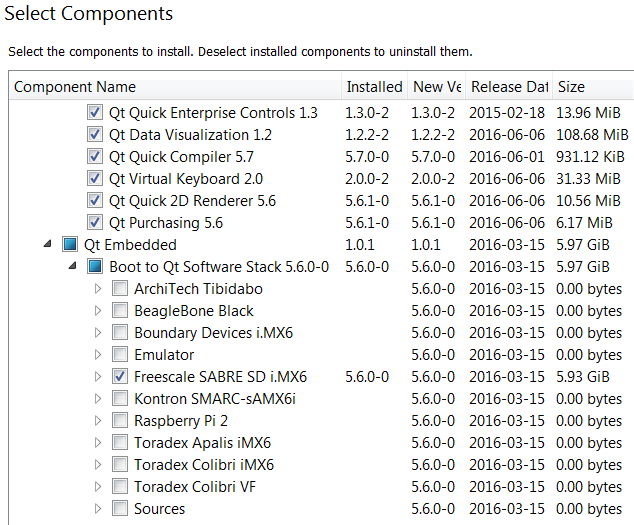
Хотя, по ходу, надо было выбирать Boundary Devices. Но тут это не так важно. Короче, визард поставит всё выбранное.
Создание загрузочного раздела
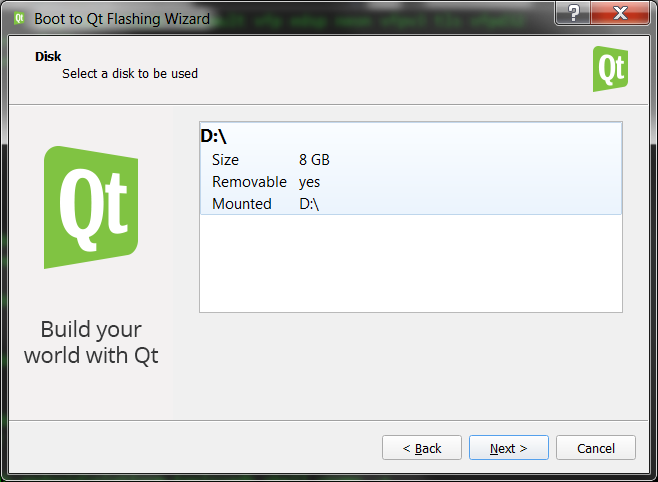
Теперь нужно подготовить SD карту, поставить на неё Boot to Qt. Вставляем карту в комп, запускаем Qt Creator, выбираем в меню Tools -> Flash Boot To Qt device. Запустится мастер, спросит про образ:

а потом спросит про карту, на которую его нужно залить:
После окончания “прошивки” карты её можно извлечь, вставить в устройство и запустить его (включить в розетку):
If video doesn't play in your browser, you can download it here.
Как видим, устройство загрузилось с установленного нами на карту образа и явило графический интерфейс на тачскрине, представленный в виде демонстрационного приложения Qt (это не моё, оно идёт в комплекте).
Настройка Qt Creator
Теперь осталось настроить Qt Creator для запуска приложений на устройстве. Оставляем устройство запущенным, присоединяем его через Micro-USB к компьютеру, ждём определения устройства системой, пока она поставит драйвера. Когда всё поставится и определится, можно проверить доступность присоединённого устройства через ADB, у меня он установлен по пути C:\programs\sdk-android\platform-tools\adb.exe:
Команда:
adb.exe devicesдолжна выдать что-то вроде:
c:\programs\sdk-android\platform-tools>adb devices
List of devices attached
* daemon not running. starting it now on port 5037 *
* daemon started successfully *
b2qt-sabre-0019b8010384 device
Значит, коннект есть. Теперь запускаем Qt Creator и идём в настройки, там Devices. Находим наше устройство:
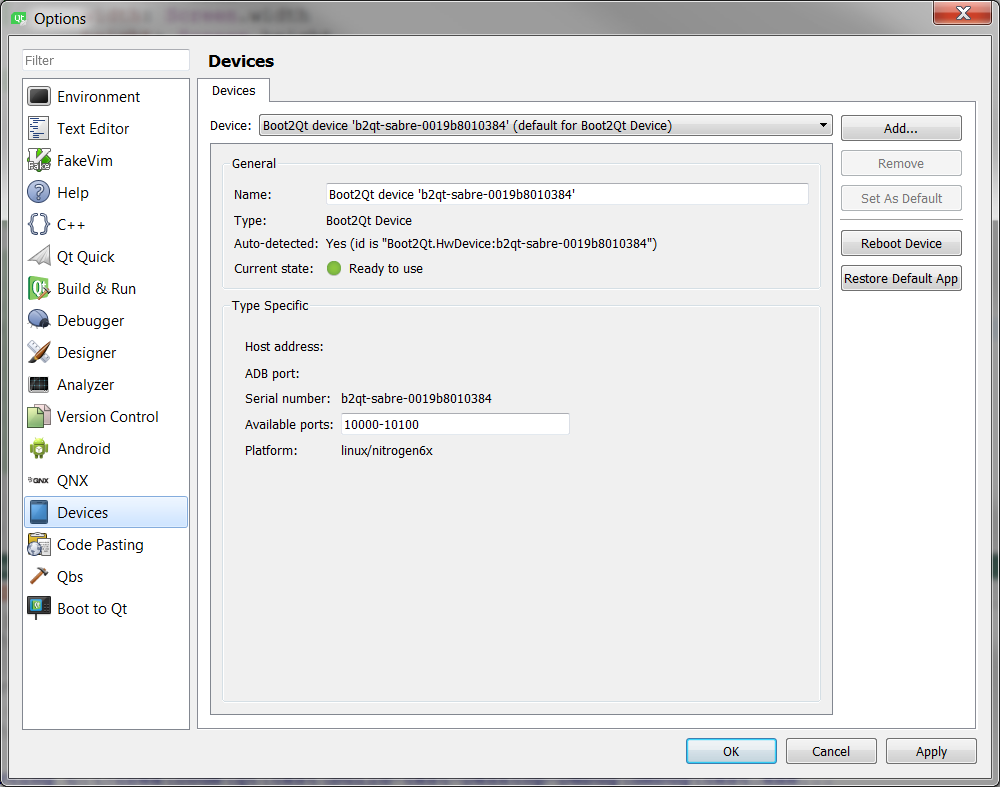
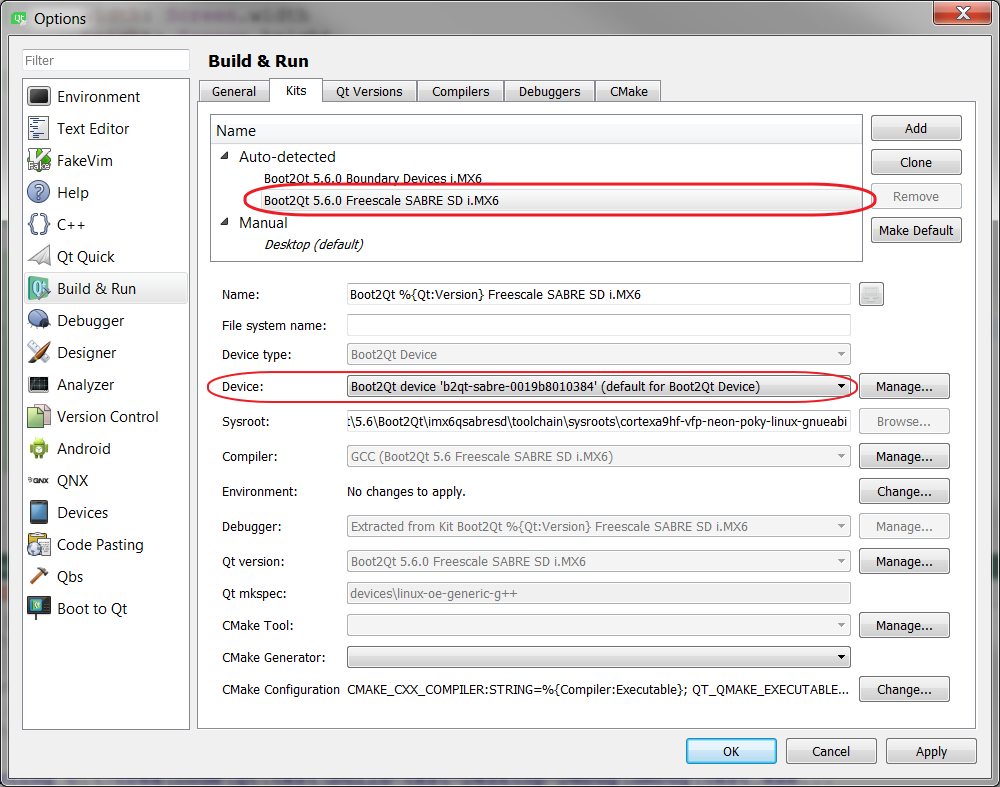
Видим, что оно там есть и его статус Connected. Теперь идём в раздел Build & Run. Там на вкладке Kits среди Auto-detected должен быть Boot2Qt, который мы выбирали при установке. Нужно нажать на него и выбрать из выпадающего списка Device наше устройство:
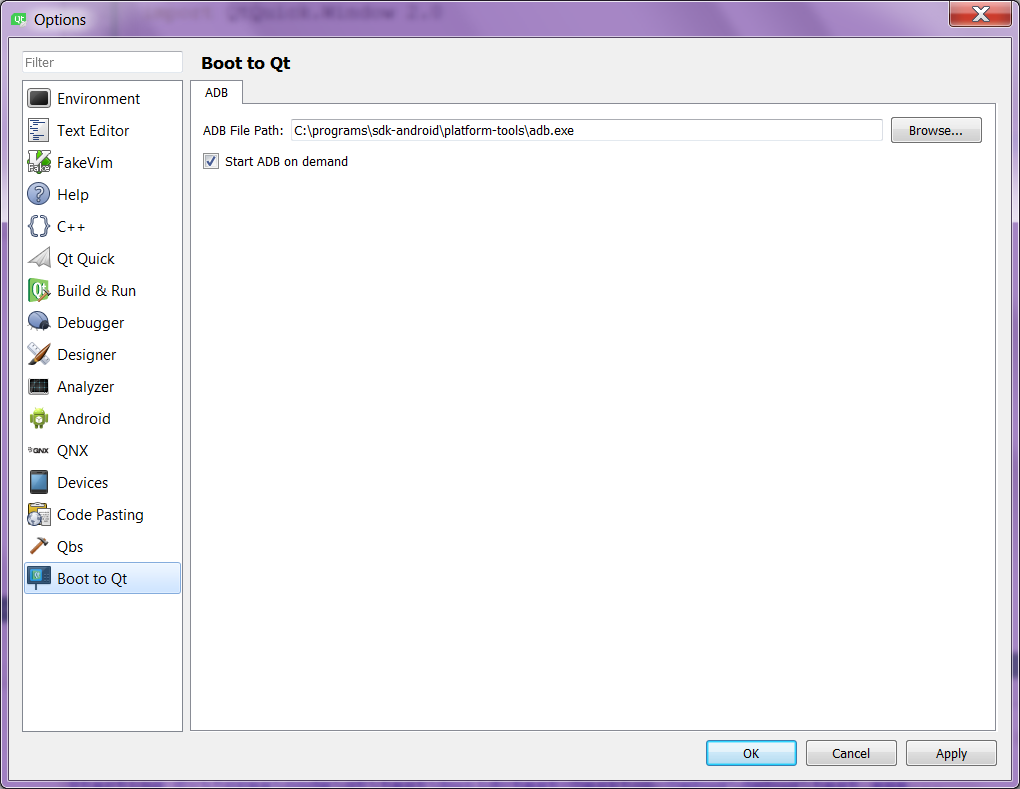
Также надо указать путь до ADB в разделе Boot to Qt:
На этом настройка закончена.
Резкий пример приложения
Запилим простейшее приложение и запустим его сразу же на устройстве.
Это будет окно на весь экран с четырьмя цветными квадратами по углам. При нажатии на каждый всё окно будет заливаться соответствующим цветом. Фрагмент кода для одного из квадратов:
Rectangle {
    id: rectGreen
    Layout.alignment: Qt.AlignLeft | Qt.AlignBottom
    color: "green"
    Layout.preferredWidth: 150
    Layout.preferredHeight: 150
    MouseArea {
        anchors.fill: parent
        onClicked: {
            root.color = rectGreen.color;
        }
    }
}
Полный исходный код проекта выложен в репозитории.
Для наглядности снял видео запуска приложения из Qt Creator на десктопе и сразу на устройстве:
If video doesn't play in your browser, you can download it here.
Как видите, удобство просто зверское. Всего лишь один переключатель, и вы можете запустить ваше приложение не только на компьютере, где идёт разработка, но сразу и на устройстве. Более того, возможна также и пошаговая отладка (да, прямо во время выполнения кода на устройстве) с использованием профайлеров, но об этом я расскажу в других статьях.
Вот ещё статья про всё то же самое, но с Raspberry Pi, включая сборку самого девайса с тачскрином.
In english 🇬🇧
In addition to the official manual I decided to write my own manual about how to install and set up Qt for Device Creation for Windows, and also to show some quick example of usage. For Linux it would be the same steps (in general).
More detailed you can read about it here. Shortly saying, it’s a pre-build boot image of Linux for embedded device plus all necessary toolchain for launching applications right from IDE Qt Creator. When you turn on the device, it will boot not to the Lunix Desktop, but straight to Qt application. So, you write something in Qt Creator and you can execute it on the connected device right away.
I want to warn you from the start, that to be able to develop with Qt for Device Creation (that’s the name of the package) you should have corresponding license, as this package is not available for Open Source licenses (GPL, LGPL). More precisely, not all components are available, for example Boot to Qt itself. And if you have a commercial project, then Open Source is definatelly not for you (in most cases). You can purchase a license here: https://www.qt.io/contact-us/
Mostly, this manual repeats these steps, but with my comments and screenshots. Though steps for Linux are missing, basically it should be all the same.
And by the way, all that (ability to work with device) is not available for Mac OS yet, it’s only Linux (x64) and Windows now.
Preparations
So, for starters I installed both JRE and JDK just for a case. Then I installed Android Studio (in general, for the Android Debug Bridge) and VirtualBox (for device emulator).
Now you can install Qt. If you are installing it for the first time, then get the installer from your Qt Account:
I would recommend online-installer, but you can choose offline-installer as well.
If you already have Qt, then you don’t have to re-install it - just add new components via Qt Maintenance Tool (Qt installer, it should be in the same folder under the name MaintenanceTool.exe).
Ok, start the installer (or Maintenance Tool), input your Qt Account credentials and choose Add or remove components.
Among the others find the branch Qt Embedded and choose corresponding device. I have a board (like this, so I chose this:
I guess, I should have chosen Boundary Devices, but this time it doesn’t really matter. So, wizard will install all selected components.
Flashing SD card
Now you need to flash the SD card (put Boot to Qt to it). Insert the card to you workstation, start Qt Creator and find in the menu Tools -> Flash Boot To Qt device. The wizard will launch and ask you about the image:
and then it will ask to choose the card to flash the image to:
After flashing being done you can eject the card, insert it to the device and start the device (turn on the power):
If video doesn't play in your browser, you can download it here.
As you can see, the device booted from the SD card with our image and showed GUI of Qt demo application (it’s not mine, it comes pre-installed with the image) on the touchscreen.
Setting up Qt Creator
Now you need to set up the Qt Creator for launching applications on the device. Leave the device running and connect it to your workstation via Micro-USB cable. Wait till it will be detected by computer and drivers will be installed. When it’s done, you can check its availability with ADB. I have it installed here: C:\programs\sdk-android\platform-tools\adb.exe.
The command:
adb.exe devicesshould give you something like this:
c:\programs\sdk-android\platform-tools>adb devices
List of devices attached
* daemon not running. starting it now on port 5037 *
* daemon started successfully *
b2qt-sabre-0019b8010384 device
So, it’s connected. Now start Qt Creator and go to the Options, then to the Devices. Find your device:
You can see that it’s there and its status is Connected. Now go to the Build & Run. There you can find Kits and among the Auto-detected ones there should be a Boot2Qt that we chose during the installation. Click on it and choose our device from the Device dropdown list:
You also need to set the path to ADB at Boot to Qt tab:
Now Qt Creator is ready.
Immediate example
Let’s create a simpliest application and launch it right on the device.
It would be a full-screen window with 4 color squares in its corners. When you click on any of them, the window will be filled with the corresponding color. Here’s a code for one of the squares:
Rectangle {
    id: rectGreen
    Layout.alignment: Qt.AlignLeft | Qt.AlignBottom
    color: "green"
    Layout.preferredWidth: 150
    Layout.preferredHeight: 150
    MouseArea {
        anchors.fill: parent
        onClicked: {
            root.color = rectGreen.color;
        }
    }
}
Full source code of the project is available in the repository.
For clarity I made a video of launching the application from Qt Creator both on desktop and on the device:
If video doesn't play in your browser, you can download it here.
As you can see, it’s incredibly convinient. Just one switch and you can launch your application not only on the computer, where all the development happens, but on right on the device as well. And there is more: it also allows you step-by-step debugging (yes, right when the app is running on the device) and using profilers, but I’ll tell about it in the next articles.
And here’s an article about all the same but with Raspberry Pi, including device assembly with a touchscreen.