New server and Remark42 comments
I decided to move from GitHub Pages to my own server with my own domain. Also I switched from commenting system based on GitHub issues to Remark42 comment engine.
So the main website and the origin is now on https://decovar.dev/, and https://retifrav.github.io/ will continue to exist as a mirror on GitHub Pages.
What’s wrong with GitHub Pages
There is (almost) nothing wrong with GitHub Pages really. It is an awesome service for hosting static websites (such as blogs) free of charge.
But as my blog is getting bigger, I started to think that I might be “abusing” GitHub’s hospitality by hosting relatively heavy resources (such as videos) on the platform.
Also, looking at the overall SJW-hysteria, I am now a bit concerned that some content in my blog can “offend” somehow yet another snowflake, and I wouldn’t like one day to find my blog repository being blocked all of a sudden. I mean, this nonsense alone about changing default branch from master to main was a good enough sign that one should not rely on GitHub solely.
In addition to that, having one’s own server provides one with many capabilities, such as having a backend and/or an API, full control over the web-server, visitors analytics and so on.
New server and domain
Since I’m now on my own without GitHub infrastructure, I needed a domain and a web-server.
For the domain I chose decovar.dev, and .dev mandates the use of HTTPS. I already covered that in the previous post.
The web-server (NGINX-config) part is not very complicated, as not much is needed for serving a static website:
server {
    listen 443 ssl;
    listen [::]:443 ssl;

    server_name decovar.dev www.decovar.dev;

    ssl_certificate /path/to/certs/decovar.dev/fullchain.pem;
    ssl_certificate_key /path/to/certs/decovar.dev/key.pem;

    charset utf-8;

    root /var/www/decovar.dev;

    index index.html;

    error_page 401 /401.html;
    error_page 403 /403.html;
    error_page 404 /404.html;

    location /admin {
        try_files $uri $uri/ =404;
        auth_basic "Speak, friend, and enter";
        auth_basic_user_file /etc/nginx/.htpasswd;
    }

    location / {
        try_files $uri $uri/ =404;
    }
}

server {
    listen 80 default_server;
    listen [::]:80 default_server;
    server_name decovar.dev www.decovar.dev;
    return 301 https://$server_name$request_uri;
}
So I could set my own error pages for 401, 403 and 404 codes. The reason for not having those templated with Hugo is simply the fact the Hugo only supports 404.
I also protected /admin route with Basic authentication - to add password protection for GoAccess reports. They are not that secret, actually, so I might make them public later.
Another nice thing about having full control over the web-server is that you can set whatever HTTP headers and MIME types. In my case I wanted to set text/plain for my public PGP key (*.asc extension), and with NGINX this is done in /etc/nginx/mime.types:
text/plain txt asc;If you now try to open this link, the PGP key should be shown right in the browser. By the way, Firefox complained about unknown encoding for a plain-text file, which is why I also needed to set charset utf-8; in the config above.
GoAccess
Having full access to NGINX logs, it is now a grand time to ditch Google Analytics and to use GoAccess instead. I’ve already described this great visitors analytics tool, and here are some additions to that article.
My current host is provided by Oracle Cloud, and what I immediately noticed in NGINX access logs is lots of probing requests to all sorts of routes - that is from the very first day on a completely empty server with no content at all:
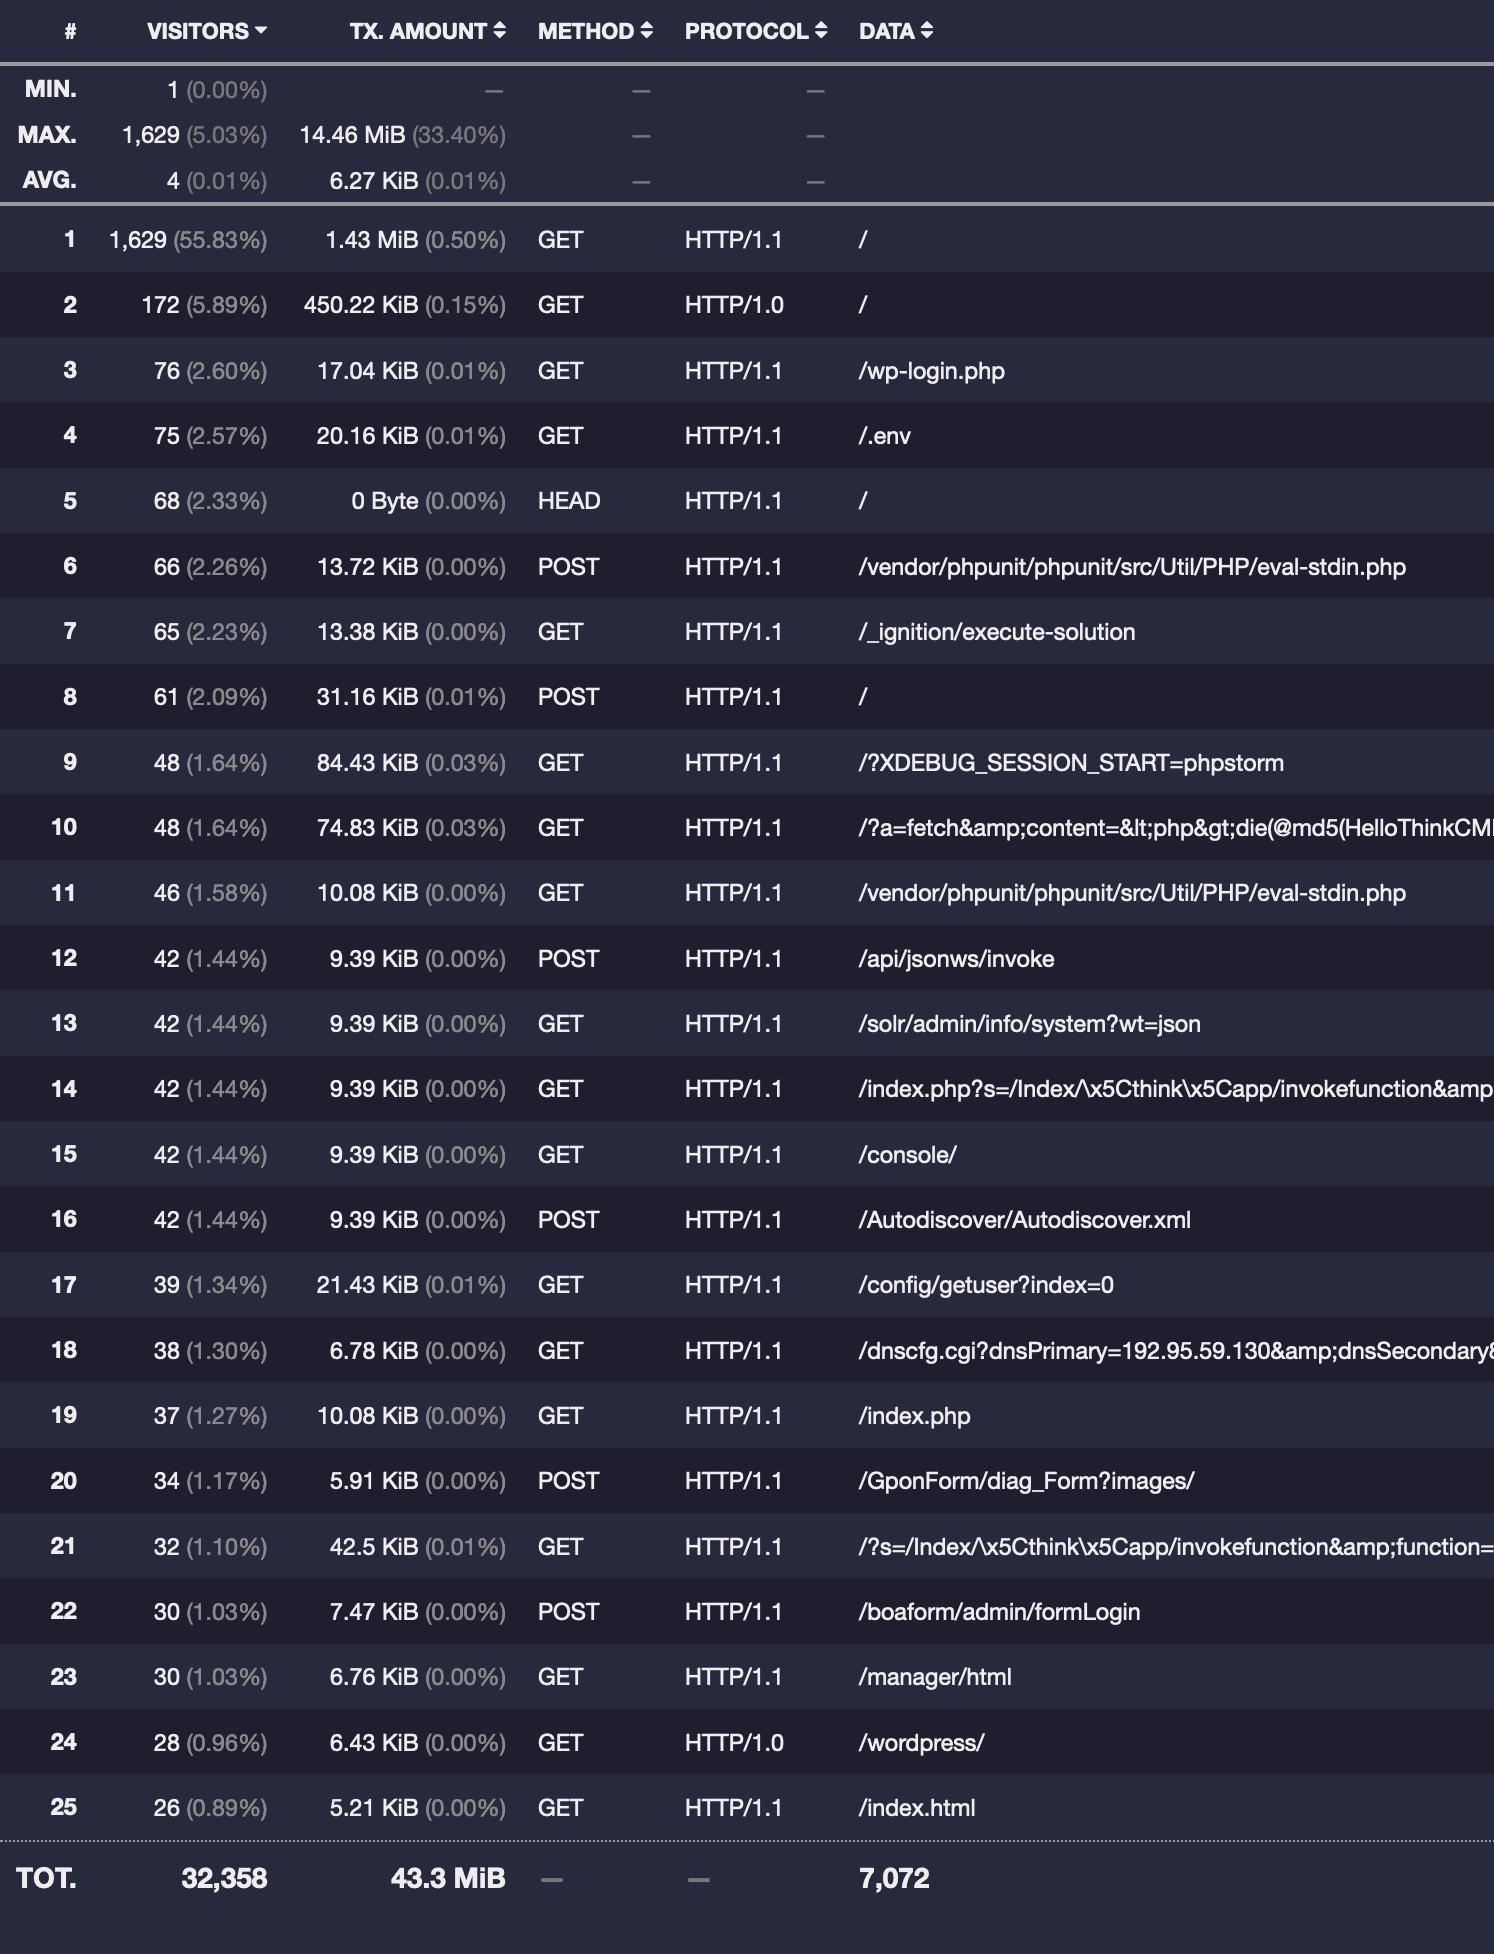
So basically everything here is probes for environmental files and common CMS routes (with different HTTP methods too). And the list of such requests goes on and on for several pages.
None (except for / and /index.html) of these routes belong to my website, and like I said there was actually no website on the server. So my guess is that since Oracle Cloud (also AWS and Azure) are often(?) rented by businesses, IP-ranges of these providers are more likely to get probed like this, comparing with the hosts from other providers. For instance, I also rent servers from a couple of other smaller providers, and none of them have this amount of such probing requests.
Naturally, such spamming completely messes up the analytics. The total number of unique visitors over the measured period (last two months) was 2918 - a value that normally I would be happy to see for my humble blog, but in this case this is obviously not a real number of actual visitors.
So what can be done here? There is a pretty simple solution - to blacklist these trash requests. For example, if we compose a text file requests-blacklisted.txt with something like this:
/vendor/phpunit/
/_ignition/
XDEBUG_SESSION_START
/solr/admin/
/index.php
/dnscfg.cgi
then here’s how this list can be used in the pipe of generating GoAccess report:
$ zcat -f /var/log/nginx/access.log* \
    | grep -v -f /path/to/requests-blacklisted.txt \
    | sudo -u www-data goaccess - -o /var/www/decovar.dev/admin/analytics.html
However, this way you are risking to accidentally blacklist some routes which you don’t have now, but might have in future, so an even better solution would be to first whitelist all the known routes of your website and then optionally blacklist some sub-routes.
In my case, here’s what I whitelisted in requests-whitelisted.txt:
GET \/\s
GET \/rss\.xml\s
GET \/projects(\/|\s)
GET \/stuff(\/|\s)
GET \/about(\/|\s)
GET \/blog(\/|\s)
GET \/etc(\/|\s)
GET \/top(\/|\s)
I don’t see much point in counting requests with methods other than GET, especially for a static website, so I explicitly whitelisted only requests with GET method.
Just in case, if you don’t understand why my rules are like this, take a look at any request in NGINX access log, such as this one:
36.233.31.141 - - [30/May/2021:05:39:47 +0000] "GET /blog/2017/09/29/virtual-box-on-mac-os/images/virtualbox-host-only-network-adapter.png HTTP/1.1" 200 210740 "https://decovar.dev/blog/2017/09/29/virtual-box-on-mac-os/" "Mozilla/5.0 (Windows NT 10.0; Win64; x64) AppleWebKit/537.36 (KHTML, like Gecko) Chrome/91.0.4472.77 Safari/537.36"Admittedly, it’s not the best RegEx in the world for such purpose, but it seems to work.
I could’ve also added GET \/ HTTP and maybe also GET \/css\/ and GET \/js\/ rules, but they add pretty much useless noise in reports, so I haven’t.
Anyway, having added this list to the pipe, I almost completely eliminated trash requests from report. Almost - because there were still some, which did not belong to my website, so I modified the file with blacklisted requests like so:
\.(jar|jsp|php|asp|aspx|cgi|pl|cfm|htm|nsf)
GET \/blog\/skin\/?
GET \/blog\/bad397\/?
GET \/blog\/pivot\/?
GET \/blog\/guestbook_entries\/?
GET \/blog\/administrator\/?
GET \/blog\/core\/?
GET \/blog\/wp-links\/?
GET \/blog\/modules\/?
GET \/etc\/shadow\/?
AhrefsBot\/
bingbot\/
BLEXBot\/
DotBot\/
Googlebot\/
MJ12bot\/
PetalBot
SemrushBot\/
SeznamBot\/
YandexZenRss\/
ZoominfoBot
The second half of the list excludes crawlers, and actually GoAccess seems to have its own lists of crawlers and even a setting to exclude them, but for some reasons that doesn’t work for me. Plus not all the crawlers I’ve seen are present in GoAccess’es list.
And the updated pipe for generating GoAccess report now looks like this:
$ zcat -f /var/log/nginx/access.log* \
    | egrep -if /path/to/requests-whitelisted.txt \
    | egrep -vif /path/to/requests-blacklisted.txt \
    | sudo -u www-data goaccess - -o /var/www/decovar.dev/admin/analytics.html
So first I apply whitelist and then blacklist. Also note the egrep here - this is to enable proper (extended) mode for regular expressions.
As a result, I now have a clean visitors analytics report:
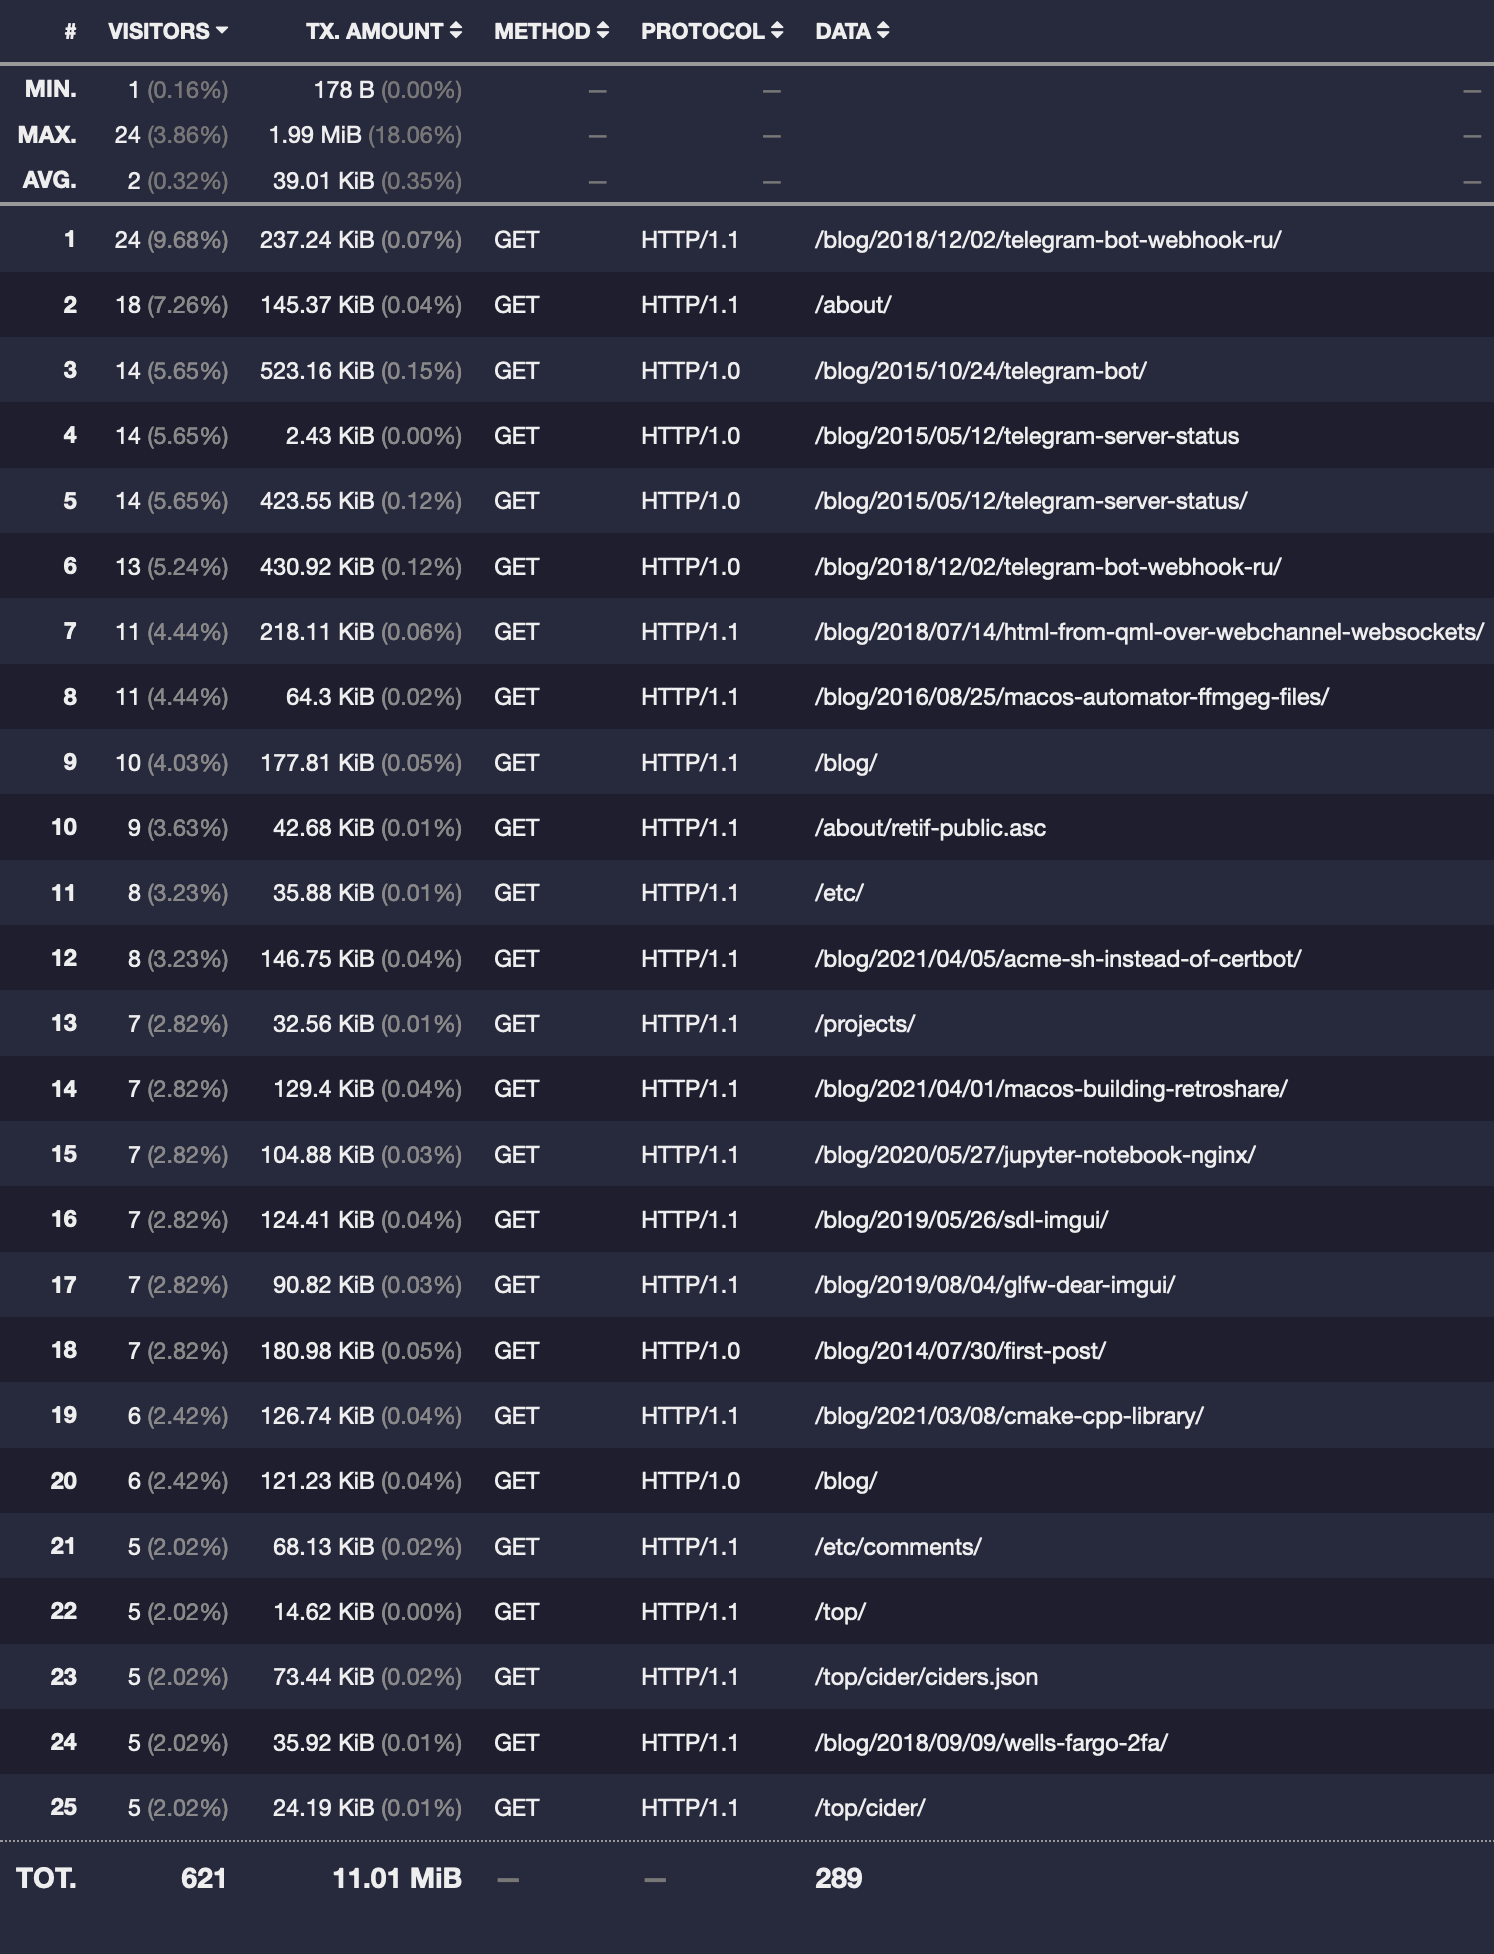
And the number of unique visitors became 248, which is not as exciting, but is an actual meaningful value.
Remark42 comments
Having moved out from GitHub, I can no longer use comments based on GitHub issues. At the very least because of CORS, but also because the whole point of moving to my own server was to become independent from 3rd-party infrastructure.
There are several commenting systems available for “in-house” hosting, but what really caught my eye was Remark42. Right away I liked that:
- it does not require a PostgreSQL/MySQL database
- it is quite lightweight
- it has good Markdown support
- it supports anonymous users, OAuth and e-mail authentication
- there is a voting system
- there is RSS, e-mail and Telegram notifications
- and there is even an API
So here’s how I added it to my website.
System user, config and systemd service
As usual, first you create a system user for it:
$ sudo adduser \
    --system \
    --group \
    --disabled-password \
    --home /home/remark42 \
    remark42
Then you get the binary and install it in the system:
$ cd /home/remark42/
$ wget https://github.com/umputun/remark42/releases/download/v1.8.1/remark42.linux-amd64.tar.gz
$ tar -xvf remark42.linux-amd64.tar.gz
$ sudo mv remark42.linux-amd64 /usr/local/bin/
Official documentation recommends to run it from Docker, but obviously we won’t do so, and that complicates things a bit. The setup without Docker is actually not that hard, but I had to refer to this article a couple of times, as some things were not entirely clear.
To run Remark42 you need to pass several mandatory parameters to it. If you’d like to provide non-default paths for things like backup folder and avatars, that can be also done via parameters.
If you’ll pass those via CLI, that might look like the following:
$ /usr/local/bin/remark42.linux-amd64 server --secret="SOME-SECRET" --url="https://comments.decovar.dev" \
    --site=decovar.dev --auth.anon --edit-time=10m \
    --store.bolt.path="/home/remark42/data" --backup="/home/remark42/backup" \
    --avatar.fs.path="/home/remark42/avatars" --avatar.bolt.file="/home/remark42/avatars.db" \
    --avatar.uri="/home/remark42/avatars" --image.fs.path="/home/remark42/img/pictures" \
    --image.fs.staging="/home/remark42/img/pictures.staging" \
    --image.bolt.file="/home/remark42/img/pictures.db" \
    --web-root="/home/remark42/web" --port=8765
Not very convenient, is it. Fortunately, you can put all this into a config/environmental file:
$ sudo -u remark42 nano /home/remark42/remark42.confREMARK_URL=https://comments.decovar.dev
REMARK_PORT=8765
SECRET=SOME-SECRET
SITE=decovar.dev
AUTH_ANON=true
EDIT_TIME=10m
AUTH_GITHUB_CID=YOUR-AUTH-GITHUB-CID
AUTH_GITHUB_CSEC=YOUR-AUTH-GITHUB-CSEC
ADMIN_SHARED_ID=YOUR-ACCOUNT-ID
#ADMIN_PASSWD=SOME-PASSWORD
By that moment I also decided not to customize paths and to go with the default ones, especially that they will appear relatively to the working folder anyway.
In the current version there was no option to bind Remark42 only to localhost (if you’d like to run it behind reverse-proxy), so its port was exposed to the internet by default, and so you might want to add a blocking rule in your firewall for it. I have asked about this in Remark42 repository, and what would you know, developers responded almost immediately and added this option to sources right away, so the next release should have it and it then became available in newer versions, so now you can add the following to your config:
# ...
REMARK_ADDRESS=127.0.0.1
REMARK_PORT=8765
# ...
To verify that it works:
$ sudo ss -lntup | grep remark42
tcp   LISTEN 0      4096           127.0.0.1:8765      0.0.0.0:*    users:(("remark42.linux-",pid=29524,fd=7))
Having created the config, you can now add a systemd service like this:
$ sudo nano /etc/systemd/system/remark42.service
[Unit]
Description=Remark42
After=network.target

[Service]
Type=simple
EnvironmentFile=/home/remark42/remark42.conf
WorkingDirectory=/home/remark42
ExecStart=/usr/local/bin/remark42.linux-amd64 server
Restart=always
RestartSec=10
SyslogIdentifier=remark42
User=remark42
Group=remark42

[Install]
WantedBy=multi-user.target
$ sudo systemctl enable remark42.service
$ sudo systemctl start remark42.service
Don’t forget to enable and run it.
NGINX config and certificate
Of course, we’ll be running Remark42 behind NGINX as a reverse-proxy (/etc/nginx/sites-enabled/comments.decovar.dev):
server {
    listen 443 ssl;
    listen [::]:443 ssl;

    server_name comments.decovar.dev;

    ssl_certificate /path/to/certs/decovar.dev/fullchain.pem;
    ssl_certificate_key /path/to/certs/decovar.dev/key.pem;

    location / {
        proxy_redirect off;
        proxy_http_version 1.1;
        proxy_set_header Upgrade $http_upgrade;
        proxy_set_header Connection keep-alive;
        proxy_set_header Host $host;
        proxy_cache_bypass $http_upgrade;
        proxy_set_header X-Forwarded-For $proxy_add_x_forwarded_for;
        proxy_set_header X-Forwarded-Proto $scheme;
        proxy_pass http://127.0.0.1:8765/;
    }
}

server {
    listen 80;
    listen [::]:80;
    server_name comments.decovar.dev;
    return 301 https://$server_name$request_uri;
}
So the service runs on a subdomain (which means you’ll need to declare it at your registrar), and the certificate is the same one as for the main domain. Just in case, here’s how you can issue and install Let’s Encrypt certificate for more than one domain:
$ acme.sh --issue -d decovar.dev -d www.decovar.dev -d comments.decovar.dev -w /var/www/decovar.dev
$ acme.sh --install-cert -d decovar.dev -d www.decovar.dev -d comments.decovar.dev \
    --key-file ~/certs/decovar.dev/key.pem  \
    --fullchain-file ~/certs/decovar.dev/fullchain.pem \
    --reloadcmd "sudo systemctl restart nginx.service"
The cron job for renewing would be the same:
45 0 * * * "/home/USERNAME/.acme.sh"/acme.sh --cron --home "/home/USERNAME/.acme.sh" --reloadcmd "sudo systemctl restart nginx.service" >> /home/USERNAME/logs/cron.logIn my setup www.decovar.dev is just a ALIAS/CNAME for decovar.dev, so ACME challenge will find the files in /var/www/decovar.dev/.well-known/acme-challenge/. But comments.decovar.dev is served from Remark42, so the challenge will fail. To resolve this I could do either of the following in comments.decovar.dev NGINX config:
- Set
/var/www/decovar.devas therootand dotry_filesfor the/.well-known/acme-challenge/location; - Or simply add a redirect to
decovar.devfor this location.
I chose the second option:
server {
    # ...

    #root /var/www/decovar.dev;

    # ...

    location / {
        proxy_redirect off;
        proxy_http_version 1.1;
        proxy_set_header Upgrade $http_upgrade;
        proxy_set_header Connection keep-alive;
        proxy_set_header Host $host;
        proxy_cache_bypass $http_upgrade;
        proxy_set_header X-Forwarded-For $proxy_add_x_forwarded_for;
        proxy_set_header X-Forwarded-Proto $scheme;
        proxy_pass http://127.0.0.1:8765/;
    }

    location /.well-known/acme-challenge/ {
        #try_files $uri $uri/ =404;
        return 301 https://decovar.dev$request_uri;
    }

    # ...
}
To test if your Remark42 setup is correct, documentation suggest to open /web/ route on your comments subdomain, such as https://comments.decovar.dev/web/, but for me this page is failing (yet another artifact of running without Docker), although this particular problem should be fixed soon. At the same time, comments on the main website are working fine.
Adding Remark42 to Hugo
To run the Remark42 scripts, I created a /layouts/partials/comments.html partial:
<script>
    var remark_config = {
        host: "{{ .Site.Params.remark42url }}",
        site_id: "{{ .Site.Params.domain }}",
        components: ["embed"],
        url: "{{ .Permalink }}",
        max_shown_comments: 25,
        theme: "light",
        page_title: "{{ .Title }}",
        locale: "en",
        show_email_subscription: false,
        simple_view: false
    };
</script>
<script>!function(e,n){for(var o=0;o<e.length;o++){var r=n.createElement("script"),c=".js",d=n.head||n.body;"noModule"in r?(r.type="module",c=".mjs"):r.async=!0,r.defer=!0,r.src=remark_config.host+"/web/"+e[o]+c,d.appendChild(r)}}(remark_config.components||["embed"],document);</script>
It takes some parameters from config.toml:
[params]
    domain = "decovar.dev"
    remark42url = "https://comments.decovar.dev"
And also it conveniently makes use of Hugo variables such as .Permalink and .Title.
If you have e-mail notifications set-up, then set show_email_subscription to true. Back then I didn’t have it, so I set it to false.
Then I included this partial in the /layouts/_default/single.html template and also added a <div> for loading the actual comments:
{{ define "main" }}
    <article class="post">
        <div>
            <h1 class ="post-title">{{ .Title }}</h1>
        </div>
        <div class="post-content">
            {{ .Content }}
        </div>
    </article>
    {{ with .Params.comments }}
        <hr class="comments-divider"/>
        <div id="comments">
            <div id="remark42"></div>
        </div>
    {{ end }}
{{ end }}

{{ define "AddToBottom" }}
    {{ with .Params.comments }}
        {{ partial "comments.html" $ }}
    {{ end }}
{{ end }}
The AddToBottom block is defined in /layouts/_default/baseof.html:
        ...
        {{- block "AddToBottom" .}}{{- end }}
    </body>
</html>
This way comments scripts will be added only on pages that have comments parameter in the front matter, like so:
---
title: "About me"
date: 2014-07-30 10:35:42 +0300
comments: true
---
But for pages in the blog section I’d like to have comments enabled by default, without adding this parameter to the front matter, so I added the scripts partial unconditionally in the /layouts/blog/single.html:
    ...
    <hr class="comments-divider">
    <div id="comments">
        <div id="remark42"></div>
    </div>
{{ end }}

{{ define "AddToBottom" }}
    {{ partial "comments.html" $ }}
{{ end }}
Styling
At the moment Remark42 commenting form and comments tree are added to the page via iframe, so setting a custom CSS would not be a very trivial task. One possible workaround for that is overwriting or rather redirecting requests to CSS files.
But actually I am totally fine with the “stock” styles for both comment form and comments tree. What I did want to customize though was the latest comments widget, and that one is not an iframe but a regular div, so here it cometh in comments.scss:
div.remark42__last-comments {
    margin: 30px 0 20px;

    article.comment {
        padding: 0;
        margin: 0 0 10px;

        div.comment__body {
            padding: 15px;
            border: 1px dashed $color-dimmed;
            font-family: $font-primary;

            .comment__title {
                margin-bottom: 5px;
                color: $color-primary;
                font-size: 1.2em;
                font-weight: bold;
            }
            .comment__title > a {
                color: inherit;
            }

            .comment__info::after {
                content: ": ";
            }

            .comment__text {
                font-style: italic;
            }
        }
    }
    article.comment:last-of-type {
        margin-bottom: 0;
    }
}
And here’re before/after screenshots:

Import from Disqus
Another nice thing about Remark42 is that it supports importing comments from Disqus. In the very beginning I was using exactly Disqus, before I switched to GitHub issue-based comments, and so it was nice to be able to move over at least the comments from Disqus.
To do so, go to Export page (but first try to find it yourself in the Disqus admin panel) and request an export. Some time later you will receive an e-mail with the link to your exported comments. Having the link, go to your host, download the archive, unpack and import to Remark42:
$ cd /home/remark42/downloads
$ sudo -u remark42 wget https://media.disqus.com/uploads/exports/1/1/waspenterprises-2021-05-22T20:31:45.123456-all.xml.gz
$ sudo -u remark42 gunzip ./waspenterprises-2021-05-22T20:31:45.123456-all.xml.gz
$ sudo -u remark42 remark42.linux-amd64 import -p disqus \
    --secret SOME-SECRET --url https://comments.decovar.dev \
    --admin-passwd SOME-PASSWORD -s decovar.dev \
    -f ./downloads/waspenterprises-2021-05-22T20:31:45.123456-all.xml
For that to work you need to have ADMIN_PASSWD set in your Remark42 config file. I didn’t see that in import/remapping examples which I found on the internet, but as I recall for me either of the commands was complaining about missing mandatory parameters such as --admin-passwd.
Now you need to remap the imported comments from the old page URLs to the new URLs on your domain. Create a file with mapping rules, like so:
$ sudo -u remark42 nano rules.txthttps://retifrav.github.io* https://decovar.dev*And execute the remapping:
$ sudo -u remark42 remark42.linux-amd64 remap \
    --secret SOME-SECRET --url https://comments.decovar.dev \
    --admin-passwd SOME-PASSWORD -f ./rules.txt -s decovar.dev
Actually, it wasn’t too obvious to guess what rules exactly are expected here. I tried several combinations of rules and parameters for the remapping command, and eventually something worked. What exactly did work - I don’t know, because to see if it worked or not, you need to restart the service, and I figured that out only after some time, so maybe the very first attempt was already successful, and all further actions were redundant.
After the remapping all the old Disqus comments magically appeared under the posts on my new website. Shortly after I went to Disqus admin panel and deleted all the comments from the old website there.
Authentication
You can enable several authentication methods for users and you can also allow anonymous comments.
Speaking about anonymous comments, at the moment there is no pre-moderation functionality, although it might be added later.
The GitHub authentication is rather simple to set-up and is already documented. Same goes for the rest of OAuth-based authentication providers, I don’t have anything to add (except for claiming that normal people don’t use Twitter or Facebook, so one should probably not bother with those).
Telegram authentication isn’t hard either, in fact that’s probably the easiest one to enable, but what you might overlook is that the bot should not have an existing backend assigned to it, so you shouldn’t have any polling/webhook handler that would be intercepting the requests. It also doesn’t seem to be required to set the domain for it in BotFather settings.
E-mail authentication is also supported, and obviously you will need to have an e-mail sending service for it.
The complexity here is that most likely you’d want to use a nice sender e-mail address with your own domain, not a poor man’s vasya@gmail.com, so first you’ll need to find some service that will provide you e-mail for your domain. You can of course host your own mail server, but that might be too much of a task for an unprepared mind.
Remark42 documentation provides examples for services like Mailgun and SendGrid, but they are just too expensive (or too strict) for a humble blog-owner, so I went with Yandex 360: they have a free-of-charge tier called “Mail for Domain” - exactly what I needed, and this is what I’ll use as an example below.
Once you have the e-mail service, in your DNS records set MX record for it and also add a TXT record for the DKIM. You might need to wait for a couple of hours (or maybe days) until the new DNS records are propagated over the internet.
Then add the following to your remark42.conf:
# enable authentication via e-mail
AUTH_EMAIL_ENABLE=true
# settings for the service that will be sending e-mails
SMTP_HOST=smtp.YOUR-EMAIL.SERVICE
SMTP_PORT=465
SMTP_TLS=true
SMTP_USERNAME=noreply@YOUR.DOMAIN
SMTP_PASSWORD=PASSWORD-FOR-THAT-ACCOUNT-AT-EMAIL-SERVICE
# from what address users will be getting authentication e-mails
AUTH_EMAIL_FROM=noreply@YOUR.DOMAIN
After restarting Remark42 you’ll see that the comment form now has an option to sign-in via e-mail:
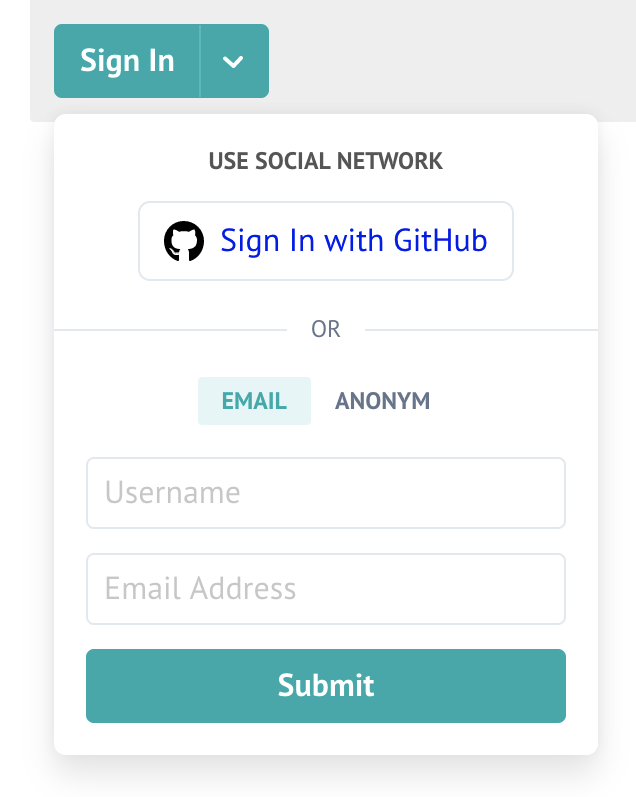
When a user will try to do so, he will receive a token to the e-mail address he provided, and after entering this token back in the form he will be authenticated in that browser. If he’ll want to get authenticated in a different browser, he’ll need to repeat the whole procedure, but he still will be authenticated as the same user, of course.
API
There is a REST API, and to use it for administration purposes you need to be logged-in via either of authentication methods and to have your user ID added to the ADMIN_SHARED_ID parameter in the config.
Then you’ll need to get a JWT. You can take it with Web Developer Tools from any request on a page with comments:
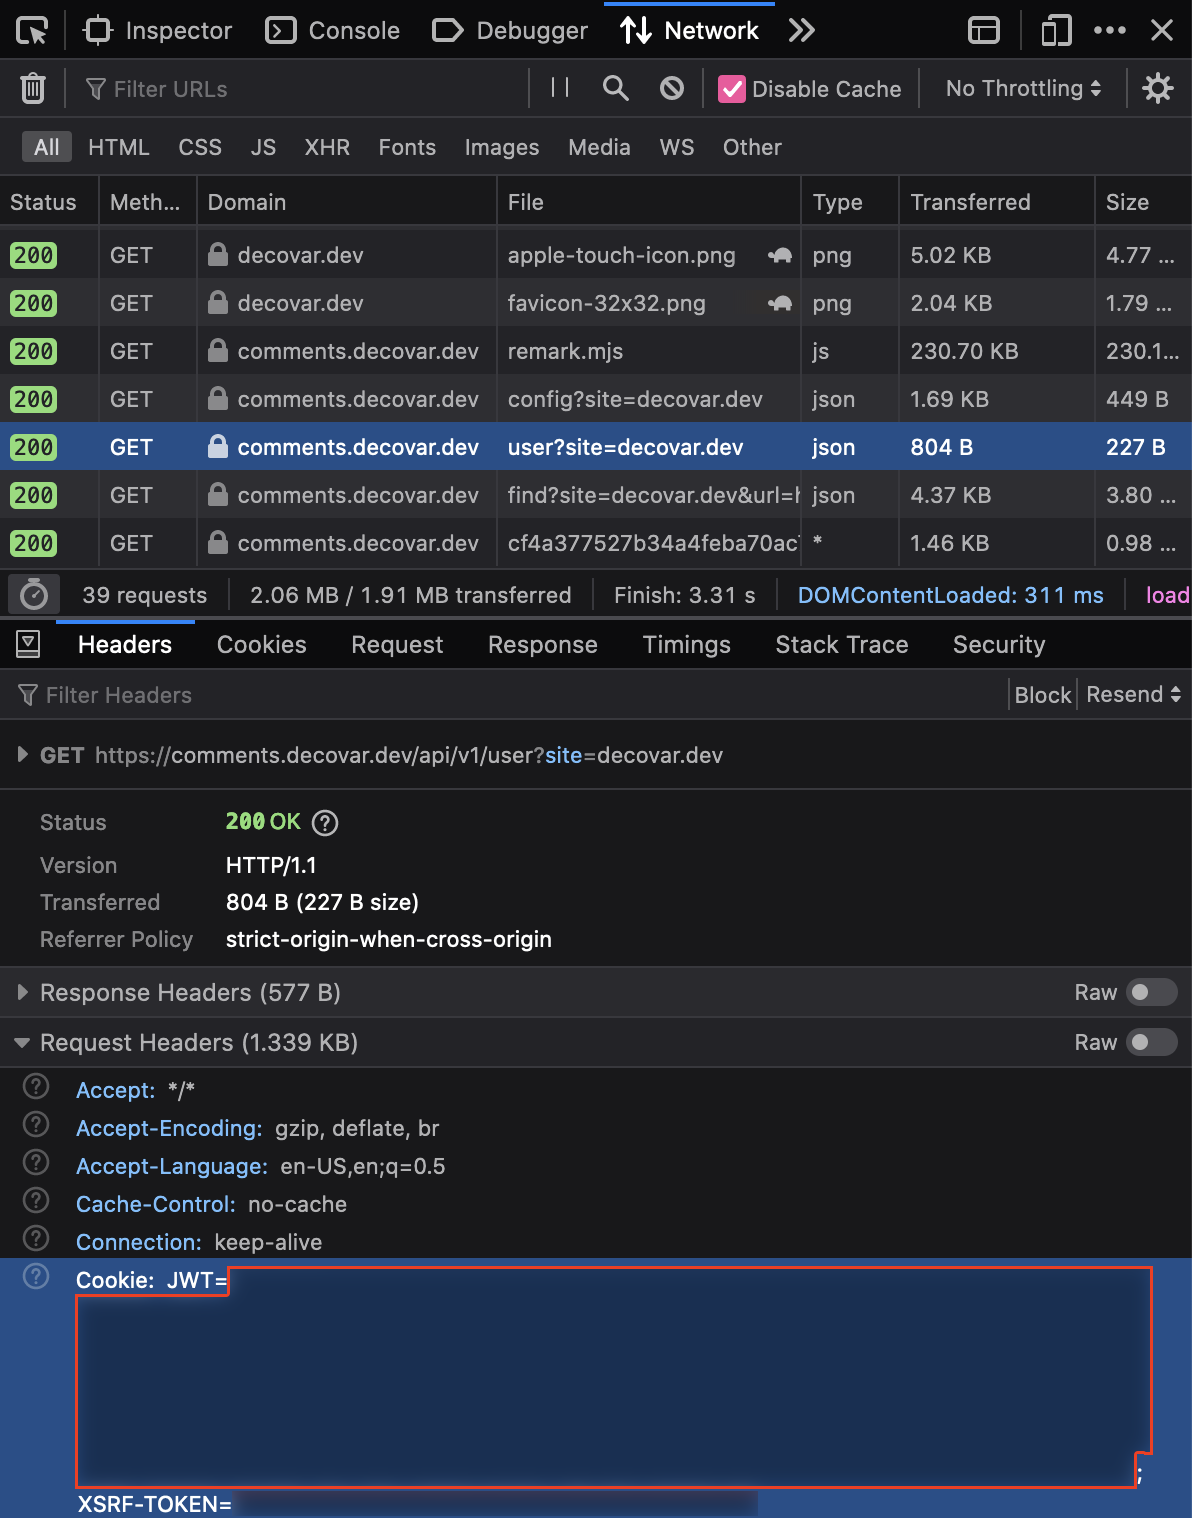
Now you can perform administrator actions. For example, if you’d like to delete a comment with COMMENT-ID from https://decovar.dev/some/page.html:
$ curl \
    -X "DELETE" "https://comments.decovar.dev/api/v1/admin/comment/COMMENT-ID?site=decovar.dev&url=https:%2F%2Fdecovar.dev%2Fsome%2Fpage.html" \
    -H 'X-JWT: HERE-GOES-JWT'
Notifications
Via Telegram
You can enable Telegram notifications in a minute or so. Get a token from BotFather (or reuse one of your existing bots) and add the following to the Remark42 config:
TELEGRAM_TOKEN=YOUR-BOT-TOKEN
NOTIFY_USERS=telegram
NOTIFY_ADMINS=telegram
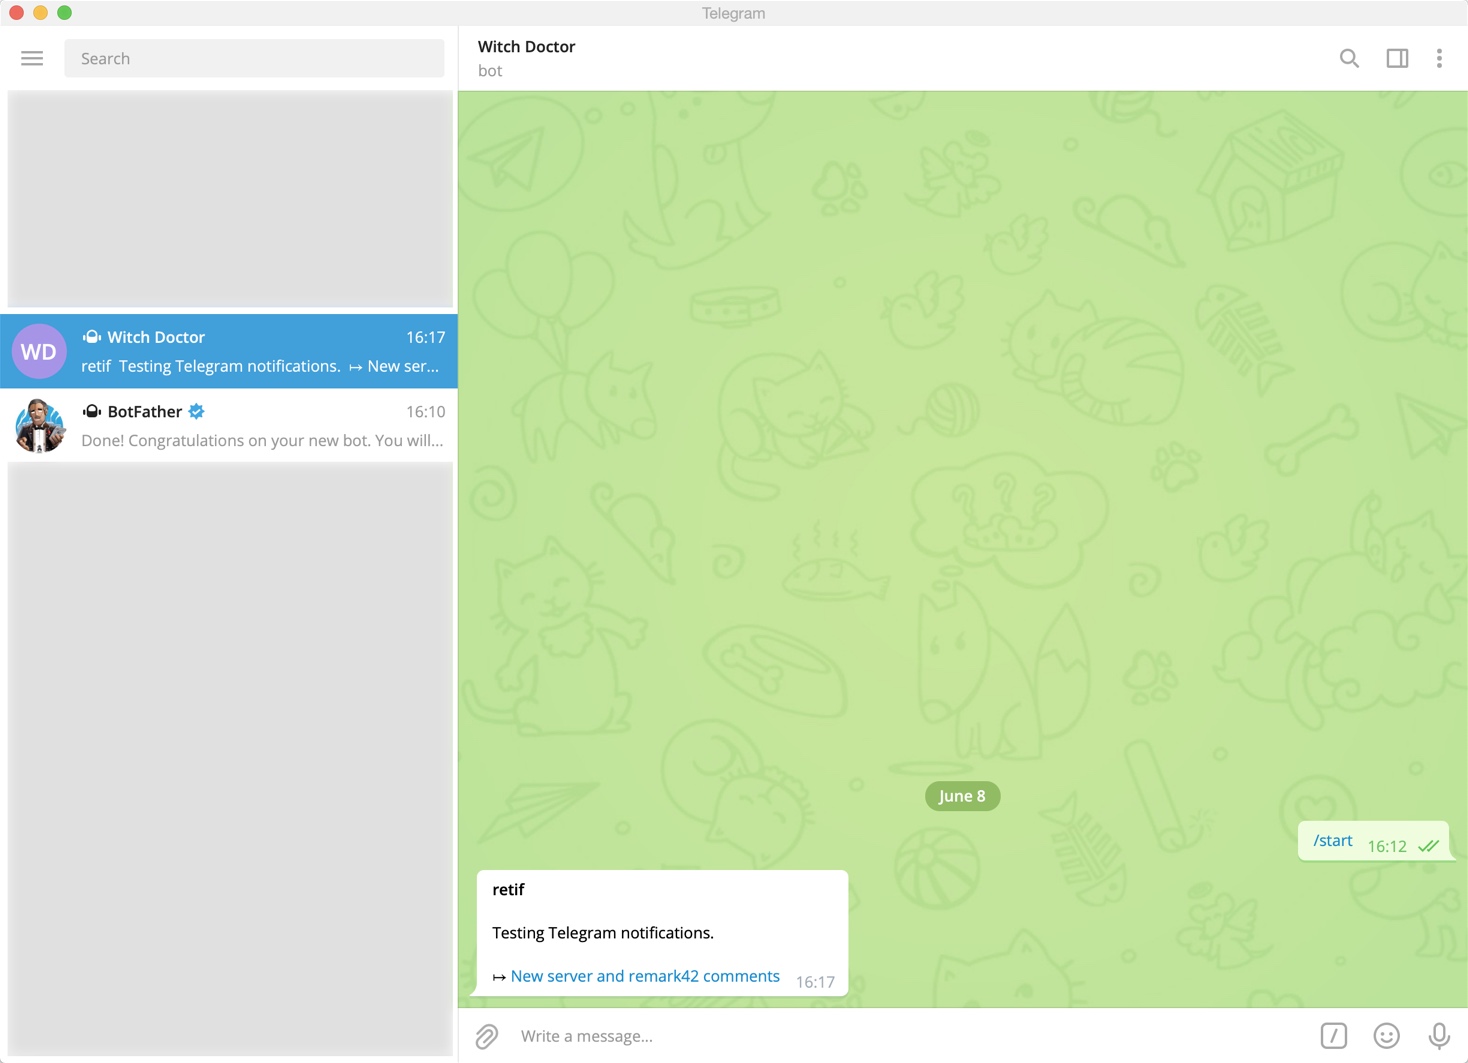
NOTIFY_TELEGRAM_CHAN=YOUR-IDDespite documentation saying that NOTIFY_TELEGRAM_CHAN is for a channel ID, this value can actually be set to either of the following:
- your own ID (numerical value, or perhaps
@-name also works). In that case the bot will be sending notifications directly to you. It might be that you’ll need to send/startto the bot first, as bots cannot message users by default - channel ID. That can be either a private (numerical value) or a public (
@-name) channel. Either way, the channel needs to be created first and the bot needs to be added to that channel as an admin - group chat ID (negative numerical value). The bot needs to be added to that group
Here’s an example of a notification sent directly to me:
Via e-mail
If you already set-up e-mail service, then you’ll only need to add the following lines to your remark42.conf:
NOTIFY_USERS=email
NOTIFY_ADMINS=email
# from which e-mail address USERS will be getting notifications about replies
NOTIFY_EMAIL_FROM=noreply@YOUR.DOMAIN
# where Remark42 will be sending ADMIN notifications to, such as about all the new comments
ADMIN_SHARED_EMAIL=admin@YOUR.DOMAIN
# in case you already have ADMIN global comments notifications via Telegram
NOTIFY_EMAIL_ADMIN=false
Now, if you have show_email_subscription set to true in the comment widget settings, then your (logged-in) users will be able to subscribe to replies to their comments:
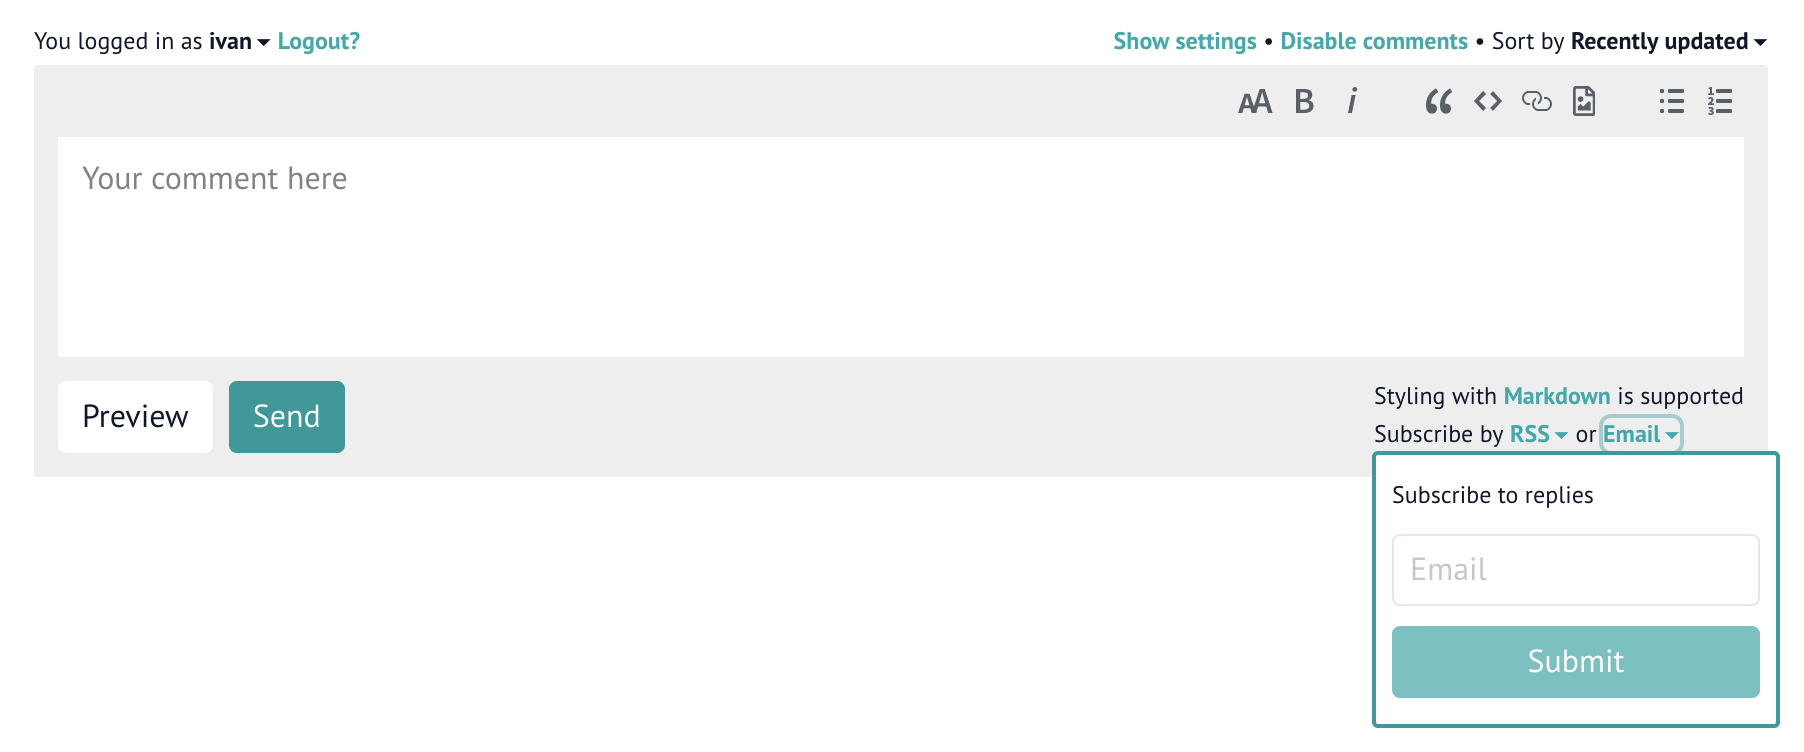
It is a bit confusing, but by default this subscription is disabled, so users will need to explicitly subscribe to notifications and once again provide an e-mail address (even though they are already authenticated and likely have an associated e-mail address). The subscription will then apply to all the pages on the website, not just to the one where user subscribed to notifications on.
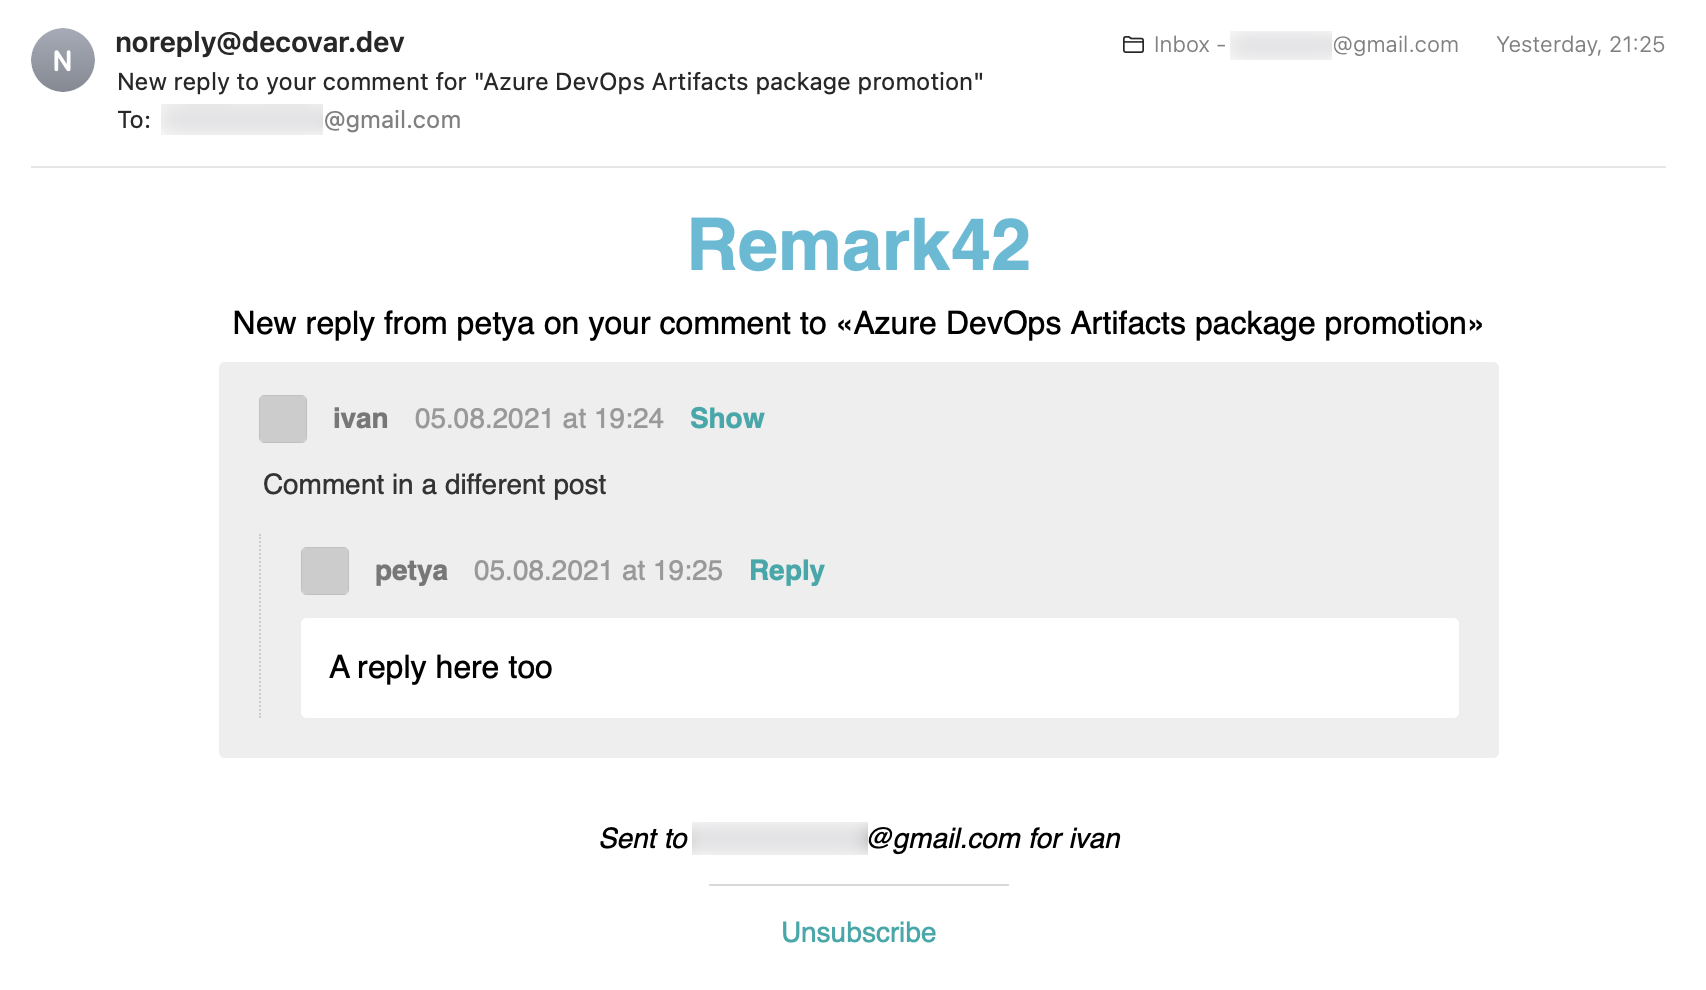
Here’s how an e-mail notification about a comment reply might look like:
Canonical URL
Something what I was curious about for quite some time: how search engines such as Google handle the same content published on several websites and/or how can one specify which is the main website and which are just mirrors.
Apparently, this is what canonical url is (partly) for. So you just need to add it to <head> on your mirrors, pointing to the main website.
However, Google can still decide on its own, which page is the origin and which is a mirror, despite your explicit intention. Classic Google.
Either way, here’s what I did for the mirror on https://retifrav.github.io/. First I added the main website base URL as a parameter in config.toml:
[params]
    mainSite = "https://decovar.dev"
And then added canonical URL in /layouts/_default/baseof.html:
<link rel="canonical" href="{{ .Site.Params.mainSite }}{{ .RelPermalink }}" />Plus I added this orange banner right under the page header block:
<div style="background-color:orange; padding:4px 16px; font-size:0.8em; text-align:center; font-style:italic;">
    On 19.05.2021 the website was moved to
    <a href="{{ .Site.Params.mainSite }}{{ .RelPermalink }}" style="color:black; font-weight:bold;">
        {{ .Site.Params.mainSite }}/</a>. This is just a mirror now.
</div>
Instead of adding canonical URL it might have been better to add a 301 redirect, but first of all I don’t have access to GitHub Pages web-server, and secondly it won’t hurt to have a mirror anyway.
It will be interesting to see a few months later, how does Google Analytics (which I kept enabled on the mirror) compare to GoAccess reports on the main server.
But most importantly, I’m very curious about which of the websites will be showing up in search results. Hopefully, canonical URL will play its role, and all the new search queries will lead to the main website rather than to the mirror.
So, here’s how Google Analytics data looked like on the old domain before moving and adding canonical URL:
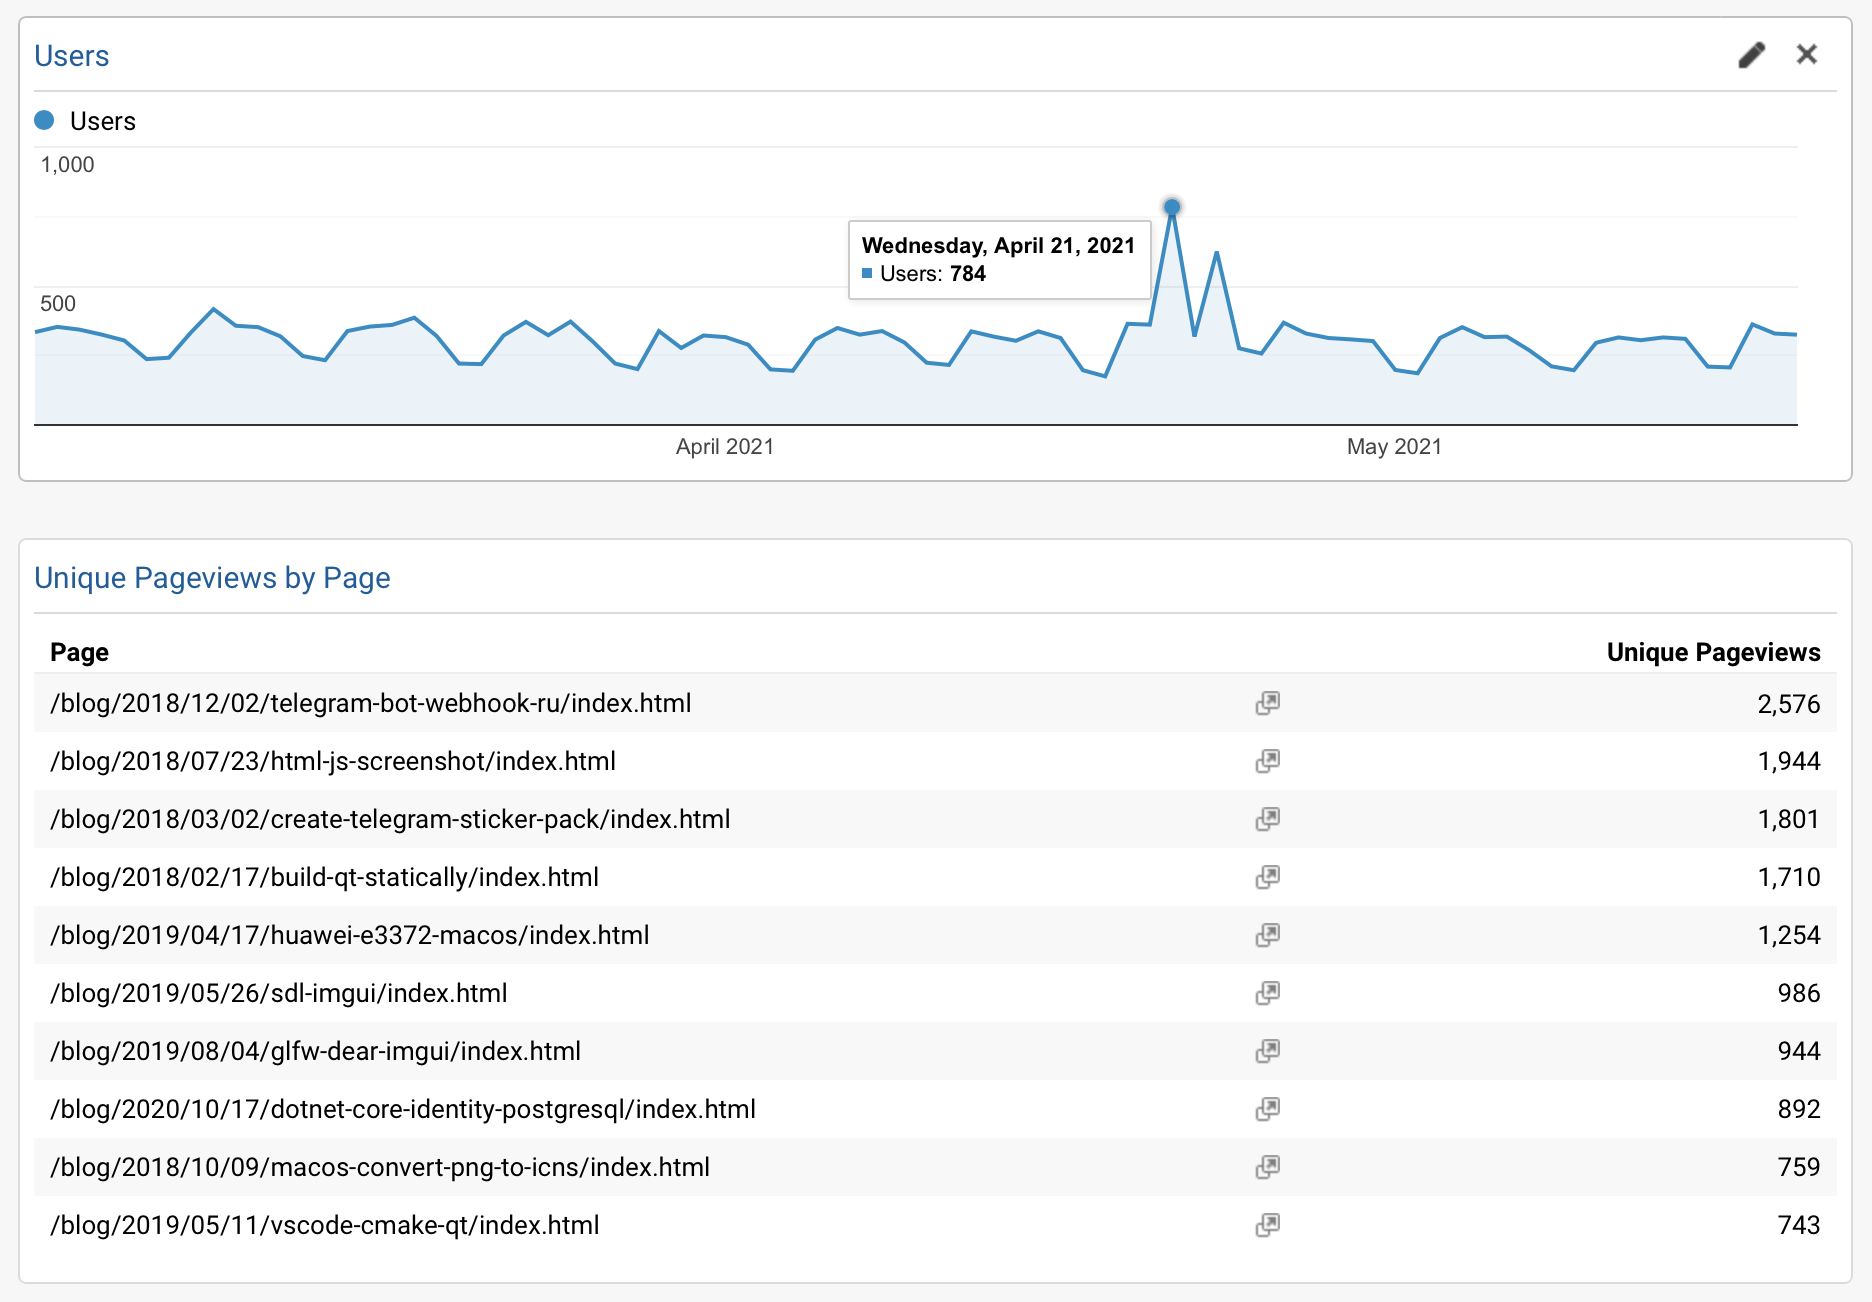
350 users per day on average and the following pages being top visited ones:
/blog/2018/12/02/telegram-bot-webhook-ru//blog/2018/07/23/html-js-screenshot//blog/2018/03/02/create-telegram-sticker-pack//blog/2018/02/17/build-qt-statically//blog/2019/04/17/huawei-e3372-macos//blog/2019/05/26/sdl-imgui//blog/2019/08/04/glfw-dear-imgui/
Here’s how GoAccess analytics looks now on the new server under new domain, 2 months after moving and adding canonical URL on the mirror:
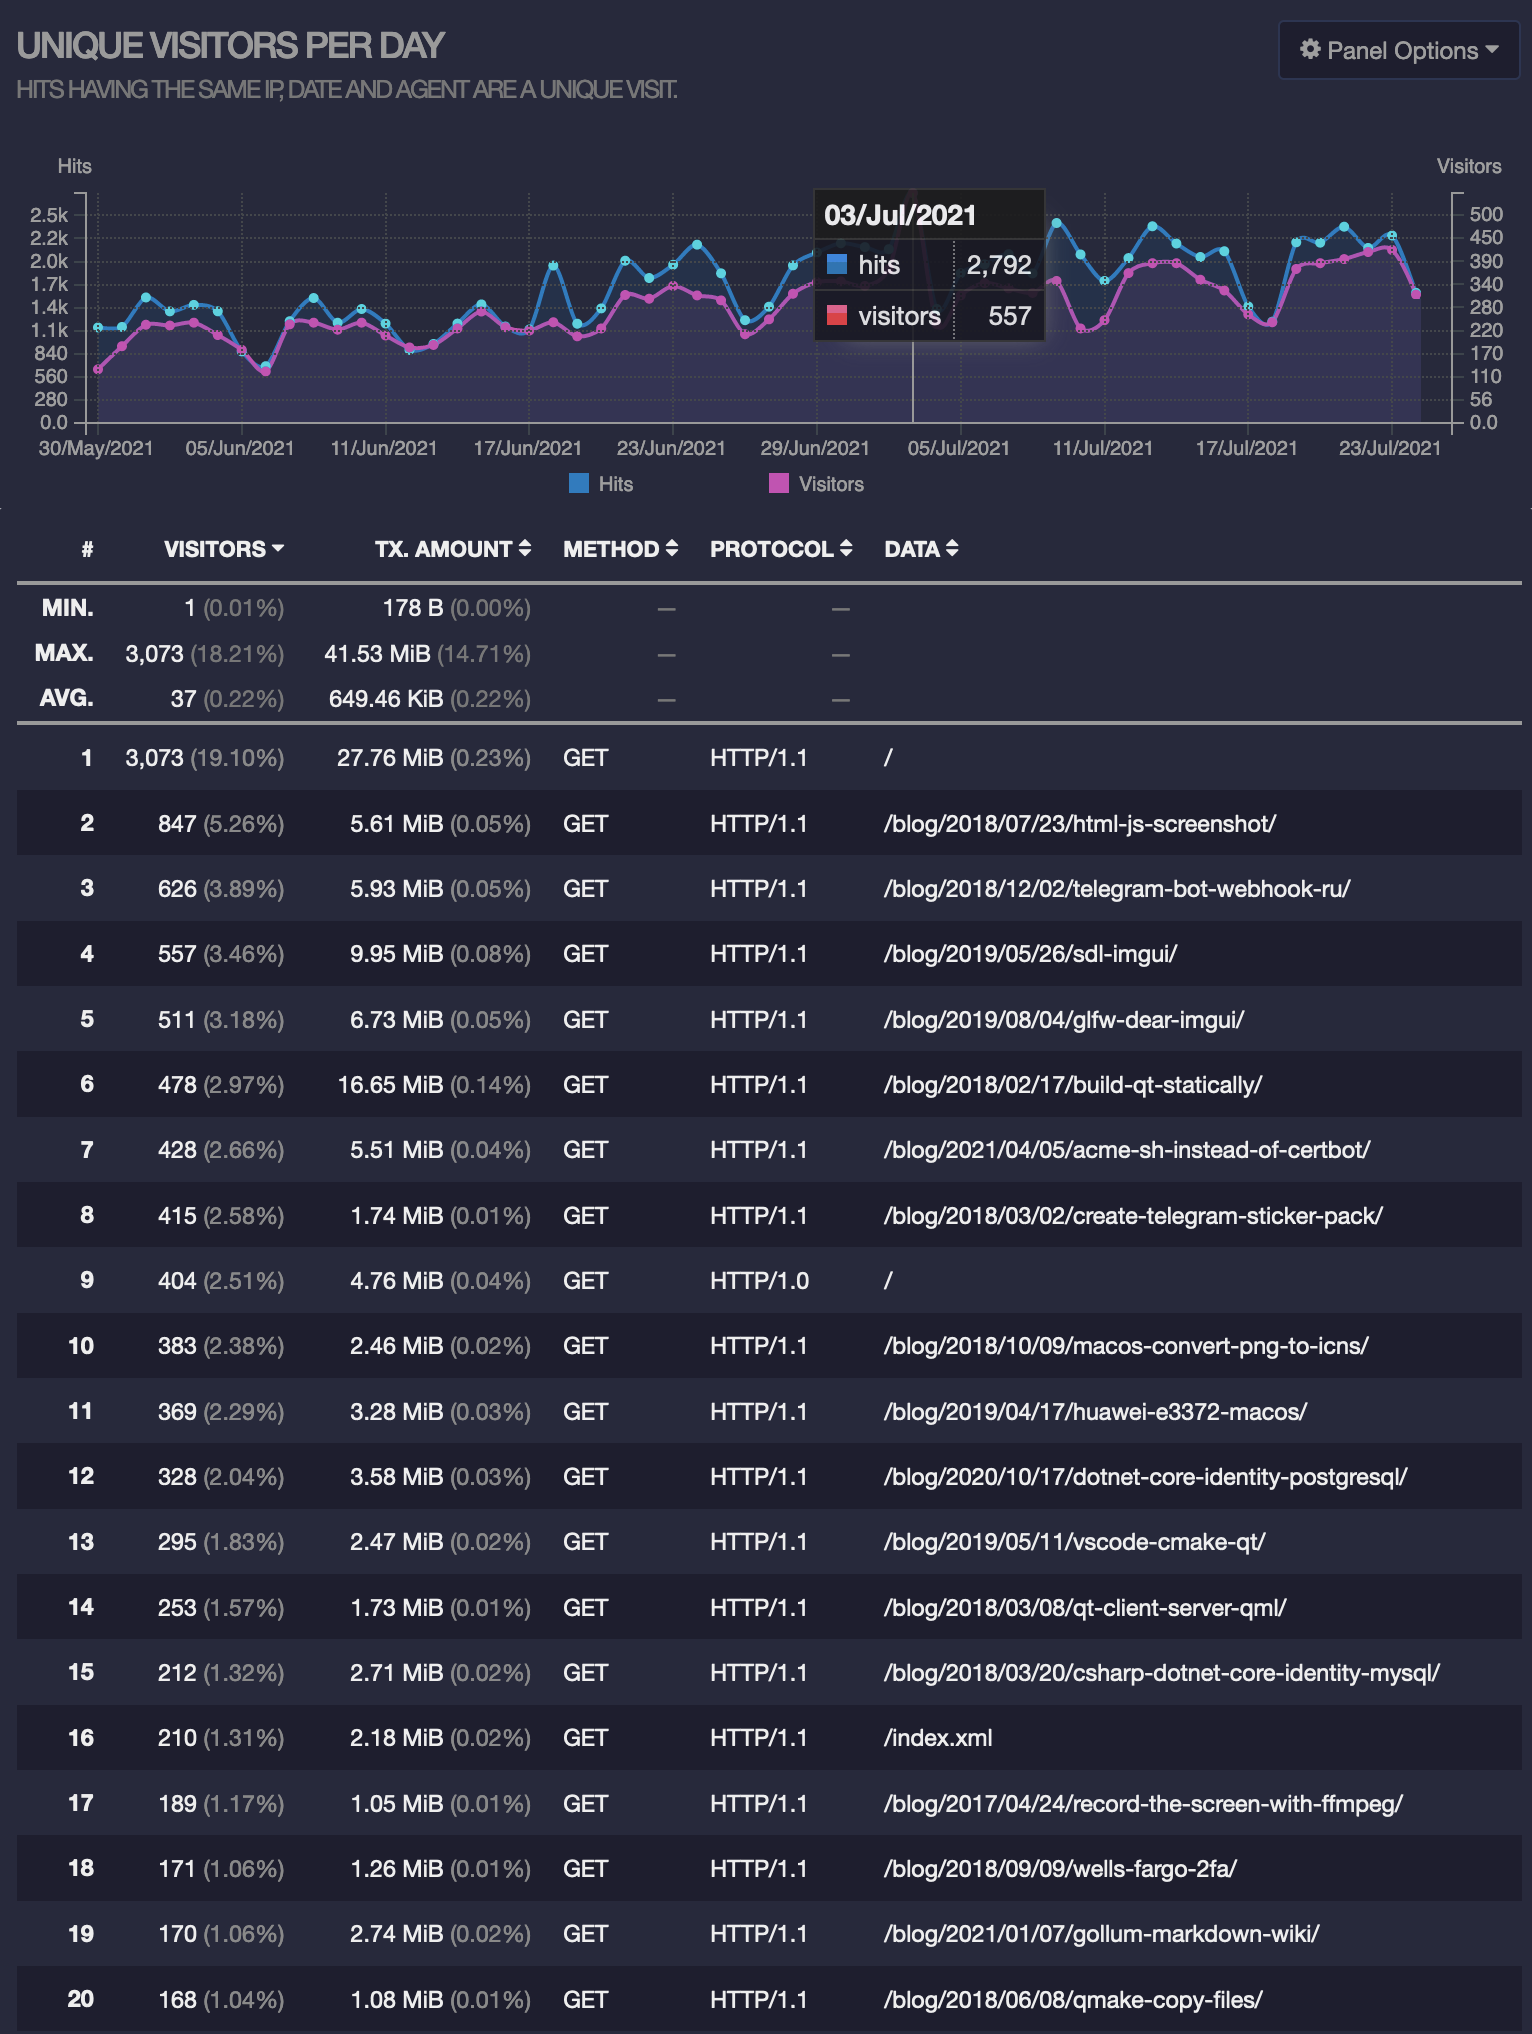
Here it’s also approximately 350 users per day and the following top visited pages:
/blog/2018/07/23/html-js-screenshot//blog/2018/12/02/telegram-bot-webhook-ru//blog/2019/05/26/sdl-imgui//blog/2019/08/04/glfw-dear-imgui//blog/2018/02/17/build-qt-statically//blog/2021/04/05/acme-sh-instead-of-certbot//blog/2018/03/02/create-telegram-sticker-pack/
So everything is almost the same.
Out of curiosity, here’s how Google Analytics looks now on the mirror under the old domain:
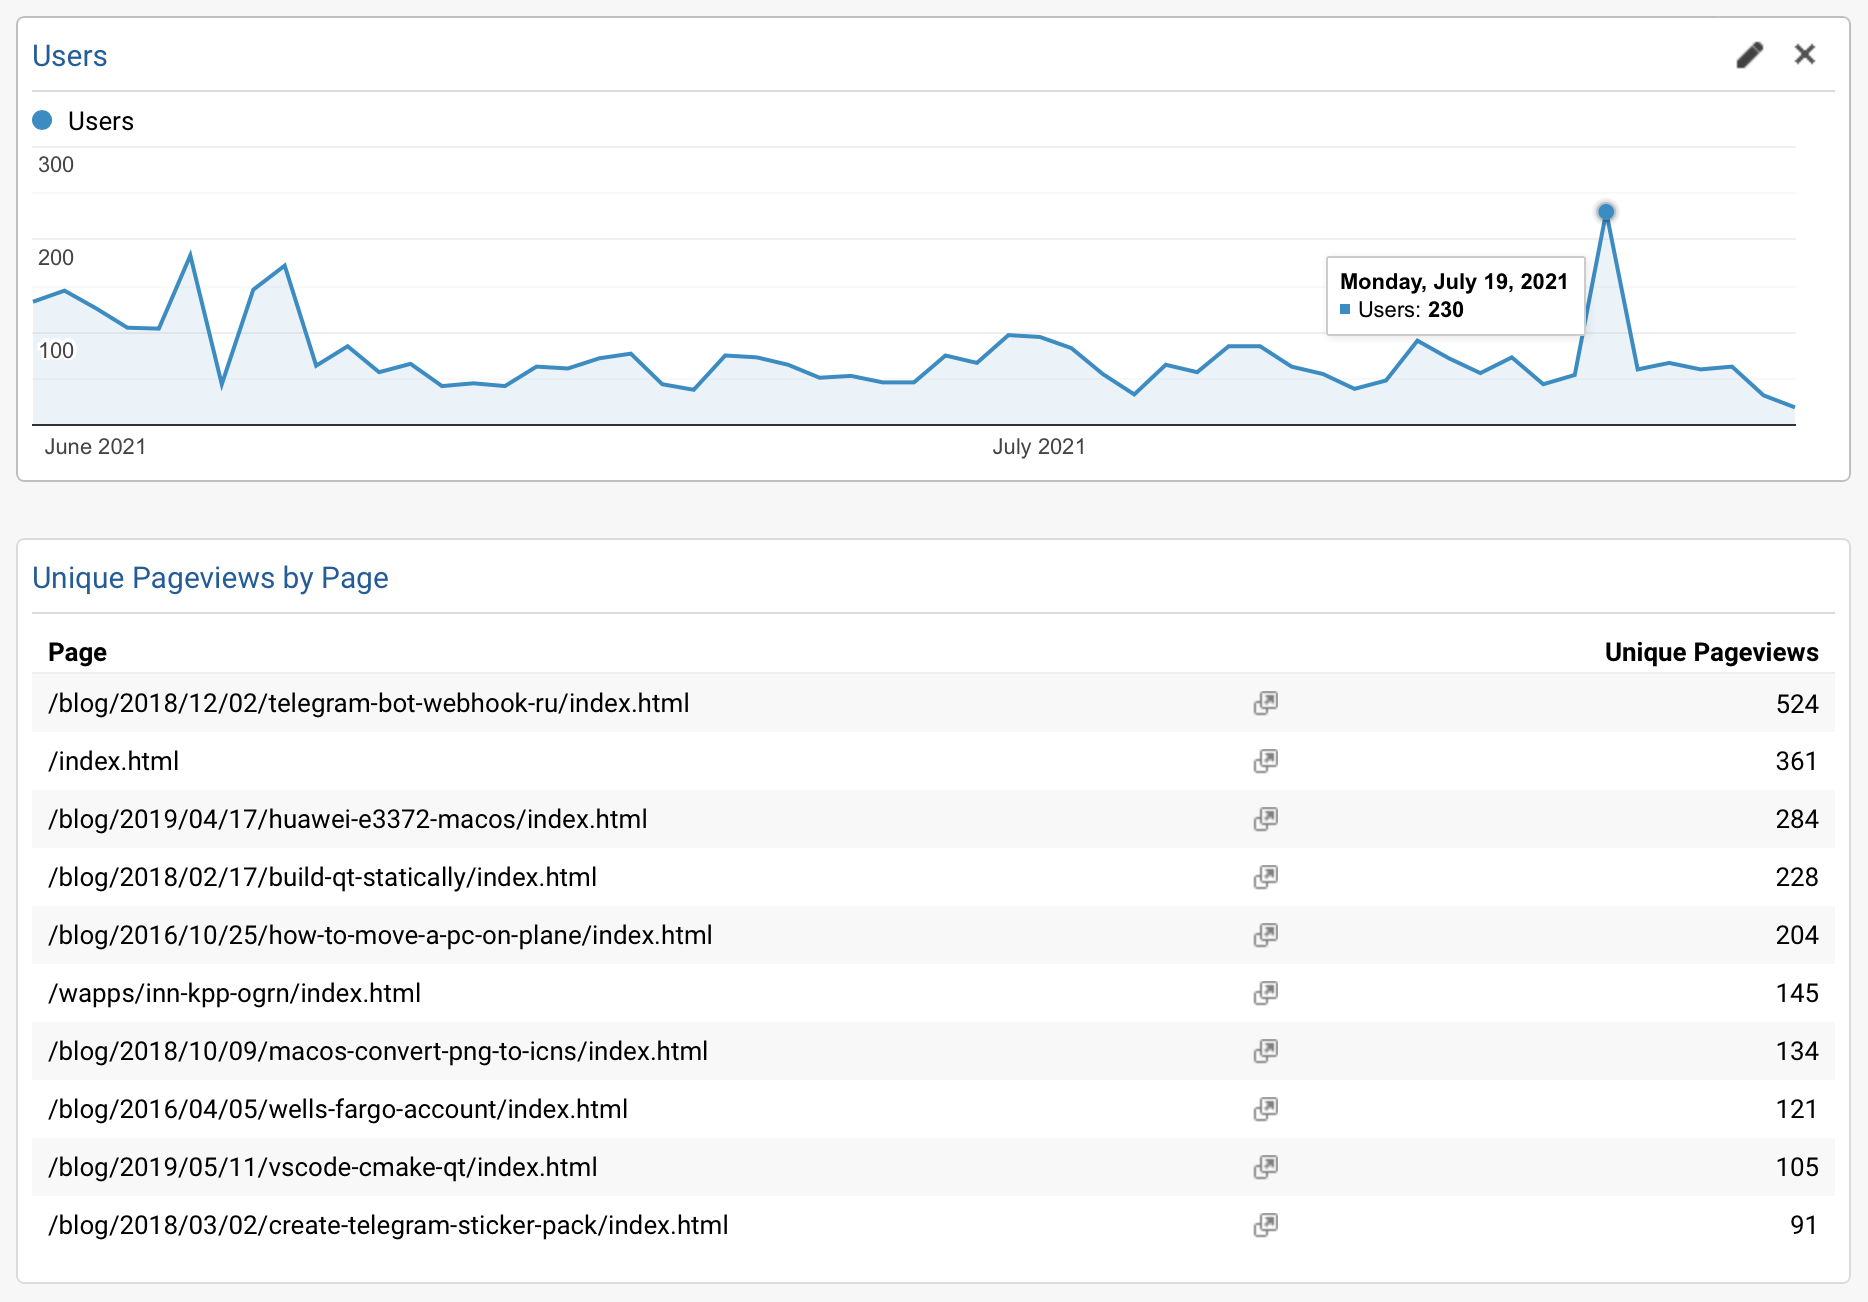
There is still some traffic, but the trend is decreasing. Looks like canonical URL did the job, and search engines find the right origin of the content.
As you can see (once again), you can get visitors analytics data without involving 3rd-party probes such as Google Analytics - you already have web-server logs, nothing can be more precise than that. And you can process it without exposing your visitors data to anyone.
To be fair, there is of course a difference between data from web-server logs and client-side data harvested with Google Analytics script, but I have no interest in knowing my visitors age, gender or any other demographics (and also I despise spying on users), so for my purpose this is all completely redundant.