Installing Qt without installer
At some point (beginning of 2020 year) Qt installer started to require users to have Qt Account (again), otherwise you can’t proceed with the installation. More details in the Qt’s official blog post.
That’s something that already happened before, but back then community got really mad about it, so The Qt Company reverted that, and installer started to work without Qt Account. And now they fucking did it again, and apparently this time community wasn’t that mad (or there is nothing left of that community after all the stunts The Qt Company has been pulling over the past years).
Anyway, I won’t tolerate such anal-probing, so The Qt Company (or rather its management) can go fuck itself, and I’ll be just building Qt from sources - it’s not that scary as it sounds.
In the very same blog post The Qt Company stated that LTS releases will be only available to commercial users, so The Qt Company can go fuck itself twice at this point. But don’t even trip, dawg, as we’ll still be able to build LTS releases from sources without Qt Account and/or commercial license. Aw, geez!
Just to clarify and to TLDR the article: it’s not about pirating the binaries, it’s not about some hack or anything shady at all - everyone can get the Qt sources and build whatever version they want. And certainly, you’ll still need to comply with GPL/LGPL terms (depending on components that you’ll be using).
Getting the Qt sources
Clone Git repository
Go to the Qt’s Git repository. Find the latest (or whichever you need) release - it’s hard not to notice that branches match releases, so 5.15.2 branch is the latest release at the moment (03.12.2020).
$ cd /d/programs/
$ mkdir -p qt/src && cd $_
$ git clone --depth 1 -b 5.15.2 git://code.qt.io/qt/qt5.git 5.15.2
That’s not the entire source code just yet, as Qt is divided into modules and first you need to initialize/download them. This is done with init-repository Perl script, so you’ll need to have Perl installed and available in your PATH.
By default it will initialize a lot of modules (essential, addon, preview, deprecated), and it will take quite some disk space (and time) to initialize all of them. Here’s the full list of default modules (the script prints it out):
$ cd 5.15.2
$ git submodule init qt3d qtactiveqt qtandroidextras qtbase qtcharts qtconnectivity qtdatavis3d
qtdeclarative qtdoc qtgamepad qtgraphicaleffects qtimageformats qtlocation qtlottie qtmacextras
qtmultimedia qtnetworkauth qtpurchasing qtqa qtquick3d qtquickcontrols qtquickcontrols2
qtquicktimeline qtremoteobjects qtrepotools qtscript qtscxml qtsensors qtserialbus qtserialport
qtspeech qtsvg qttools qttranslations qtvirtualkeyboard qtwayland qtwebchannel qtwebengine
qtwebglplugin qtwebsockets qtwebview qtwinextras qtx11extras qtxmlpatterns
I don’t want preview, deprecated and obsolete groups, and also I don’t want quite a lot of some other stuff, so I ran it like this:
$ ./init-repository --module-subset=essential,addon,-qtwebengine,-qtactiveqt,-qt3d,\
-qtlottie,-qtdatavis3d,-qtgamepad,-qtpurchasing,-qtquick3d,-qtquickcontrols,\
-qtquicktimeline,-qtspeech,-qtvirtualkeyboard,-qtwayland,-qtsensors,-qtserialbus,\
-qtserialport,-qtscxml,-qtremoteobjects,-qtqa
It took 40 minutes (with my 3 MB/s connection) and 3 GB to initialize such a list. Be sure to check it in case you might actually need some modules which I excluded here.
Download source package
Or you can just get a source package ZIP archive from the download page. That will be actually much faster, and even though you can’t choose modules here, later you’ll be able to skip building unwanted modules with -skip option (-skip qtwebengine, -skip qtactiveqt, -skip qt3d and so on).
Building Qt from sources
Now when you have the sources, you can just build Qt and get the same binaries that are installed using installer.
I’ll describe the process for Windows 10 and Visual Studio 2019 / MSVC 142 (assuming that you have all that), but it will be almost the same with different toolchains and on other platforms too.
5.x with qmake
Let’s say you have downloaded/cloned sources to d:\programs\qt\src\5.15.2 and you would like to install Qt to d:\programs\qt\5.15.2. Open x64 Native Tools Command Prompt for VS 2019 and there:
> c:
> cd d:\programs\qt\src\5.15.2
> mkdir build
> cd build
> ..\configure.bat -release -no-pch -prefix "d:\programs\qt\5.15.2" -skip qtwebengine -nomake tools -nomake tests -nomake examples
Choose and accept Open Source license terms (if you do accept those) and wait for the configuration to finish. Note that this will give you release build, so don’t forget to set your projects to release configuration too. Also be aware that by default Qt is built for dynamic linking, and if you need static linking, then you need to add -static option too.
By the way, I have a more detailed article about building static Qt from sources, although the only difference there is basically just this -static option.
Anyway, once it’s configured, run the build and then install using jom (you do have jom, don’t you):
> jom
> jom install
It took about 1 hour to build and 10 minutes to build and install the binaries. The resulting size of the installation folder (d:\programs\qt\5.15.2) is 143 MB.
Out of curiosity, I also built Qt with sources from source package ZIP archive and the same configuration options (so it built also all the stuff that I excluded with modules), and there it took a bit longer than 1 hour and resulted in 193 MB of installation folder. So actually simply downloading the source package and keeping all the modules can save you quite some time, and 50 MB of difference doesn’t seem to be significant enough to not to do so.
6.x with CMake
Starting with Qt 6, you can build it with CMake. The process is almost the same as with qmake. I tried it with Qt 6.0.1 (downloaded to d:\programs\qt\src\6.0.1).
At first I wanted to see if I can now run everything from Git BASH:
# where to install the binaries to
$ mkdir /d/programs/qt/6.0.1
# build folder
$ cd /d/programs/qt/src/6.0.1
$ mkdir build && cd $_
$ ../configure -cmake-generator "Visual Studio 16 2019" -release -no-pch -prefix "d:/programs/qt/6.0.1" -skip qtwebengine -nomake tools -nomake tests -nomake examples
and that failed:
ERROR: C++11 <random> is required and is missing or failed to compile.
ERROR: detected a std::atomic implementation that fails for function pointers.  Please apply the patch corresponding to your Standard Library vendor, found in qtbase/config.tests/atomicfptr

CMake Error at qtbase/cmake/QtBuildInformation.cmake:72 (message):
  Check the configuration messages for an error that has occurred.
Call Stack (most recent call first):
  qtbase/cmake/QtBuildInformation.cmake:10 (qt_configure_print_summary)
  CMakeLists.txt:87 (qt_print_feature_summary)
After a brief googling I found that Visual Studio 16 2019 generator is not supported. I’ve set it here because otherwise by default with Ninja it discovers Clang toolchain, which I also have in my environment, but I want to build Qt with MSVC toolchain.
And while I could’ve tried to set cl.exe for CMAKE_C_COMPILER and CMAKE_CXX_COMPILER explicitly, I decided not to and just switched back to x64 Native Tools Command Prompt for VS 2019. There MSVC toolchain is detected just fine:
**********************************************************************
** Visual Studio 2019 Developer Command Prompt v16.8.3
** Copyright (c) 2020 Microsoft Corporation
**********************************************************************
[vcvarsall.bat] Environment initialized for: 'x64'

D:\programs\qt\src>cd 6.0.1\build

D:\programs\qt\src\6.0.1\build>ninja --version
1.9.0

D:\programs\qt\src\6.0.1\build>cmake --version
cmake version 3.18.4

D:\programs\qt\src\6.0.1\build>..\configure.bat -release -no-pch -prefix "d:/programs/qt/6.0.1" -skip qtwebengine -nomake tools -nomake tests -nomake examples

+ cd qtbase
+ D:\programs\qt\src\6.0.1\qtbase\configure.bat -top-level -release -no-pch -prefix "d:/programs/qt/6.0.1" -skip qtwebengine -nomake tools -nomake tests -nomake examples
CMake Warning at D:/programs/qt/src/6.0.1/qtbase/cmake/QtProcessConfigureArgs.cmake:223 (message):
  '-nomake tools' is not implemented yet.
Call Stack (most recent call first):
  D:/programs/qt/src/6.0.1/qtbase/cmake/QtProcessConfigureArgs.cmake:625 (qtConfAddWarning)
  D:/programs/qt/src/6.0.1/qtbase/cmake/QtProcessConfigureArgs.cmake:689 (check_qt_build_parts)

'D:/programs/cmake/bin/cmake.exe' '-DBUILD_qtwebengine=OFF' '-DBUILD_WITH_PCH=OFF' '-DCMAKE_INSTALL_PREFIX=d:/programs/qt/6.0.1' '-DQT_BUILD_TESTS=FALSE' '-DQT_BUILD_EXAMPLES=FALSE' '-DCMAKE_BUILD_TYPE=Release' '-G' 'Ninja' 'D:/programs/qt/src/6.0.1'
-- The CXX compiler identification is MSVC 19.28.29335.0
-- The C compiler identification is MSVC 19.28.29335.0
-- The ASM compiler identification is MSVC
-- Found assembler: D:/programs/vs/2019/VC/Tools/MSVC/14.28.29333/bin/Hostx64/x64/cl.exe
-- Detecting CXX compiler ABI info
-- Detecting CXX compiler ABI info - done
-- Check for working CXX compiler: D:/programs/vs/2019/VC/Tools/MSVC/14.28.29333/bin/Hostx64/x64/cl.exe - skipped
-- Detecting CXX compile features
-- Detecting CXX compile features - done
-- Detecting C compiler ABI info
-- Detecting C compiler ABI info - done
-- Check for working C compiler: D:/programs/vs/2019/VC/Tools/MSVC/14.28.29333/bin/Hostx64/x64/cl.exe - skipped
-- Detecting C compile features
-- Detecting C compile features - done
Apparently, -nomake tools is not implemented yet (or was renamed), but that’s okay-ish. The configuration successfully completes, though with some more warnings:
# ...

OpenGL:
    Desktop OpenGL ....................... no
    Dynamic OpenGL ....................... yes
    OpenGL ES 2.0 ........................ no
    OpenGL ES 3.0 ........................ no
    OpenGL ES 3.1 ........................ no
    OpenGL ES 3.2 ........................ no
  Vulkan ................................. no

# ...

WARNING: QDoc will not be compiled, probably because libclang could not be located. This means that you cannot build the Qt documentation.
 Either set CMAKE_PREFIX_PATH or LLVM_INSTALL_DIR to the location of your llvm installation. On Linux systems, you may be able to install libclang by installing the libclang-dev or libclang-devel package, depending on your distribution. On macOS, you can use Homebrew's llvm package.
WARNING: Clang-based lupdate parser will not be available. LLVM and Clang C++ libraries have not been found.

Qt is now configured for building. Just run 'cmake --build . --parallel'

Once everything is built, you must run 'cmake --install .'
Qt will be installed into 'D:/programs/qt/6.0.1'

To configure and build other Qt modules, you can use the following convenience script:
        D:/programs/qt/6.0.1/bin/qt-configure-module.bat

If reconfiguration fails for some reason, try to remove 'CMakeCache.txt' from the build directory

-- Configuring done
-- Generating done
CMake Warning:
  Manually-specified variables were not used by the project:

    BUILD_qtwebengine

-- Build files have been written to: D:/programs/qt/src/6.0.1/build
So, first of all Desktop OpenGL is not detected, which is a bit concerning, as I seem to remember that it should be. However, having built and run a couple of Qt Quick application, I didn’t see any issues.
Then BUILD_qtwebengine is ignored, so does it mean that WebEngine will be also built? How does one disable it then?
And finally, QDoc and lupdate will not be compiled, but that’s also a minor issue.
Let’s run the build and install now:
$ cmake --build . --parallel
$ cmake --install .
For me that took 1 hour and resulted in 159 MB of installation folder (d:\programs\qt\6.0.1). So WebEngine wasn’t built after all.
Failed pcre2_jit_compile.c.obj, oaidl.h
If your build fails with something like this:
Building C object qtbase\src\3rdparty\pcre2\CMakeFiles\BundledPcre2.dir\src\pcre2_jit_compile.c.obj
FAILED: qtbase/src/3rdparty/pcre2/CMakeFiles/BundledPcre2.dir/src/pcre2_jit_compile.c.obj
D:\programs\vs\VC\Tools\MSVC\14.29.30133\bin\Hostx64\x64\cl.exe  /nologo -DHAVE_CONFIG_H -DPCRE2_CODE_UNIT_WIDTH=16 -DPCRE2_STATIC -DQT_NO_DEBUG -DQT_NO_EXCEPTIONS -DUNICODE -DWIN32 -DWIN64 -D_CRT_SECURE_NO_WARNINGS -D_ENABLE_EXTENDED_ALIGNED_STORAGE -D_UNICODE -D_USE_MATH_DEFINES -D_WIN64 -ID:\programs\qt\src\6.2.0\build\qtbase\src\3rdparty\pcre2\BundledPcre2_autogen\include -ID:\programs\qt\src\6.2.0\qtbase\src\3rdparty\pcre2\src -ID:\programs\qt\src\6.2.0\qtbase\mkspecs\win32-msvc -ID:\programs\qt\src\6.2.0\build\qtbase\include /DWIN32 /D_WINDOWS /DNDEBUG -O2 -MD -W0 /wd4530 /wd4577 -FS -Zc:rvalueCast -Zc:inline -Zc:strictStrings -Zc:throwingNew -Zc:referenceBinding -Zc:externConstexpr -Zc:wchar_t -guard:cf -Zc:__cplusplus -permissive- -utf-8 -std:c11 /showIncludes /Foqtbase\src\3rdparty\pcre2\CMakeFiles\BundledPcre2.dir\src\pcre2_jit_compile.c.obj /Fdqtbase\lib\Qt6BundledPcre2.pdb /FS -c D:\programs\qt\src\6.2.0\qtbase\src\3rdparty\pcre2\src\pcre2_jit_compile.c
C:\Program Files (x86)\Windows Kits\10\include\10.0.17763.0\um\oaidl.h(487): error C2059: syntax error: '/'
C:\Program Files (x86)\Windows Kits\10\include\10.0.17763.0\um\oaidl.h(502): error C2059: syntax error: '/'
C:\Program Files (x86)\Windows Kits\10\include\10.0.17763.0\um\oaidl.h(530): error C2059: syntax error: '}'
C:\Program Files (x86)\Windows Kits\10\include\10.0.17763.0\um\oaidl.h(531): error C2059: syntax error: '}'
C:\Program Files (x86)\Windows Kits\10\include\10.0.17763.0\um\oaidl.h(533): error C2059: syntax error: '}'
C:\Program Files (x86)\Windows Kits\10\include\10.0.17763.0\um\oaidl.h(534): error C2059: syntax error: '}'
C:\Program Files (x86)\Windows Kits\10\include\10.0.17763.0\um\oaidl.h(665): error C2079: 'varDefaultValue' uses undefined struct 'tagVARIANT'
C:\Program Files (x86)\Windows Kits\10\include\10.0.17763.0\um\oaidl.h(950): error C2079: 'varValue' uses undefined struct 'tagVARIANT'
C:\Program Files (x86)\Windows Kits\10\include\10.0.17763.0\um\propidlbase.h(319): error C2059: syntax error: '/'
C:\Program Files (x86)\Windows Kits\10\include\10.0.17763.0\um\propidlbase.h(378): error C2371: 'pvarVal': redefinition; different basic types
C:\Program Files (x86)\Windows Kits\10\include\10.0.17763.0\um\oaidl.h(510): note: see declaration of 'pvarVal'
C:\Program Files (x86)\Windows Kits\10\include\10.0.17763.0\um\propidlbase.h(379): error C2059: syntax error: '}'
C:\Program Files (x86)\Windows Kits\10\include\10.0.17763.0\um\propidlbase.h(380): error C2059: syntax error: '}'
C:\Program Files (x86)\Windows Kits\10\include\10.0.17763.0\um\propidlbase.h(383): error C2059: syntax error: '}'
C:\Program Files (x86)\Windows Kits\10\include\10.0.17763.0\um\propidlbase.h(384): error C2059: syntax error: '}'
[19/8412] Building C object qtbase\src\3rdparty\pcre2\CMakeFiles\BundledPcre2.dir\src\pcre2_study.c.obj
ninja: build stopped: subcommand failed.
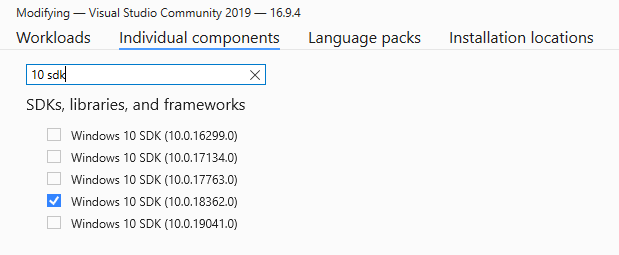
Then perhaps you have an “old” Windows 10 SDK installed. In my case it was 10.0.17763, so I deleted that one and installed 10.0.18362 instead (using Visual Studio Installer):
It might be a good idea to reboot the system just in case before starting a new build.
Alternatively, perhaps, you can get PCRE2, make it visible to Qt configuration and pass -system-pcre. Or maybe even configure Qt without PCRE (-no-pcre).
Using your own Qt build
This is it, you can already use this your very own Qt distribution to build your projects.
With CMake and bare CLI
I have an article about that already, but there it’s more about CMake and Visual Studio Code, so here will be a shorter CLI-only version.
Be aware that with Qt 6 you might need to explicitly set Ninja as your generator (and help it discover cl.exe), otherwise it might fail with the same error as on configuring/building the Qt itself.
Say, you have some Qt Quick project with CMake and the following CMakeLists.txt:
cmake_minimum_required(VERSION 3.15)

project("color-corners")

# that's all you need for your Qt installation to be discovered by CMake
set(CMAKE_PREFIX_PATH "d:/programs/qt/5.15.2")

set(CMAKE_INCLUDE_CURRENT_DIR ON)
set(CMAKE_AUTOMOC ON)

message("Looking for Qt...")

find_package(Qt5 REQUIRED Quick Qml)
if (${Qt5_FOUND})
    message("Found Qt " ${Qt5_VERSION})
else()
    message("Couldn't find Qt")
endif()

set(sources
    main.cpp
)

qt5_add_resources(qrc qml.qrc)

add_executable(${CMAKE_PROJECT_NAME} WIN32 ${sources} ${qrc})

target_link_libraries(
    ${CMAKE_PROJECT_NAME}
    Qt5::Quick
    Qt5::Qml
    )
Configure and build the project:
$ cd /d/code/qt/color-corners/
$ mkdir build && cd $_

$ cmake ..
-- Building for: Visual Studio 16 2019
-- Selecting Windows SDK version 10.0.18362.0 to target Windows 10.0.18363.
-- The C compiler identification is MSVC 19.27.29112.0
-- The CXX compiler identification is MSVC 19.27.29112.0
-- Detecting C compiler ABI info
-- Detecting C compiler ABI info - done
-- Check for working C compiler: D:/programs/vs/2019/VC/Tools/MSVC/14.27.29110/bin/Hostx64/x64/cl.exe - skipped
-- Detecting C compile features
-- Detecting C compile features - done
-- Detecting CXX compiler ABI info
-- Detecting CXX compiler ABI info - done
-- Check for working CXX compiler: D:/programs/vs/2019/VC/Tools/MSVC/14.27.29110/bin/Hostx64/x64/cl.exe - skipped
-- Detecting CXX compile features
-- Detecting CXX compile features - done
Looking for Qt...
Found Qt 5.15.2
-- Configuring done
-- Generating done
-- Build files have been written to: D:/code/qt/color-corners/build

$ cmake --build . --config Release
Microsoft (R) Build Engine version 16.7.0+b89cb5fde for .NET Framework
Copyright (C) Microsoft Corporation. All rights reserved.

  Checking Build System
  Automatic MOC for target color-corners
  Generating qrc_qml.cpp
  Building Custom Rule D:/code/qt/color-corners/src/CMakeLists.txt
  mocs_compilation.cpp
  main.cpp
  qrc_qml.cpp
  Generating Code...
  color-corners.vcxproj -> D:\code\qt\color-corners\build\Release\color-corners.exe
  Building Custom Rule D:/code/qt/color-corners/src/CMakeLists.txt
So it’s all good: CMake found your Qt installation and successfully built the project.
But you might, however, get the following error:
Qt5Gui.lib(Qt5Gui.dll) : fatal error LNK1112: module machine type 'x86' conflicts with target machine type 'x64' [D:\code\qt\color-corners\build\color-corners.vcxproj]Try to re-configure the project with explicitly set x32/x86 architecture:
$ rm -r ./* && cmake -G "Visual Studio 16 2019" -A Win32 ..
$ cmake --build . --config Release
If that works fine, then it means that you built Qt in x86 Native Tools Command Prompt, so your Qt build is x32/x86. If you need x64, then you’ll need to build Qt again, but this time in x64 Native Tools Command Prompt.
In Qt Creator
Most likely you’ll want to use your Qt build in Qt Creator.
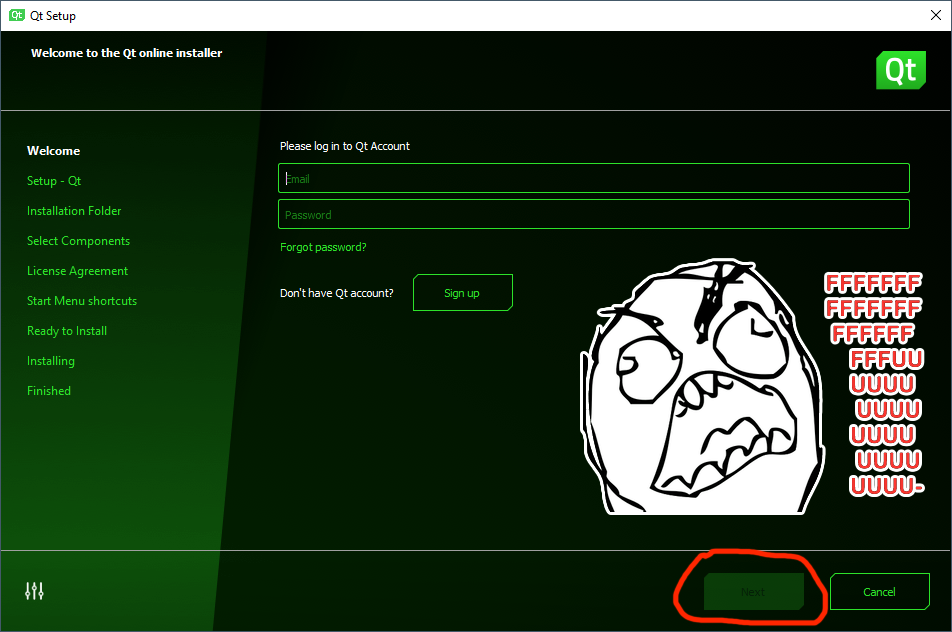
Install Qt Creator
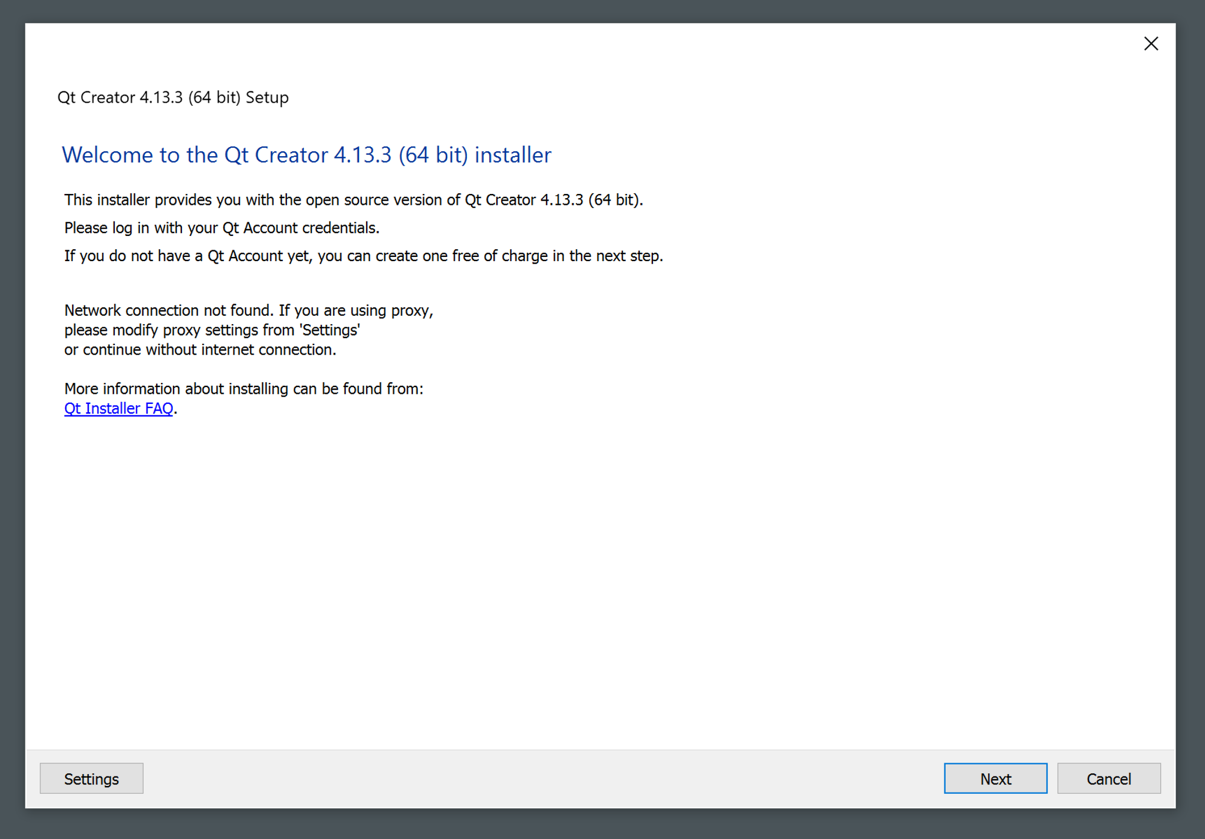
The Qt Creator installer is also available at the official download page. Good news that installer does not require Qt Account (yet?). Actually, it does, but only if it discovers internet connection - it that case the first installer view looks like this at the moment:
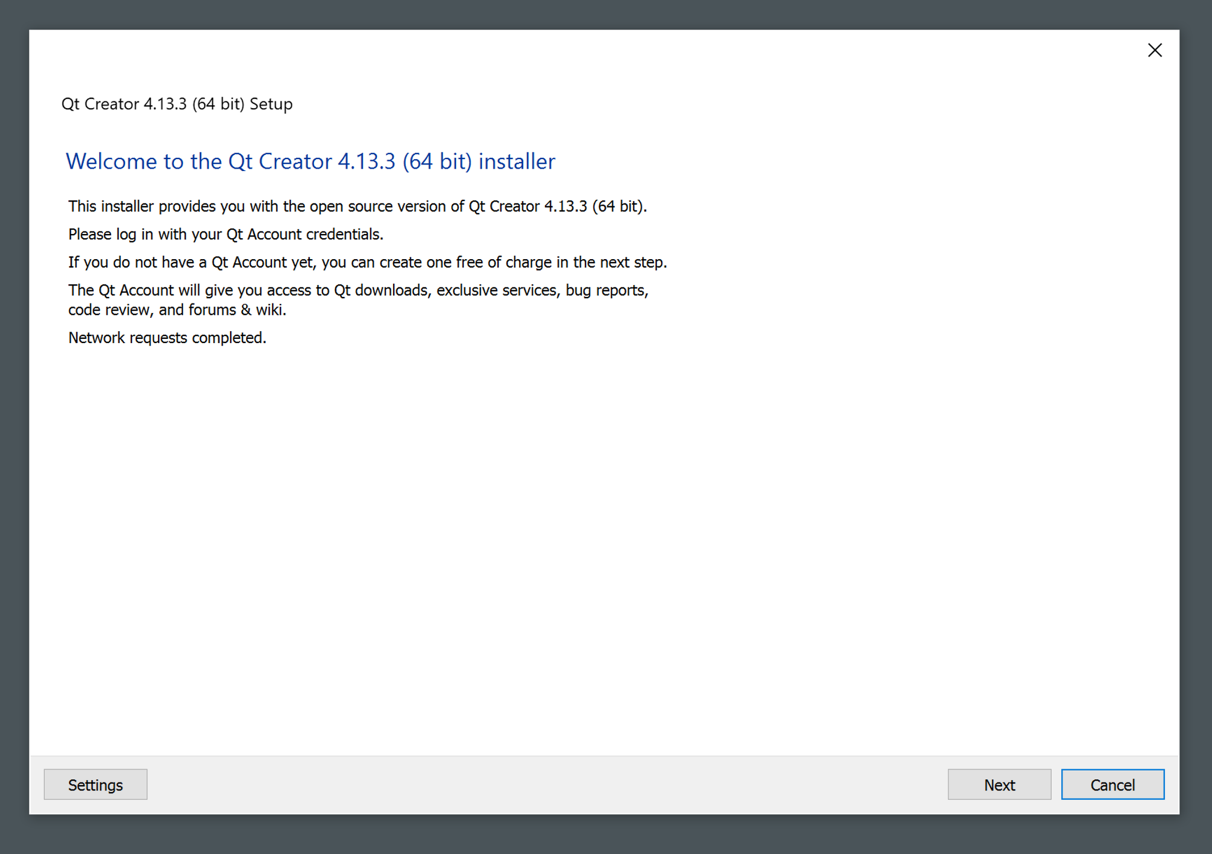
So you can just disconnect from the internet or block any network access for the installer before launching it, and then the first view will look like this:
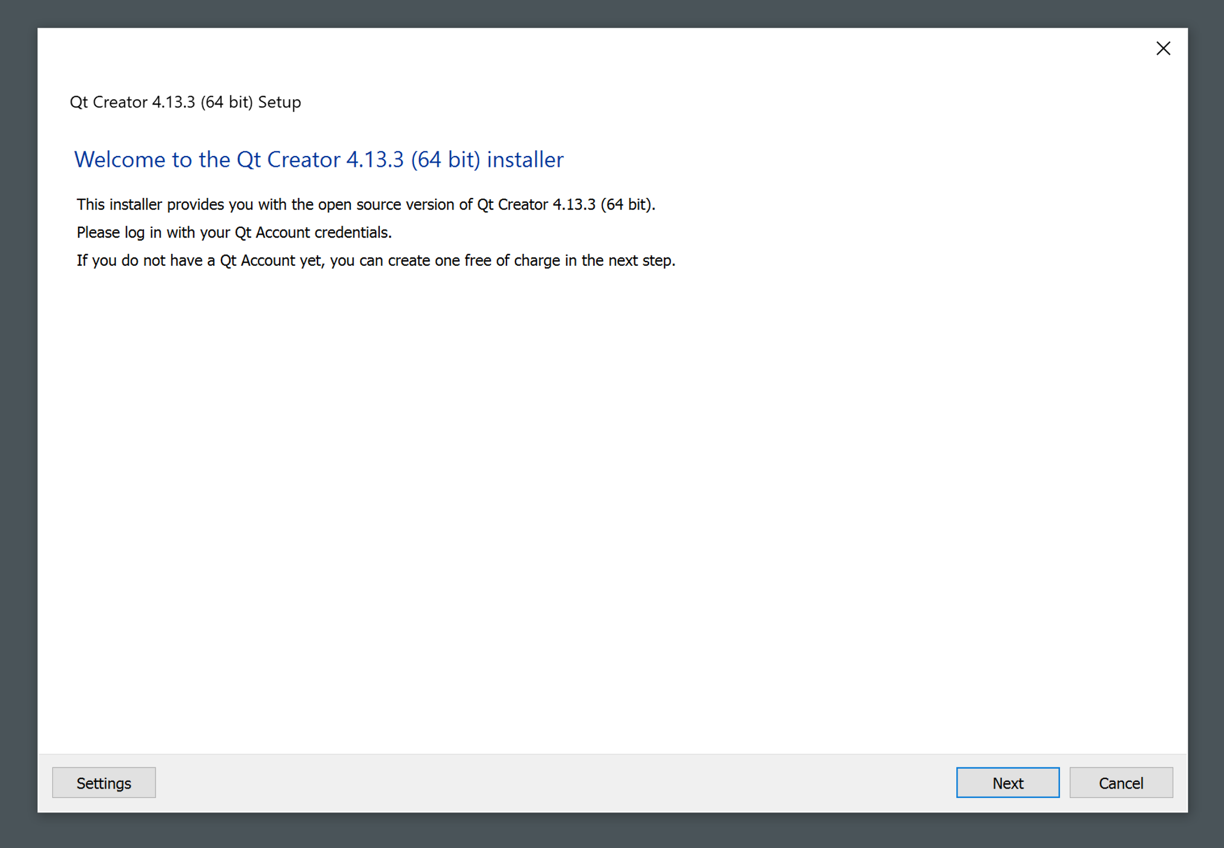
or this:
So you’ll be able to proceed without Qt Account.
And if you are brave enough, you can of course build it from sources as well.
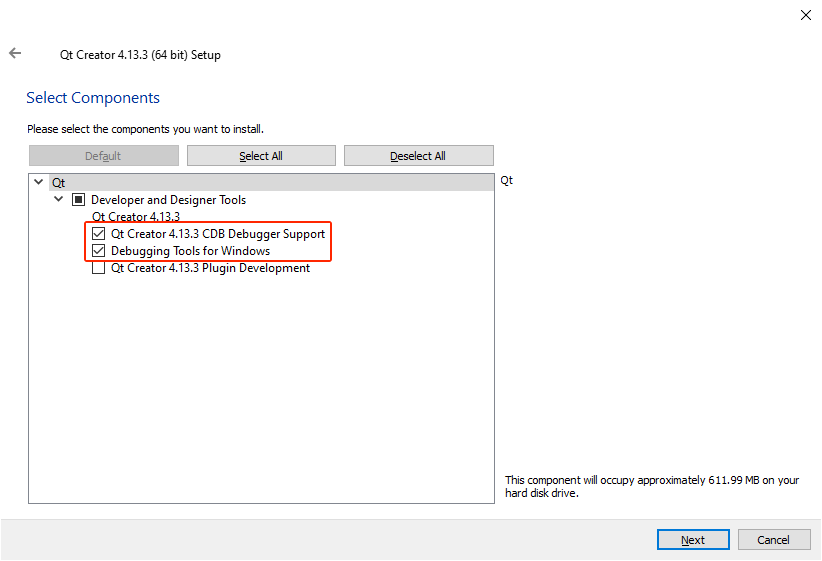
If you, like me, are using MSVC toolchain and CDB, then it is important to check CDB Debugger Support and Debugging Tools for Windows components:
Add a new kit
First time you launch Qt Creator, it will suggest you to “link” existing Qt installation, which is nice. But what does it actually want - I have no fucking idea, because when I pointed it to my Qt build, it didn’t enable Link with Qt button:
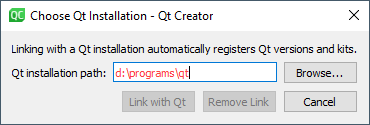
To hell with this thing then.
Just in case, note that I’ve updated the Qt paths in my system after adding a section about Qt 6, so now I have two Qt versions, but screenshots below still point to old paths. The screenshots also have 5.12.2 version, but that’s just a typo - it should be 5.15.2 there.
Open Qt Creator settings, go to Kits and there to Qt Versions. Add your Qt build here (you’ll need to provide path to d:\programs\qt\VERSION\bin\qmake.exe). Click on Apply button, otherwise versions list on the Kits tab won’t have it.
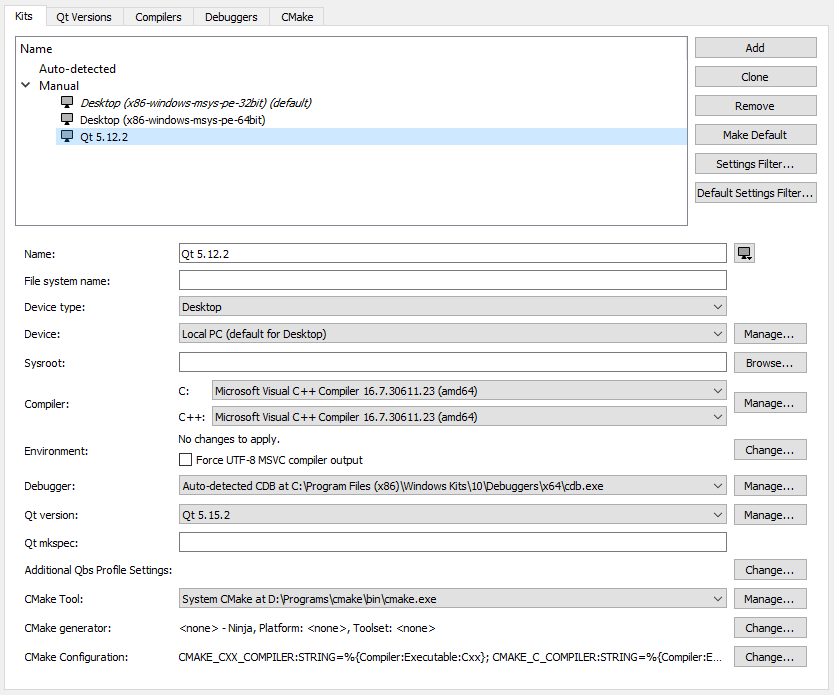
Now go to Kits tab and add a new kit. Select your Qt version, C and C++ compilers (in my case it’s amd64 variant) and debugger (CDB). If you haven’t installed CDB Debugger Support and Debugging Tools for Windows, then you won’t have CDB option available.
If you won’t set debugger, you’ll get a yellow warning. To get details about what’s wrong, hover your mouse over it and there will be a pop-up tooltip with some explanation:
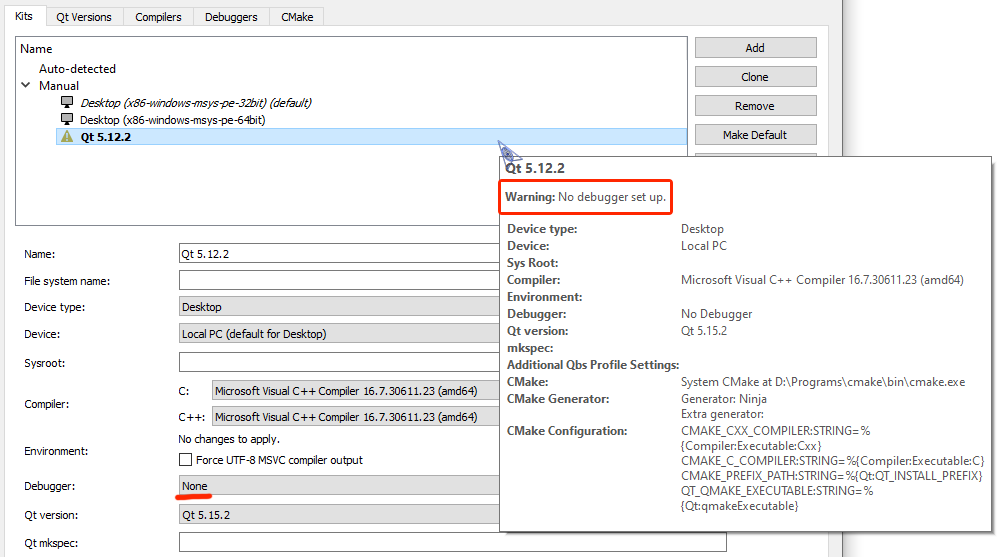
Despite it’s just a warning, you nevertheless won’t be able to select this kit in your projects.
If you’ll set a wrong compiler, then you’ll get a red error and the following explanation in the pop-up tooltip:
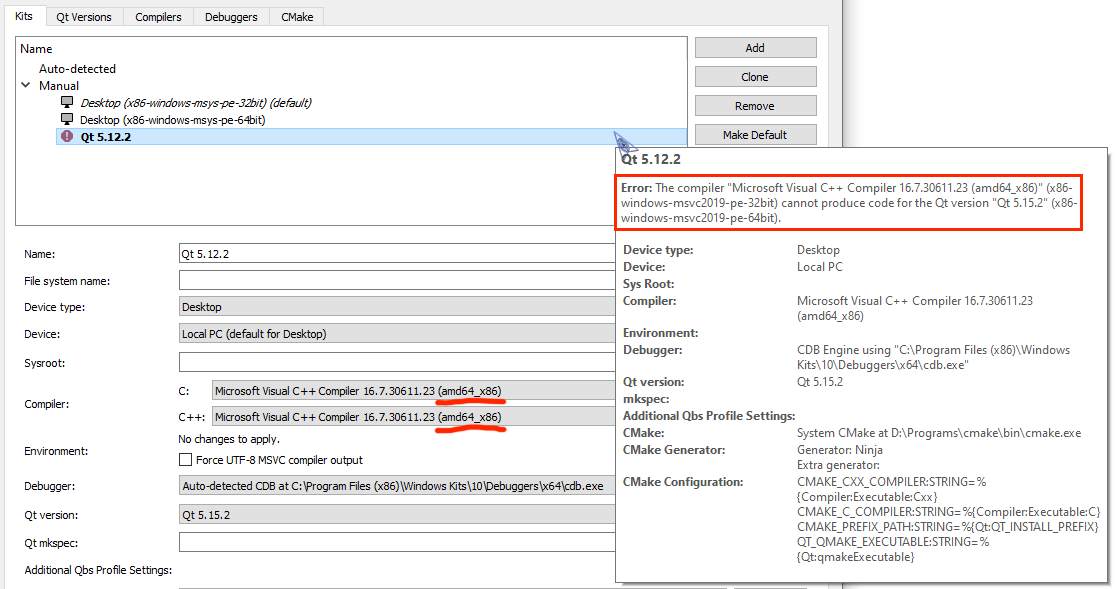
And if everything is good, then the kit won’t have any yellow/red warnings/errors:
So here you’ve got a perfectly splendid Qt installation without using the installer and creating Qt Account. And The Qt Company’s management can go fuck itself for the third time now.
Updates
03.03.2022
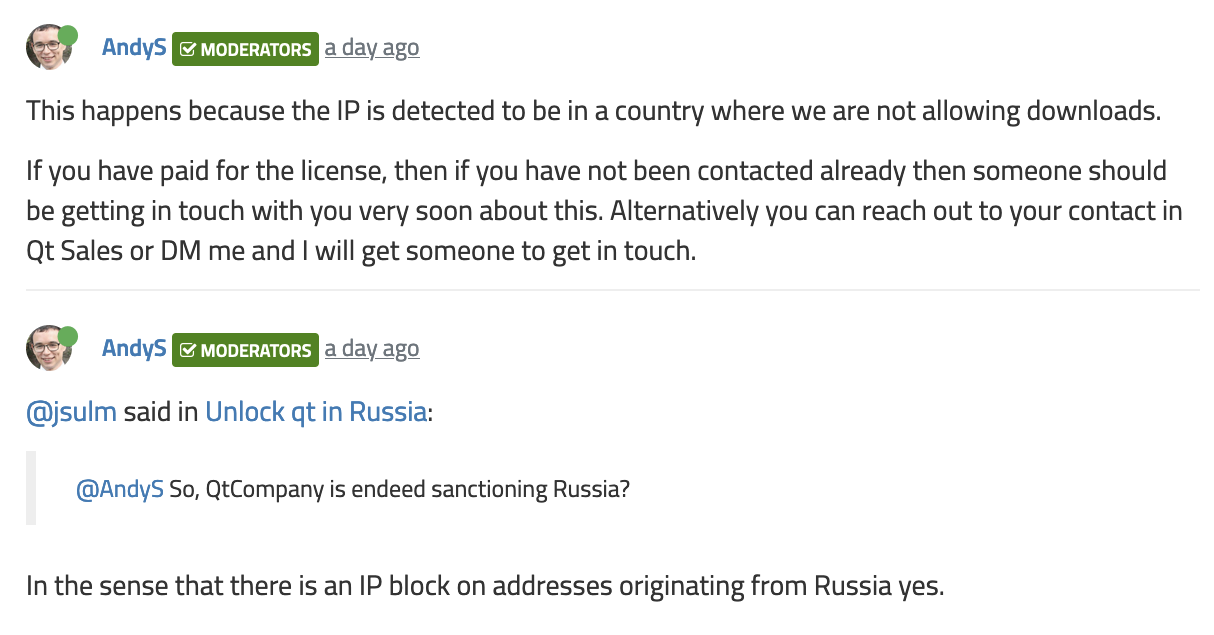
The Qt Company has blocked installing Qt from installer and logging-in to Qt Account using russian IP addresses.
So far this has been mentioned only in this thread on Qt forum and also in comments under Qt Design Studio 3.1 Released blog post. Company representatives confirmed the blocking:

and
So reporting bugs and editing wiki will become unavailable too? It’s strange that posting on forum is still available, as it is also tied to Qt Account, but perhaps they used VPN.
What an unexpected way for this article to suddenly become more in demand.