Apple TV, Kodi and network share
For a long time I was using Kodi with LibreELEC running on a Raspberry Pi 3 Model B device. It was pretty good, and I was going to write a post about it, but never had time for that, and now I got an Apple TV, so instead I’ll write a post about using Kodi on Apple TV.
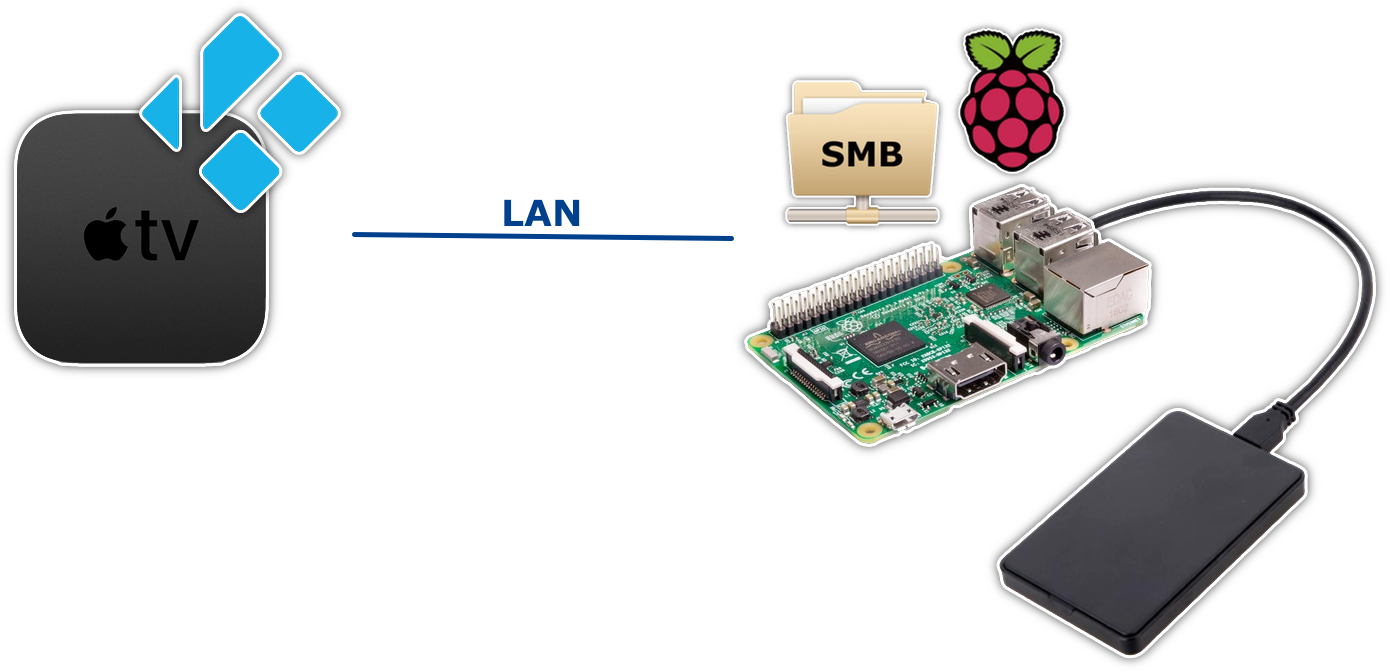
I’ll talk about how to install Kodi on Apple TV and how to create a network media storage for it.
What’s wrong with Apple TV
Given its price, one would think that Apple TV should be able to do a lot of things and to have great media capabilities.
In reality, Apple TV as a media box is pretty much useless on its own. If you are not subscribed to the whole bazillion of TV services (Netflix, HBO, Hulu and many many more), then you will always be missing something (quite a lot of something), as TV shows are heavily scattered across TV providers and none has them all. It is fair to say that without subscriptions Apple TV is merely just an AirPlay host.
Certainly, you can buy or rent TV shows or movies in iTunes Store, but that will cost you a fortune, so it’s not really an option.
The conclusion here is that you need a proper video player - the one that could simply play your video files from wherever they are.
But that’s not all: Apple TV has a very limited internal storage. Basically, you won’t be able to store your movies and TV shows collection on it. Well, Raspberry’s case is even worse in that regard, but hear this - Apple TV does not support connecting external disk drives! And that means that the only option would be to set-up a network share, and play your videos from there.
The fuck then would you buy Apple TV for
So, what is the point in getting Apple TV at all? There is actually a couple of reasons.
First of all, it is actually quite a powerful device in terms of hardware, plus it has a very nice GUI and an unusual remote control (a bit retarded, but also nice).
AirPlay is also a quite nice thing to have, because the majority of devices and computers in the house are from Apple.
But mostly I got Apple TV kinda “for the future”: till the times I’ll have a 4K HDR Dolby Atmos telly, and also hoping that there will be finally a single streaming service containing all the movies and TV shows from all the networks (but there never will be such a service).
Make Apple TV a better media box
Meanwhile, let’s try to make Apple TV to be more useful with what we have nowadays.
Set-up a network share
I reused the same Raspberry Pi device (the one that was my media player before) as the server. Since I’ve had it with all the limitations of LibreELEC, I formatted the card and put there Raspbian instead. And as the purpose of the device is just to share files from the connected external disk over the network, there was no point in having a desktop environment, so I took Raspbian Buster Lite.
Mounting external disk
I have an external disk drive, where I store my movies and TV shows collection plus downloads, and I wanted to use this disk as the main storage for Raspberry device.
For that it needs to auto-mount every time the device reboots and also it needs to mount to the same path. In order to do that, first you need to find its label (or UUID):
$ sudo blkid

/dev/mmcblk0p1: LABEL_FATBOOT="boot" LABEL="boot" UUID="5203-VC74" TYPE="vfat" PARTUUID="6c586e13-01"
/dev/mmcblk0p2: LABEL="rootfs" UUID="2ab3f8e1-7dc6-43f5-b0db-dd1159d51l2e" TYPE="ext4" PARTUUID="6c586e13-02"
/dev/mmcblk0: PTUUID="6c586e55" PTTYPE="dos"
/dev/sda1: LABEL="somedisk" UUID="21V9-9819" TYPE="exfat" PARTUUID="ol37c326-01"
Create a mounting folder (it will also be your share):
$ sudo mkdir /media/somediskThen edit /etc/fstab like this:
LABEL=somedisk /media/somedisk exfat defaults,uid=1000,gid=1000,nofail 0 0Values uid and gid stand for user and group IDs - who will have access to the mounted path. By default, in Raspbian your user (pi) has ID = 1000 for both itself and its group. You can check that with the following command:
$ idAlso, as you can see, my disk is formatted to exFAT, so I needed to install these as well:
$ sudo apt install exfat-fuse exfat-utilsNow the disk will be mounted automatically every time the system starts.
Sharing the files
What file sharing service/protocol to use?
Samba
For many years I was stumbling upon DLNA being mentioned here and there, implying that it is a widely known and adopted media sharing standard, so I thought it’s a good time to finally try it. I installed MiniDNLA, but to my surprise it did not get discovered by neither of media players (I tried Kodi, VLC and others).
Having wasted some time on trying to make it announce itself in a way someone would finally discover it, I got a seditious idea to just try SMB.
Install Samba and create user password (I went with default pi):
$ sudo apt install samba samba-common-bin
$ sudo smbpasswd -a pi
Edit the config:
$ sudo nano /etc/samba/smb.conf[global]
workgroup = WORKGROUP
[share]
Comment = MediaPi SMB
Path = /media/somedisk
Browseable = yes
Writeable = no
only guest = no
create mask = 0644
directory mask = 0644
Public = yes
Guest ok = noRestart the service:
$ sudo systemctl restart smbd.serviceAnd you know what? It just worked - the share immediately became discoverable from anywhere. So much for the media “standards”.
SFTP
Why didn’t I use SFTP and went with Samba? Because I wanted to have SSH passwords disabled on my file server and allow connecting with SSH keys only, and Kodi on Apple TV sadly cannot use SSH keys (or I didn’t find a way).
What I didn’t know is that it is possible to enable using SSH password just for one user.
So when suddenly Kodi (and VLC too) stopped connecting to my Samba share (could recent tvOS update be the reason?), I just enabled SSH password for pi user:
$ sudo nano /etc/ssh/sshd_config

Match User pi
    PasswordAuthentication yes
and then added my file server to Kodi with SFTP.
The pi user here might seem not the best example, but actually later I’ve replaced Raspberry Pi with a proper PC and desktop Ubuntu, and there pi user was created with very limited rights.
By the way, my seedbox also allows connecting to it via SFTP, so now I don’t even need to download files to my local server (though I’ll still talk about it below).
Downloading new files
Okay, you can share existing files from the disk, but how to put new files to the disk?
If you are from a country that doesn’t care much about you stealing media content via torrents, then I guess you can just install a torrent client (although I would first think about your disk resource first). And if you are from a Germany-like country, then most likely you are using a seedbox and are downloading files from it via SFTP/FTPS.
One way would be to download files to your computer first and then upload them to Raspberry via the very same SMB (or, better yet, via SFTP), but wouldn’t it be faster to download files directly to Raspberry without this intermediate step?
It definitely would, if only there was some remote GUI for that, because doing this via CLI is not so convenient.
And there is at least one such tool - rclone. It’s great for transferring files, and also it has a web-based GUI, so you can control it from your computer remotely, while all the downloads will happen directly on Raspberry.
Install rclone and config it with two remotes: one for your actual source of downloads (a seedbox, some server, some cloud storage, whatever) and another for your external disk. Here’s my config, for example:
[seedbox]
type = sftp
host = some.seedbox.io
user = some
pass = some
md5sum_command = none
sha1sum_command = none

[disk]
type = local
The reason you need to add the disk as a remote is that without it rclone will map / path to /home/pi/, so downloads will go to SD card instead of the disk. I have no idea why is that.
Here’s how to launch rclone with web GUI:
$ rclone rcd --rc-web-gui --rc-addr :8998 --rc-htpasswd /home/pi/.htpasswdTo generate /home/pi/.htpasswd, install apache2-utils and provide a password of your choice:
$ sudo apt install apache2-utils
$ htpasswd -c /home/pi/.htpasswd
Now open http://PASPBERRY-IP-ADDRESS:8998 in your browser, enter login/password and here’s what you should see in the files explorer:
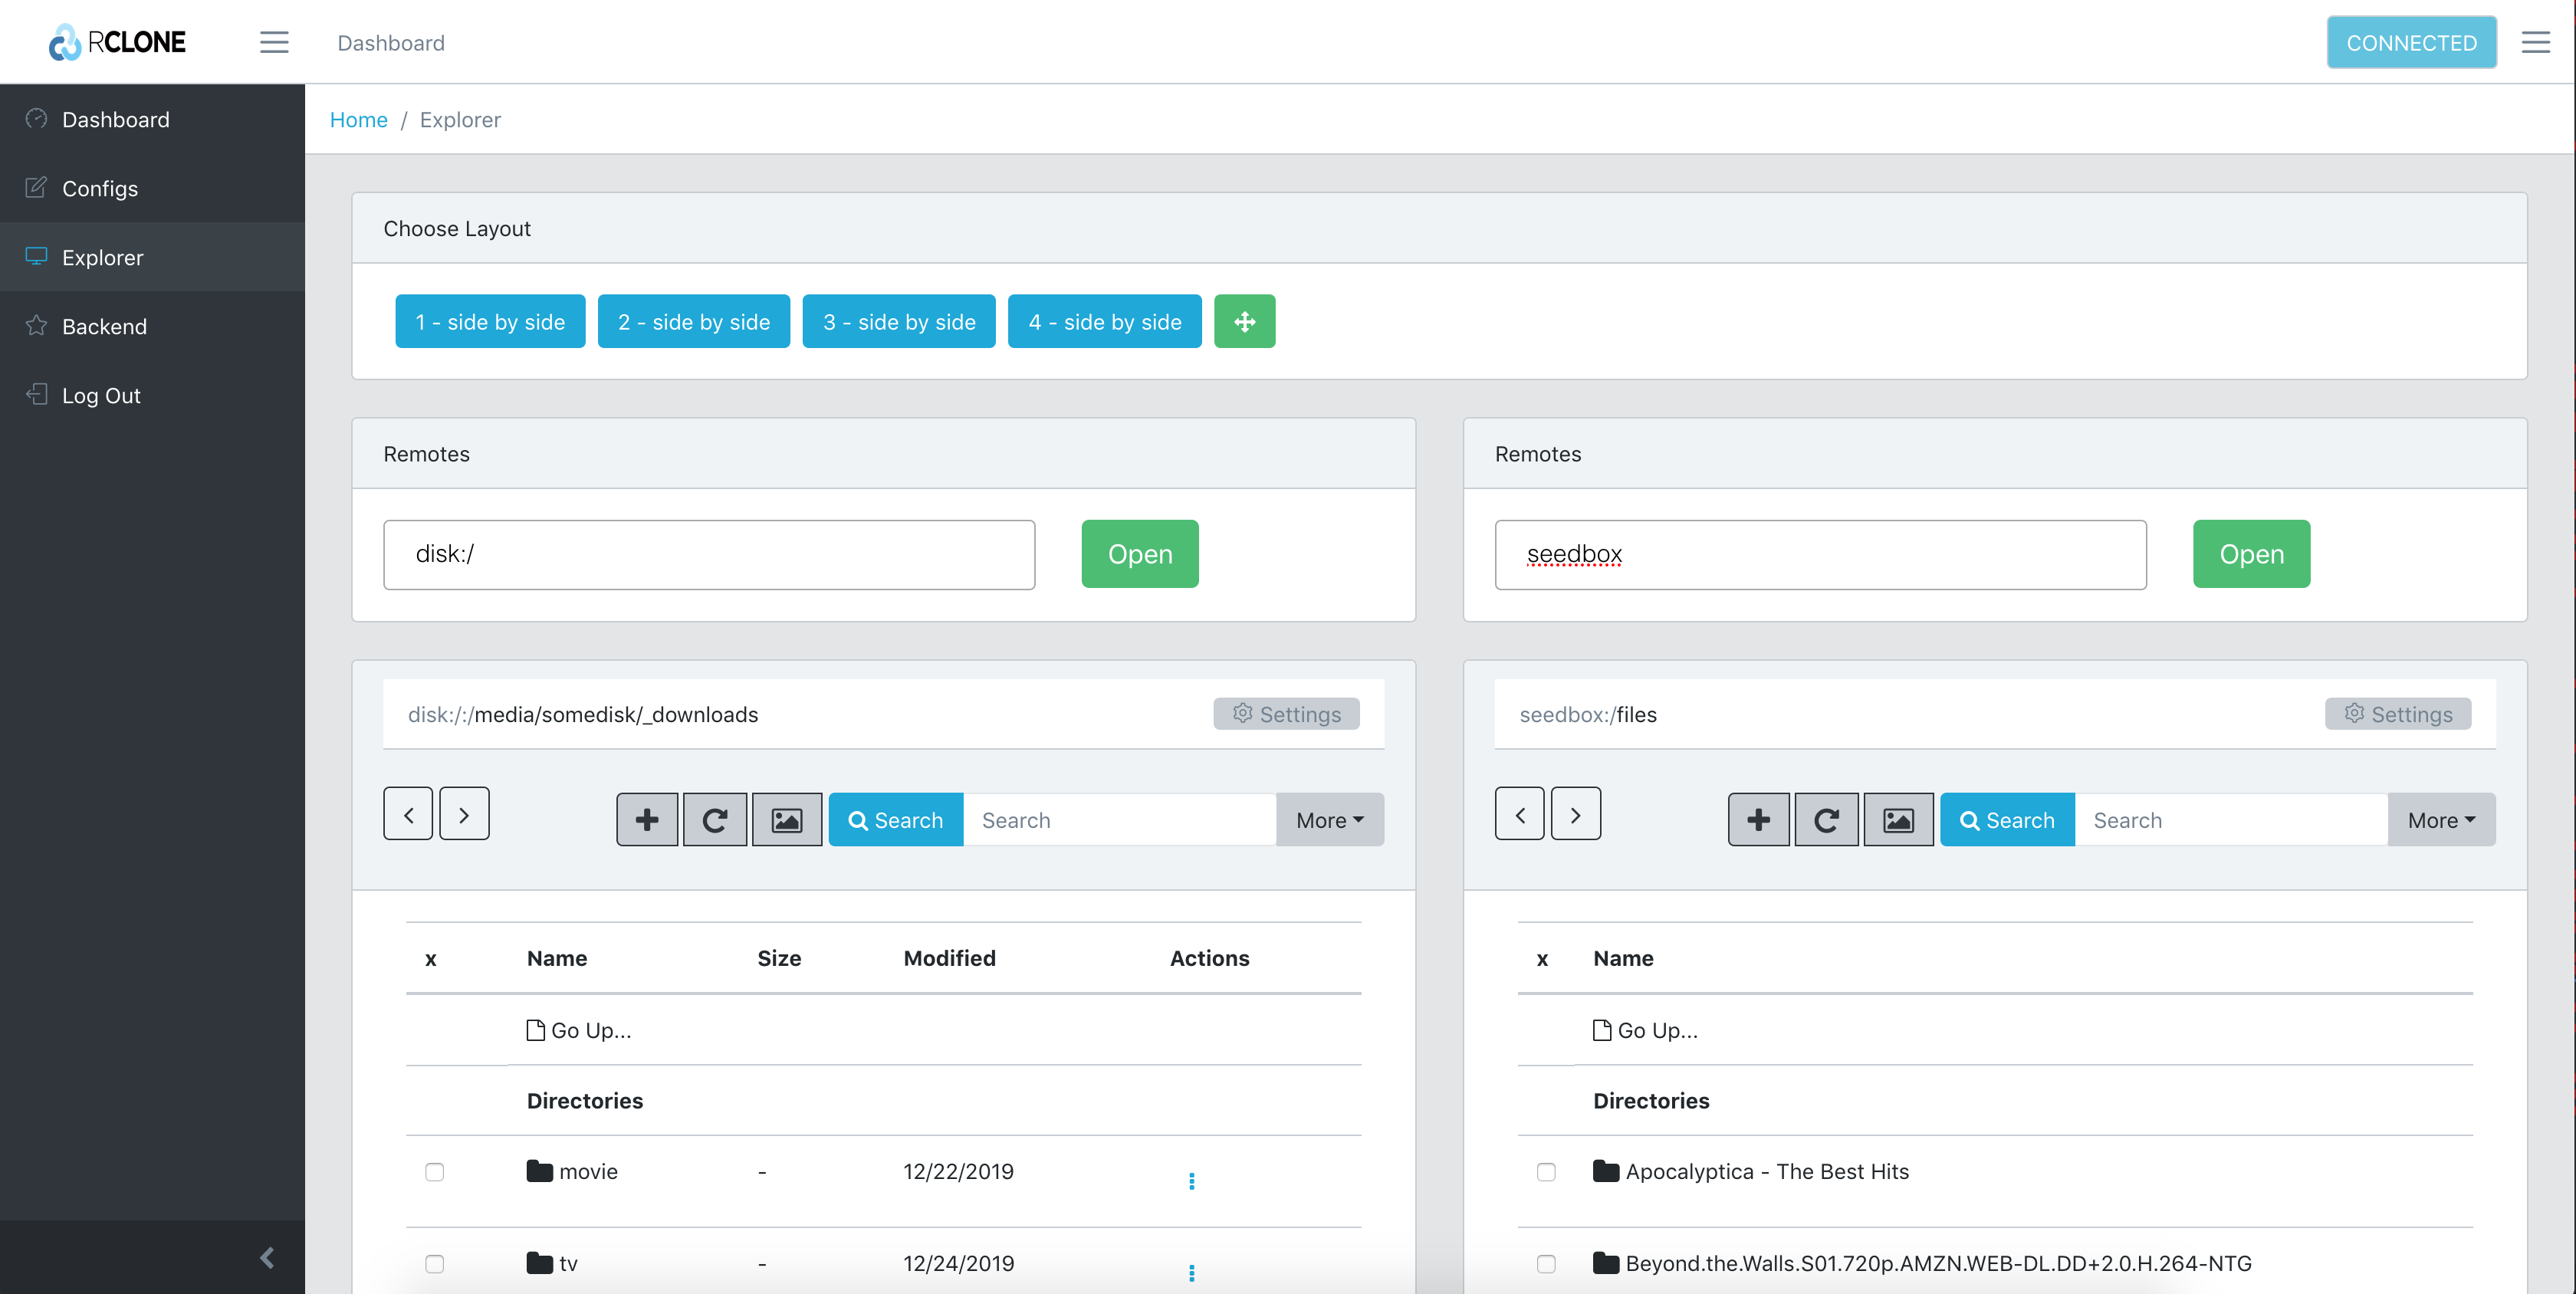
To start a download just drag and drop files/folders from the remote to your disk.
Works fine, however there are some pretty annoying issues:
- what’s the point of checkboxes next to files, as there are no group operations;
- by the way, it wouldn’t hurt to be able to select several files and drag and drop all of them to start the download. At the moment you have to drag and drop them one by one;
- when you add several downloads, all of them are downloading in parallel, as there is no queue;
- there is no way to cancel ongoing downloads;
- it is unclear what Load Media button does;
- floating Progress window doesn’t show anything;
- files are sorted alphabetically and you can’t sort them otherwise;
- one wrong move and files are downloading in your browser.
Hopefully, those will be fixed eventually, especially given that the whole project started not that long ago. Meanwhile, I’ve created my own web-interface for the task (I’ll write a separate post about it some time later).
Another more serous issue with rclone itself is that the download speed endlessly decreases right from the download start till it reaches some ridiculously low values, while the actual download never progresses past a couple of megabytes. Apparently, it has something to do with relatively recent changes regarding threads, because providing --multi-thread-streams 1 option solves the issue.
One last step is to create a systemd service for rclone running with web GUI:
[Unit]
Description=rclone web GUI

[Service]
WorkingDirectory=/home/pi
ExecStart=rclone rcd --rc-web-gui --rc-addr :8998 --rc-htpasswd /home/pi/.htpasswd --transfers 1 --multi-thread-streams 1
Restart=always
RestartSec=10
SyslogIdentifier=rclonewebgui
User=pi

[Install]
WantedBy=multi-user.target
Install Kodi
There is at least a couple of promising media players in the App Store, but they cost around 10 USD per year (or 60 USD for a lifetime license), which is a rip-off.
There is also VLC, and it is available for free, however I don’t like its GUI and media capabilities (from my experience with its desktop version). Although, to be fair, VLC can actually serve the purpose, because it supports reading files from network share plus it provides its own service for uploading videos from computer.
But why bother with all that when there is Kodi - the best thing to have as a media player on a TV box.
Unfortunately, it is not available in App Store. Fortunately, you can install it on Apple TV yourself. It’s the same thing as with iOS devices - as a developer you can install anything you want on your device (goes without saying that you’ll need a Mac for that).
Here’s the instruction with all the details, and here I’ll only list a short version of the process:
- Register an Apple Developer account if you don’t have one and add it to Xcode. To clarify, this is not the one that requires you to pay 100 USD per year, no need to get that;
- Create a new project for tvOS - this is only needed to generate a provisioning profile. Just a default tvOS application (the language is Swift, but it likely doesn’t matter) with a Bundle Identifier of your choice (
com.something.kodi); - Download a Kodi build for tvOS. I’d recommend to start with version
kodi-20180227-4a25e62-yab-tvos, and you’ll see later why;- if this version is no longer available there, I’ve saved a copy here;
- Download iOS App Signer. Launch it, choose
.debbundle you downloaded at the step 2, select Signing Certificate from your Apple Developer account, select Provisioning Profile that was generated in Xcode at step 3 and sign the bundle;- if you have other developer profiles/certificates in the system, it might fail to perform the signing. It will suggest to try to fix the problem, but in my case that didn’t succeed. So what I eventually had to do is delete every other profile/certificate that I could find in Keychain Access application, restart Xcode, restart iOS App Signer and try signing again;
- Upload signed
.ipabundle to Apple TV.
And it’s all good, except for one sad little detail - basic (unpaid) Apple Developer account allows you to create provisioning profiles that are valid for only 7 days, so you’ll have to repeat steps 3 (just open the same project and check the provisioning profile), 6 and 7 every week. When I get annoyed enough, I’ll try to find a way to automate that.
How to upload an application to Apple TV
Open Devices and Simulators in Xcode. If your Apple TV has a cable connection, everything should be straightforward for you, but in my case it is an Apple TV 4K version, so the only way to connect to it is wirelessly.
To make an Apple TV discoverable, open Remote App and Devices in its Settings:
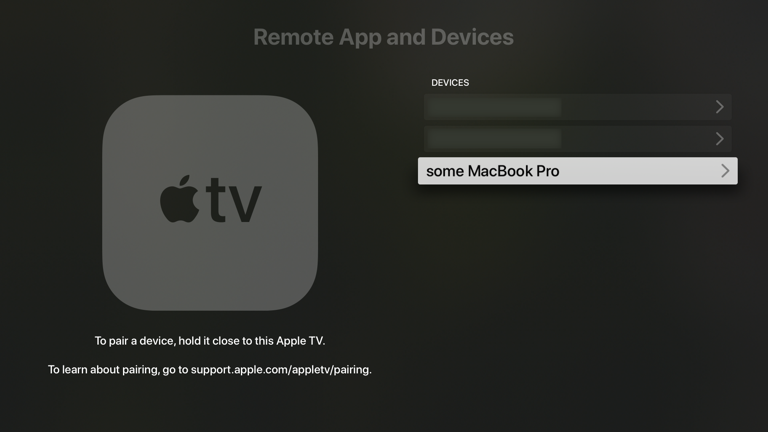
Then you should be able to initiate the pairing process from Xcode.
If your Apple TV does not appear in the Xcode’s window, you can thank Apple for making this process so unstable that it literally takes multiple reboots of both Apple TV and your Mac until it fucking appears in the list. Fuck all you can do about that. Even if the devices are already paired, as you can see on the screenshot above, it still might not appear in the Xcode’s list, so you can only reboot some more and pray.
After Apple TV is paired/discovered, click on + button in the Installed apps section and upload the .ipa file to Apple TV:
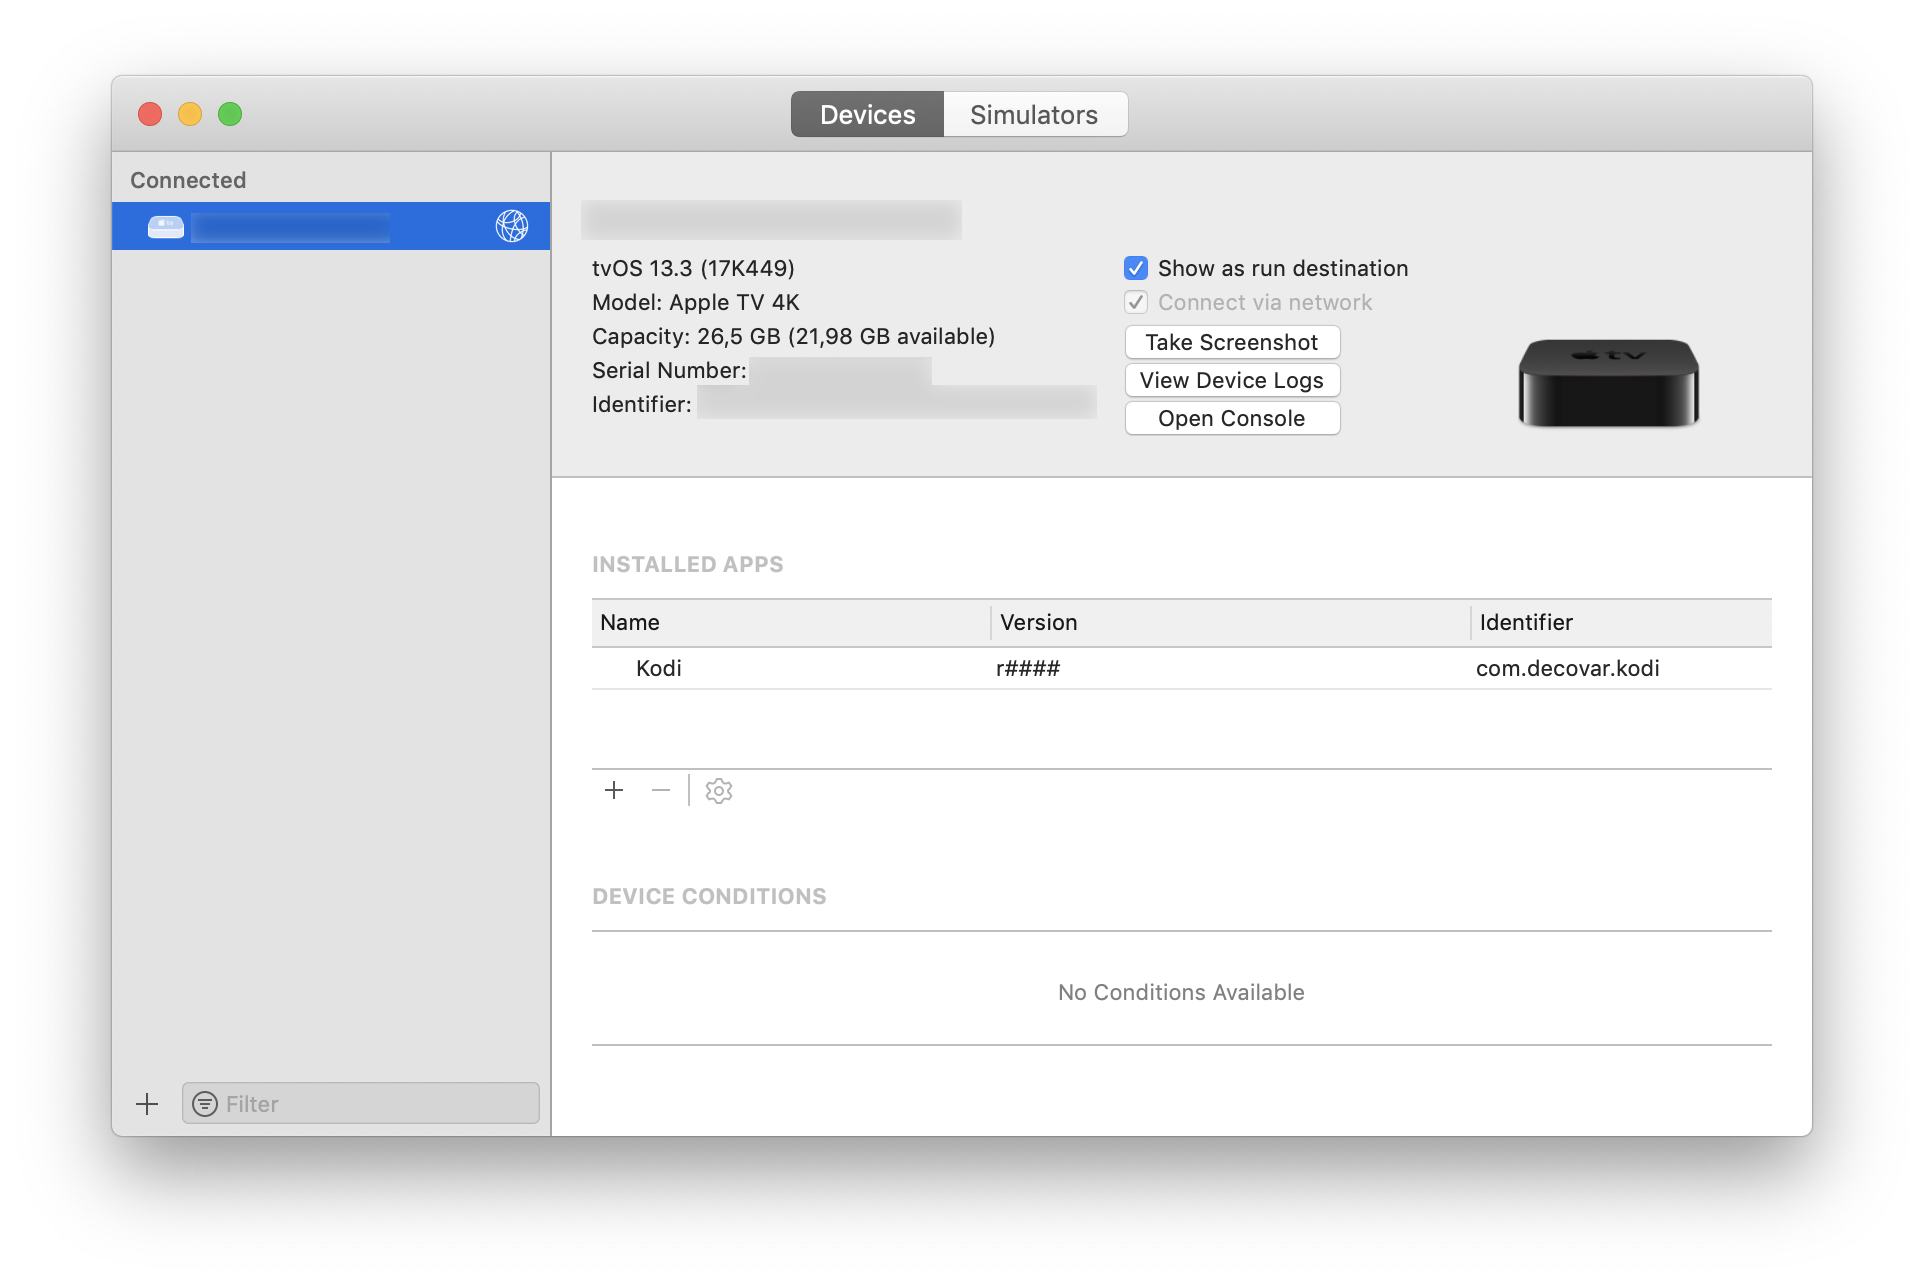
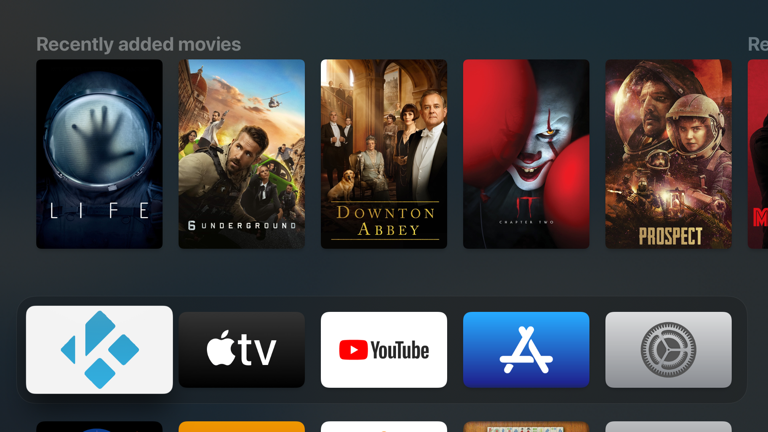
After that Kodi application should appear on your Apple TV:
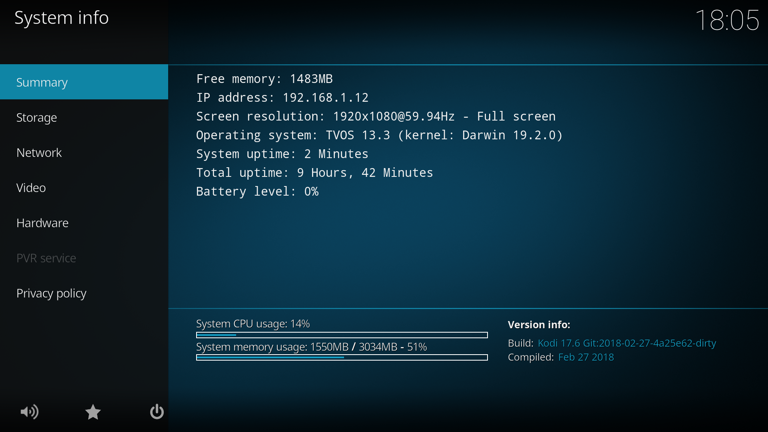
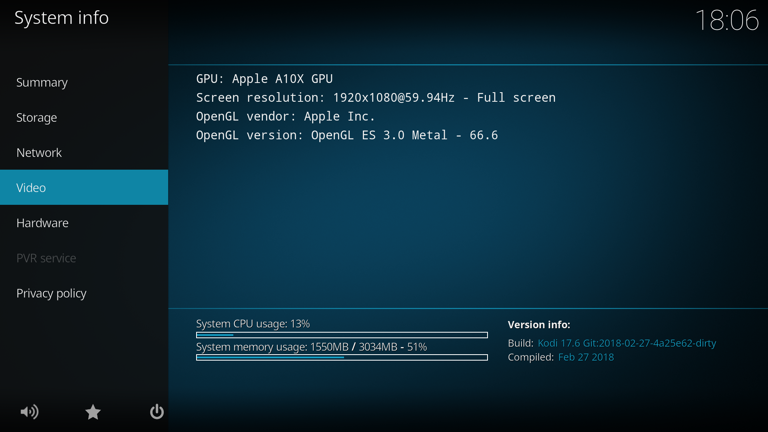
Here’re also screenshots with system information from Kodi:
Connect to network share from Kodi
There are several protocols for connecting to networks shares, and one of them is for example SMB:
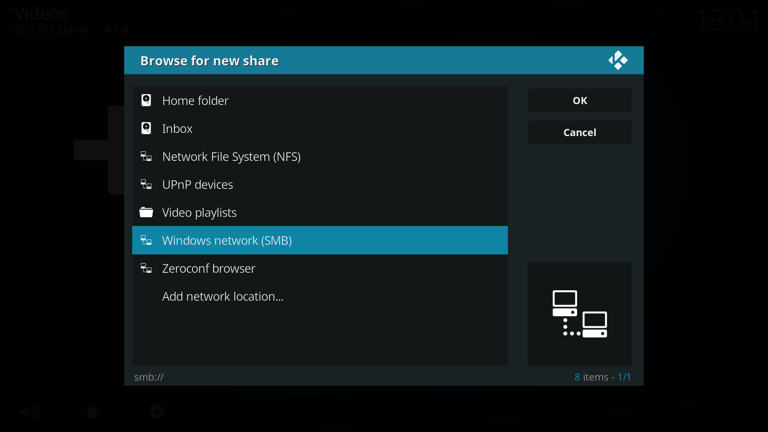
Choose WORKGROUP and it will discover your Raspberry share automatically. Choose a folder and add it as a source:
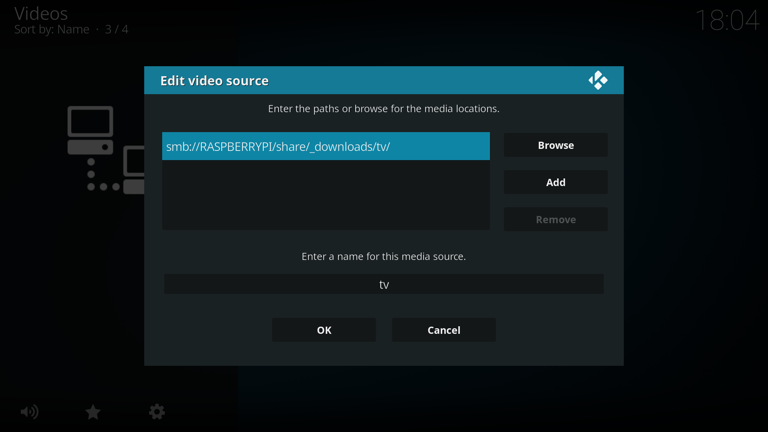
Now you’ll be able to navigate it like a local filesystem and open any video file you put there.
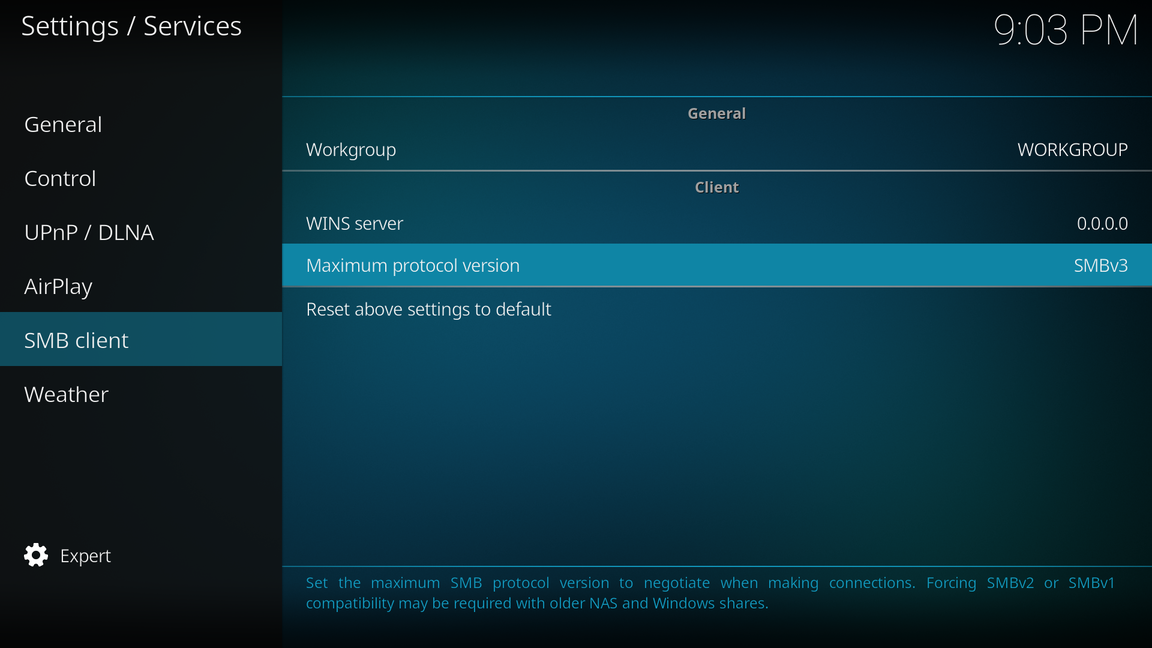
Cannot connect to SMBv3 share
Trying to connect to an SMB share on my other server (Synology DSM), I was getting “timeout” errors within milliseconds after clicking the button. The actual error was found in the server logs: turned out, Kodi was trying to connect with SMBv1, but my server only allows SMBv2 and SMBv3 (as it should).
Googling around, I found this thread, from which I got to know that there is an SMB client setting, but when I openned that page in Kodi settings, there was no option to select SMB protocol, I only had Workgroup and WINS server there.
Googling some more, I’ve discovered that this option is disabled in my build, so I had to unpack the *.deb and edit several configs:
$ brew install dpkg
$ dpkg-deb -R ./kodi-20180227-4a25e62-yab-tvos.deb ./kodi
$ nano ./kodi/var/mobile/Applications/Kodi.app/AppData/AppHome/userdata/advancedsettings.xml<advancedsettings>
<cache>
<memorysize>116391936</memorysize>
<readfactor>10</readfactor>
</cache>
<smb>
<maxprotocol>3</maxprotocol>
</smb>
</advancedsettings>$ nano ./kodi/var/mobile/Applications/Kodi.app/AppData/AppHome/system/settings/settings.xml...
<setting id="smb.maxprotocol" type="integer" label="36621" help="36622">
<level>2</level>
<visible>true</visible>
<default>3</default>
<constraints>
<options>
<option label="36623">0</option>
<option label="36624">1</option>
<option label="36625">2</option>
<option label="36626">3</option>
</options>
</constraints>
<control type="list" format="integer" />
</setting>
...$ nano ./kodi/var/mobile/Applications/Kodi.app/AppData/AppHome/system/settings/win32.xml...
<section id="services">
<category id="general">
<group id="2">
<setting id="services.zeroconf">
<default>false</default>
</setting>
</group>
</category>
<category id="smb">
<visible>true</visible>
</category>
</section>
...$ dpkg-deb -b ./kodi ./kodi-20180227-4a25e62-yab-tvos-smb3-and-bigger-cache.debAfter signing and installing that variant, I got the SMB protocol option:

…But I still couldn’t connect to my SMB share. The error was still the same, so apparently Kodi was still trying to connect with SMBv1. I tried to change that option from SMBv3 to SMBv2, but got the same result. I also tried explicitly setting 445 port in the connection settings (tried explicit 139 too), but that didn’t help either. So, either something is wrong in this particular Kodi version, or Apple TV does not have support for anything but SMBv1, which would explain why SMB protocol option is disabled in this Kodi build by default.
Fortunately, my server is also available via SFTP, so I just went with this protocol instead of SMB, and that worked fine.
Increasing video cache for unstable network
If one of your network shares is on the internet (seedbox), and your internet connection is not very stable, for example there is a significant packets loss, so your playback gets interrupted, you can try to fight this by increasing the video cache. That way Kodi would (hopefully) pre-download bigger chunks of video ahead and thus survive through the packets loss periods by playing from cached data instead of stuttering.
For that you’ll need to edit the advancedsettings.xml file inside the *.deb package:
$ brew install dpkg
$ dpkg-deb -R ./kodi-20180227-4a25e62-yab-tvos.deb ./kodi
$ nano ./kodi/var/mobile/Applications/Kodi.app/AppData/AppHome/userdata/advancedsettings.xml
<advancedsettings>
<cache>
<memorysize>116391936</memorysize>
<readfactor>10</readfactor>
</cache>
</advancedsettings>The 116391936 value is 111 MB, which could likely be increased even more, but be careful not to exceed available RAM on your Apple TV. The readfactor value I’m not sure about how exactly does it affect things.
To pack the modified bundle back to .*deb:
$ dpkg-deb -b ./kodi ./kodi-20180227-4a25e62-yab-tvos-bigger-cache.debUpdates
2020-03-23 | Trying Kodi version from 2020-03
Kodi 19 for tvOS was announced at the official Kodi website, so I went and installed the latest kodi-20200316-b31d8bf0-depends-libnfs-tvos.deb (it is uploaded to the same folder).
…And rolled back to the old one because of the following issues with the new one:
- it is slow/laggy and poorly optimized
- Siri remote control works quite badly: hypersensitivity and glitches
- it couldn’t automatically discover or manually add my Samba share as a source
- also I couldn’t delete this failed source from the list as there is suddenly no context menu
- it did not pick up my existing settings (moreover, it fucking ruined them, so when I rolled back to the old version, I had to set everything up again)
- there is no clicking sound for menu actions
- they say you need to have a paid Apple Developer account for the Top Shelf feature now. Lolwut, it was working just with fine before
And the good old kodi-20180227-4a25e62-yab-tvos.deb has none of these issues. So what was the point of the new build?
2020-10-24 | Trying Kodi versions from 2020-10
I saw that there are a lot of new releases available and decided to try the latest. I tried the following 3 (so you can already tell that it didn’t go well):
kodi-20201008-7a0563a7-media_import_19.0a2-Matrix-tvos.debfrom 21.10.2020kodi-20201007-f4787d92-PR18528-head-tvos.debfrom 08.10.2020kodi-20201005-54be31bc-master-tvos.debfrom 05.10.2020
This time they did not ruin my settings, so that’s already some progress, however all 3 had these issues:
- still Top Shelf feature is not working. I don’t really need it, but that’s just amusing how two years old version has it and the latest ones don’t
- still no clicking sound for menu/navigation actions
- now it couldn’t connect to any of my SFTP shares, which renders the whole application useless
Needless to say, reverting back to the reliable kodi-20180227-4a25e62-yab-tvos.deb made things right again.
Oh well, I’ll check again another half-year later.
2022-03-30 | Trying Kodi version from 2022-03
I gave new versions another chance, now I tried these ones:
kodi-20220306-d4420246-media_import_19.4-Matrix-tvos.deborg.xbmc.kodi-tvos_19.4-0-tvos.deb
Still the fucking same results:
- still no Top Shelf feature, but this time they had a note in documentation, claiming that it only works if you have 99 USD paid Apple Developer account. How come then it works with
kodi-20180227-4a25e62-yab-tvos.debrelease without a paid account? - still no clicking sound for actions;
- still can’t connect to SFTP shares;
- plus now it’s also sluggish and less responsive even while simply navigating the main menu.
Phenomenal progress!
I made some more backup copies of the good old kodi-20180227-4a25e62-yab-tvos.deb release.
2023-10-12
Trying Kodi version from 2023-03 (Nexus 20.1)
Yeah, 3 years later I tried yet another latest Kodi build for tvOS - kodi-20230311-289ec664-20.1-Nexus-13808-tvos - and it keeps up the tradition of being crap:
- still no clicking sound for actions;
- impossible to navigate the menus, even tiniest movement on the remote jumps great distances on the screen, so you just can’t select what you want;
- because of that, I couldn’t test anything else and rolled back to the good old stable
kodi-20180227-4a25e62-yab-tvos.
- because of that, I couldn’t test anything else and rolled back to the good old stable
Failed to install, not a valid bundle
On Mac OS 13.6 and Xcode 15.0 (15A240d) I suddenly got this problem, trying to upload the *.ipa to Apple TV (tvOS 17):
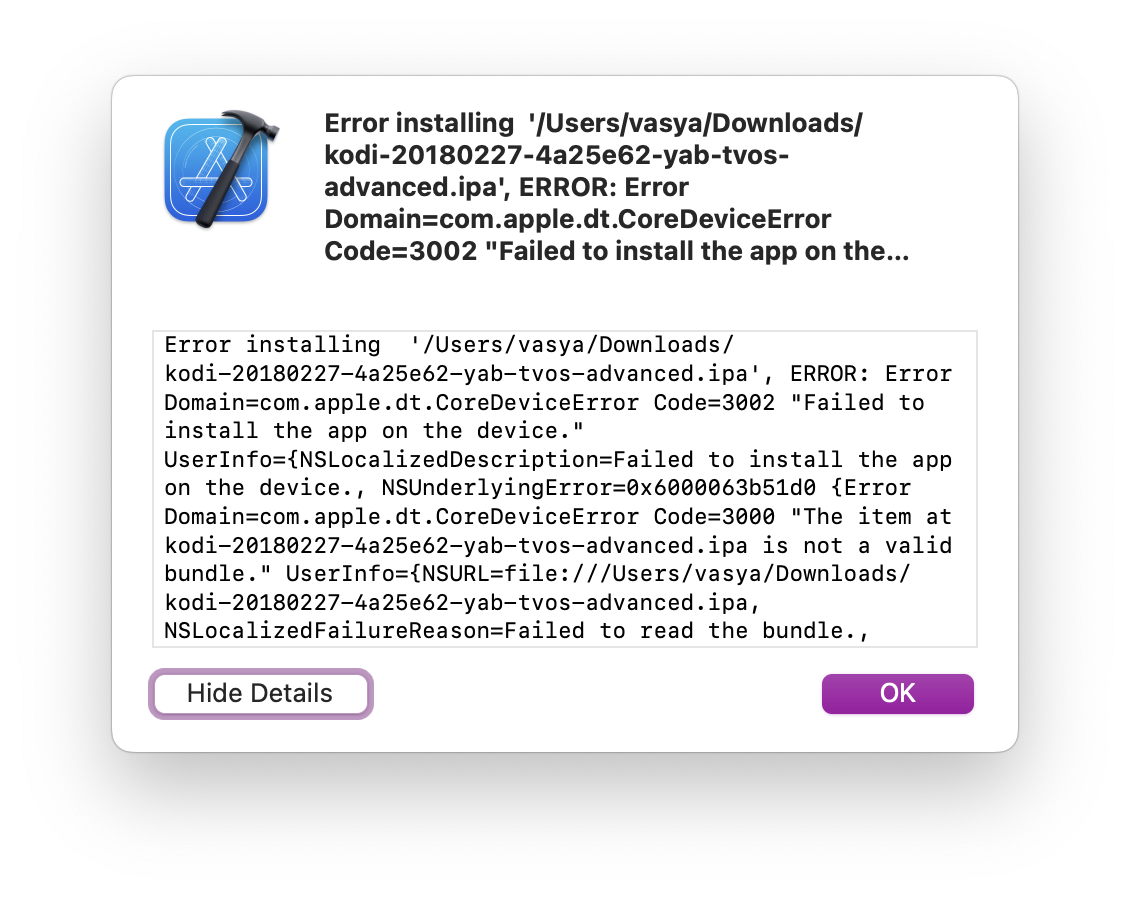
The full text from details:
Error installing  '/Users/vasya/Downloads/kodi-20180227-4a25e62-yab-tvos-advanced.ipa', ERROR: Error Domain=com.apple.dt.CoreDeviceError Code=3002 "Failed to install the app on the device." UserInfo={NSUnderlyingError=0x600007261740 {Error Domain=com.apple.dt.CoreDeviceError Code=3000 "The item at kodi-20180227-4a25e62-yab-tvos-advanced.ipa is not a valid bundle." UserInfo={NSURL=file:///Users/vasya/Downloads/kodi-20180227-4a25e62-yab-tvos-advanced.ipa, NSLocalizedFailureReason=Failed to read the bundle., NSLocalizedDescription=The item at kodi-20180227-4a25e62-yab-tvos-advanced.ipa is not a valid bundle.}}, NSURL=file:///Users/vasya/Downloads/kodi-20180227-4a25e62-yab-tvos-advanced.ipa, NSLocalizedDescription=Failed to install the app on the device.}
Domain: com.apple.dt.DVTCoreDevice
Code: -1
User Info: {
    DVTErrorCreationDateKey = "2023-10-12 17:21:02 +0000";
}
--


System Information

macOS Version 13.6 (Build 22G120)
Xcode 15.0 (22265) (Build 15A240d)
Timestamp: 2023-10-12T19:21:02+02:00
Thanks a fucking lot, Apple.
Googling a bit led me to this answer, and indeed, unpacking *.ipa and uploading extracted ./Payload/*.app did work, the application got successfully uploaded and installed on Apple TV.
Another commentor says that in his case it was because of the missing Bundle name in the target Info, but I already had it there and still got the problem. So uploading the extracted *.app instead of *.ipa is the way to go.
2024-08-16 | Moved to Vero V
I finally got tired of dancing around Apple TV issues and switched to Vero. Should have done so from the beginning, buying Apple TV was a mistake.