XBMC/Kodi remote control application
There is this great piece of software - XBMC/Kodi media player. I’ll write a separate article about that one, but today I want to show you a remote control application for it, which I’ve created for myself.
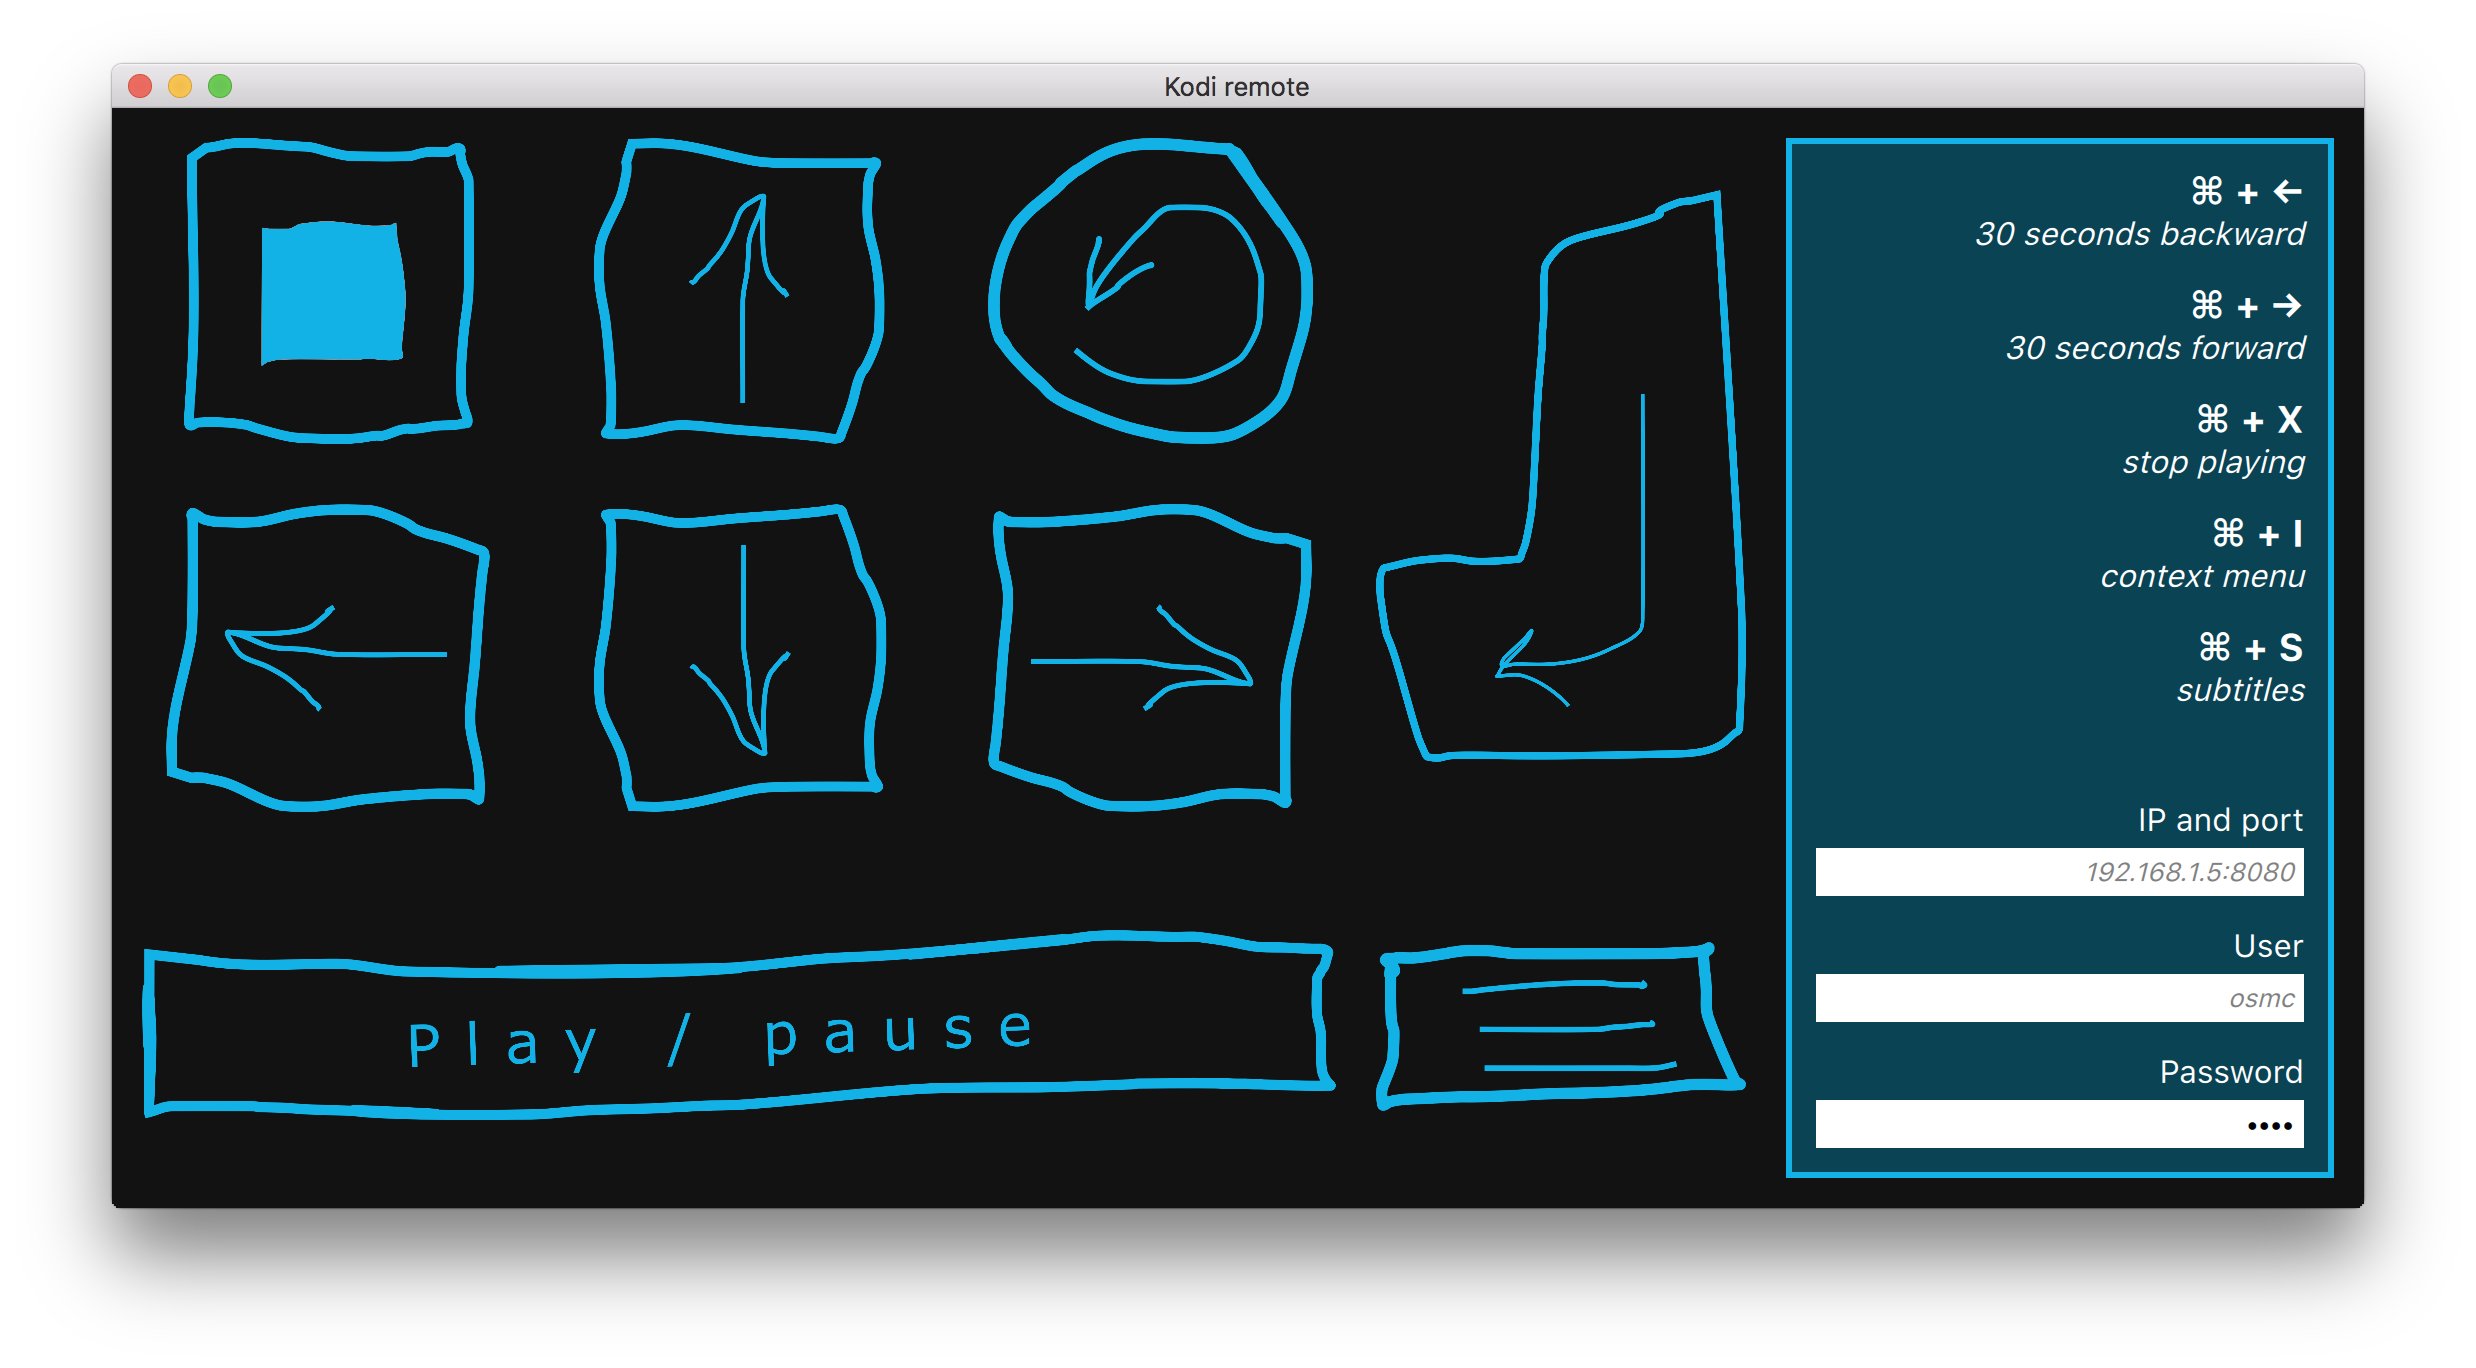
Beauty, innit.
Why
There are quite a few remote control applications available already (I personally use this one on my phone), so what’s the point of creating yet another one? There is no much of a point, actually, so I did it mostly for fun. But not entirely, because while mobile offering is pretty much satisfying, I couldn’t find a convenient desktop (Mac OS) application. Well, there is this Dashboard widget, but I didn’t like it.
So I decided to create my own.
Framework
First of all, how does Kodi even respond to the outside world? Long story short, it has a JSON-RPC API, so you can talk to it via XMLHttpRequests. That immediately begs for a Qt/QML application, because:
- It has XMLHttpRequest support out of the box;
- Nice GUI which is easy to create;
- As a “side effect”, it will be a truly cross-platform application.
Development
So it is a QML application, and there is (almost) no C++ code except for the standard main.cpp stuff. I have nothing against C++, but there was no point in using it here, as you will see.
And as I’m having a 12 hours flight, I’ll describe my application with lots of unnecessary details.
Window geometry and settings
As any other frequently used application, it should save and restore its window coordinates and geometry. A handy QSettings module will take care of it for you, even though its QML API is still a part of Qt.labs:
import Qt.labs.settings 1.0

Window {
    id: root
    // ...
    Settings {
        id: settings

        property alias x: root.x
        property alias y: root.y
        property alias width: root.width
        property alias height: root.height
    }
    // ...
}
Don’t forget to specify your application’s name and domain at main.cpp:
QGuiApplication app(argc, argv);
app.setOrganizationName("Declaration of VAR");
app.setApplicationName("KodiRemote");
app.setOrganizationDomain("decovar.io");
Launch the application, change its size and position, close it and launch again. You can also check the settings file here: ~/Library/Preferences/io.decovar.KodiRemote.plist (or wherever).
Layout and controls
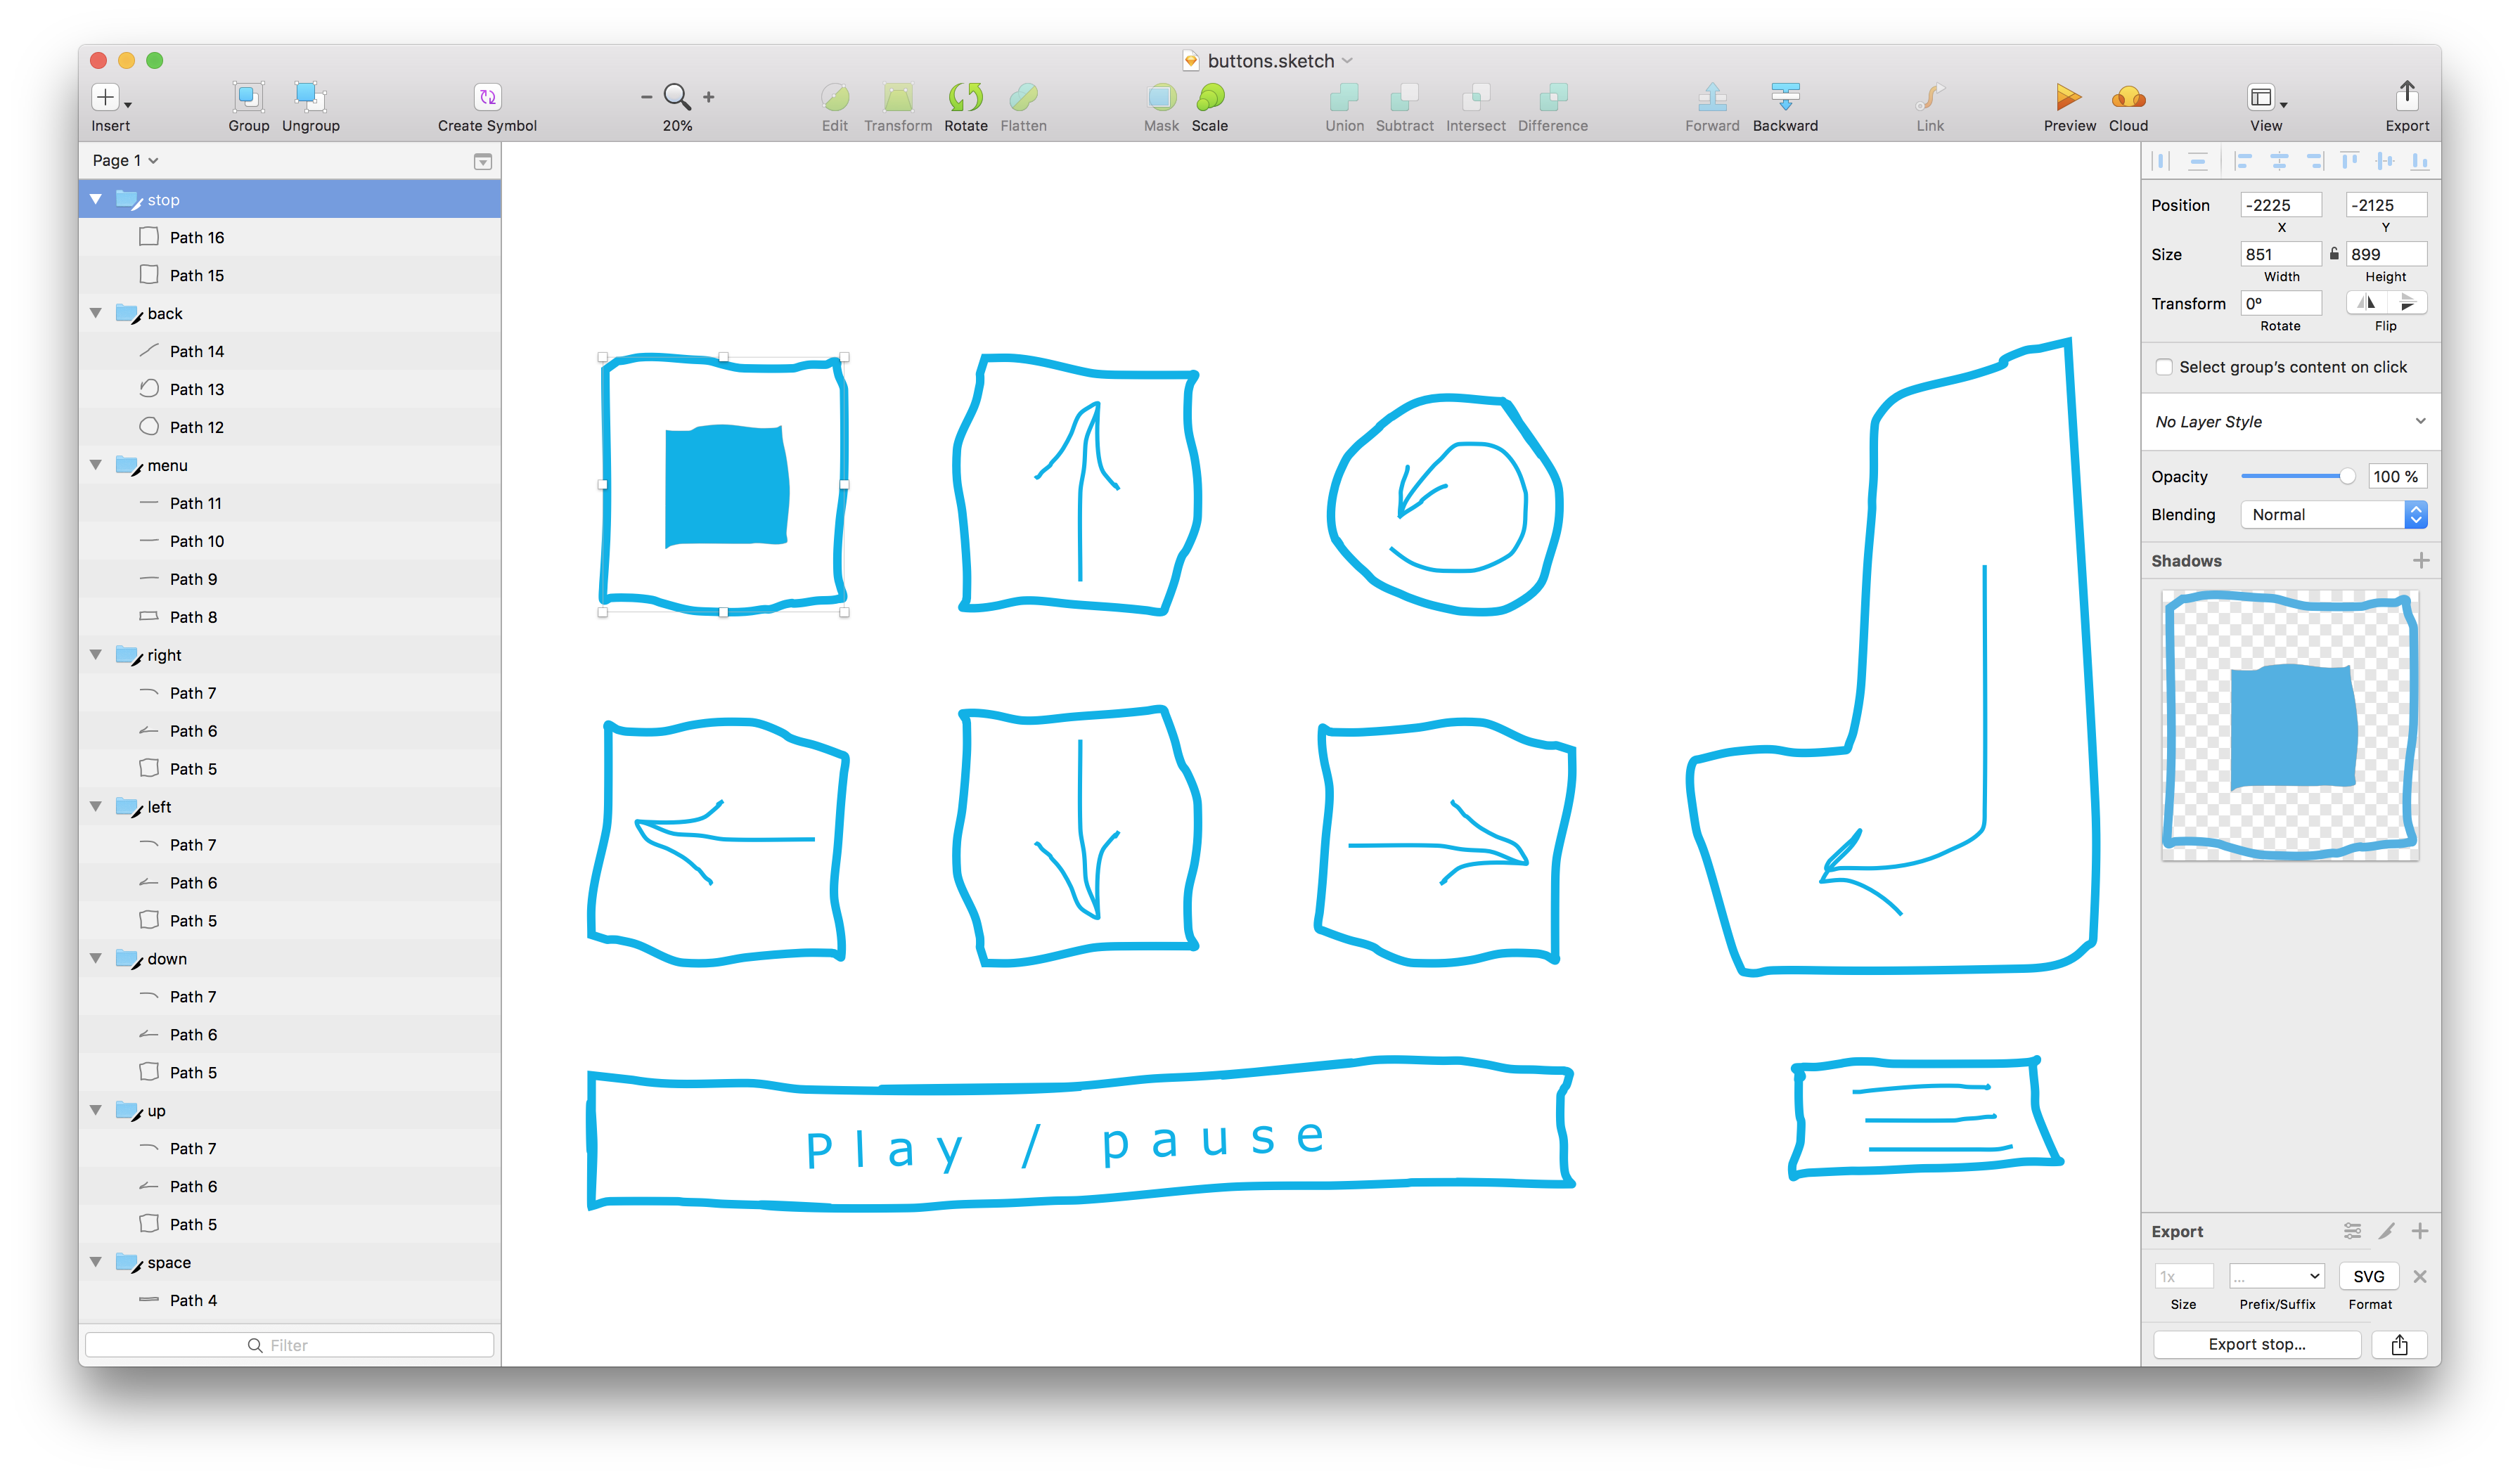
I took a GridLayout and filled it with control buttons, each having fancy SVG image made by me in Sketch (such a nice tool for that purpose):
Since buttons share a fair amount of properties, I created a custom ControlButton.qml component:
import QtQuick 2.11
import QtQuick.Controls 2.4
import QtQuick.Layouts 1.11
import QtGraphicalEffects 1.0

Button {
    property alias source: img.source

    Layout.fillWidth: true
    Layout.fillHeight: true

    // gets bigger a bit when hovered
    scale: hovered ? 1.05 : 1

    background: Rectangle {
        color: "transparent"
    }

    // here goes an SVG image
    Image {
        id: img
        anchors.fill: parent
        fillMode: Image.PreserveAspectFit
    }

    // also, when hovered, the button glows a bit
    Glow {
        id: glow
        anchors.fill: img
        radius: 20
        samples: 30
        color: "#094354"
        source: img
        visible: parent.hovered
    }
}
Glowing and scaling effects look like this:
If video doesn’t play in your browser, you can download it here.
And I put them into GridLayout like this:
ControlButton {
id: btn_stop
Layout.row: 0
Layout.column: 0
// do keep your images in resources
source: "qrc:/img/stop.svg"
onClicked: {
// some logic will be here later
}
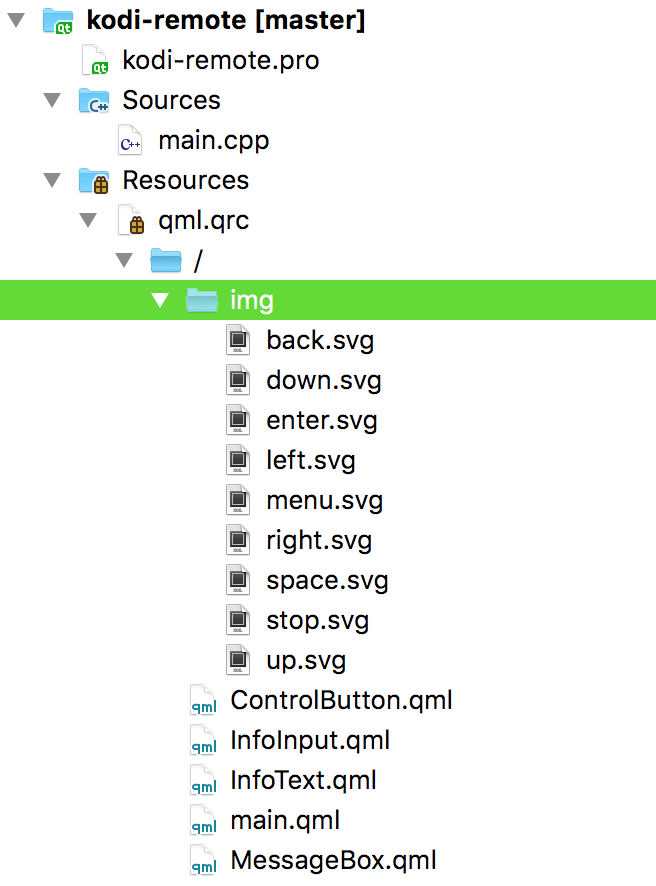
}I recommend to utilize Qt Resource System for storing images, so you could use qrc:/ path instead of absolute or relative paths from your file-system. For instance, here’s how my project’s structure looks like:
Aside from buttons I also have custom labels and inputs on the side panel. Labels are not that interesting (you can look at their source code later), but text inputs are something different. It is actually not that trivial task to create a more or less decently looking input field in QML. So here’s mine InfoInput.qml
import QtQuick 2.11
import QtQuick.Controls 2.4
import QtQuick.Layouts 1.11

// a background for it, so the field clearly stands out
Rectangle {
    // take all the width avaulable
    Layout.fillWidth: true
    // leave anough room for symbols in the line
    Layout.preferredHeight: ti.contentHeight * 1.5

    // expose the text property
    property alias text: ti.text
    // expose also the placeholder property
    property alias placeholder: placeholder.text
    // in case of a password field
    property alias echoMode: ti.echoMode

    TextInput {
        id: ti
        anchors.verticalCenter: parent.verticalCenter
        width: parent.width
        horizontalAlignment: Text.AlignRight
        // make paddings so you inputs don't look like your average Linux application GUI
        leftPadding: 5
        rightPadding: leftPadding
        clip: true

        Text {
            id: placeholder
            anchors.fill: parent
            horizontalAlignment: parent.horizontalAlignment
            leftPadding: parent.leftPadding
            rightPadding: leftPadding
            clip: parent.clip
            font.italic: true
            color: "grey"
            // hide placeholder when any text in entered
            visible: !ti.text
        }
    }
}
Another custom control I created is a MessageBox.qml - dialog window for showing errors:
import QtQuick 2.11
import QtQuick.Window 2.11
import QtQuick.Controls 2.4
import QtQuick.Layouts 1.11

Window {
    id: dialog

    // both title and message text properties are available to be set from "outside"
    property string title
    property string textMain

    title: dialog.title
    modality: Qt.WindowModal

    width: 400
    minimumWidth: width
    maximumWidth: width
    height: 160
    minimumHeight: height
    maximumHeight: height

    Rectangle {
        anchors.fill: parent
        border.width: 3

        ColumnLayout {
            anchors.fill: parent

            Text {
                Layout.fillWidth: true
                Layout.fillHeight: true
                Layout.topMargin: 10
                Layout.leftMargin: 15
                Layout.rightMargin: 15
                horizontalAlignment: Text.AlignHCenter
                verticalAlignment: Text.AlignVCenter
                text: dialog.textMain
                font.family: "Courier New"
                font.pixelSize: 16
                wrapMode: Text.WordWrap
            }

            Button {
                id: btn
                Layout.leftMargin: 3
                Layout.rightMargin: 3
                Layout.fillWidth: true
                text: "Close"
                onClicked: { dialog.close(); }
            }
        }
    }
}
Shortcuts
Shortcuts are actions for the keyboard keys combinations. I wanted to be able to operate my remote control not only with mouse/touchpad, but with a physical keyboard too. That is actually the main reason why I decided to create my own remote control application, so I could bind the keys I like:
- arrow keys for navigation;
- enter/return for selecting;
- space for play/pause;
- other combinations like jumping back and forth, choosing subtitles, etc.
Some of the combinations I had in mind originally turned out to be impossible to implement (like single ⌥/ALT key), because there is no such sequence available, so I had to substitute them with less obvious ones, which led to adding a side-panel where all the combinations are listed.
But anyway, here’s how you add a shortcut:
Shortcut {
    sequence: "Ctrl+X"
    onActivated: btn_stop.clicked()
}
So when Ctrl + X combination is pressed, btn_stop.clicked() handler will get executed - just like as if you clicked on this button with mouse.
JSON-RPC API
Now the most interesting part - how to communicate with Kodi API.
How to send requests
As I said, it has a JSON-RPC API, and it is available at http://IP:port/jsonrpc, which is the entry point for your requests. Every request should contain a method you would like to call, and that’s how you control the Kodi: choosing a movie to watch, sending play/pause command, switching between subtitles, deleting files - all that is done via XMLHttpRequests calling certain methods.
API is self-descriptive, so if you send a request with method JSONRPC.Introspect, Kodi will return you the list of methods it supports:

By the way, that is Paw at the screenshot - a must-have application for working with HTTP-requests.
How to understand which methods to use? Well, read the documentation or try them one by one yourself. Or you can start with the ones that are listed by some nice dude in this thread.
Now how to implement it in QML. Since all the requests have a similar structure, I decided to store it in a property, so I could just replace -=PLACEHOLDER=- value with concrete methods and parameters each time I need to send a new request:
// ...
property string playerURL: "http://" + ti_iPort.text + "/jsonrpc"
property string methodTemplate: "{\"jsonrpc\":\"2.0\",\"method\":-=PLACEHOLDER=-,\"id\":1}"
// ...
So the full URL for a request is formed like this:
function prepateRequest(actionName)
{
    return playerURL
            + "?request="
            + encodeURIComponent(
                methodTemplate.replace("-=PLACEHOLDER=-", actionName)
                );
}
XMLHttpRequests in QML are nothing new, except if you protected your player with a password - then you need to add Authorization header:
function request(url, callback)
{
    //console.log(decodeURIComponent(url));
    var xhr = new XMLHttpRequest();
    xhr.onreadystatechange = (function(myxhr) {
        return function() {
            if(myxhr.readyState === 4) { callback(myxhr); }
        }
    })(xhr);
    xhr.open("GET", url);
    xhr.setRequestHeader("Content-Type", "application/json");
    xhr.setRequestHeader("Authorization", "Basic " + Qt.btoa(user + ":" + password));
    xhr.send();
}
I saved my user/password data (values from input fields at the side panel) as well as player’s IP address and port in Settings too:
Window {
    id: root
    // ...
    property string playerURL: "http://" + ti_iPort.text + "/jsonrpc"
    property string user: ti_user.text
    property string password: ti_password.text

    Settings {
        id: settings
        // ...
        property alias iPort: ti_iPort.text
        property alias user: ti_user.text
        property alias password: ti_password.text
    }
    // ...
    InfoText { text: "IP and port" }
    InfoInput {
        id: ti_iPort
        placeholder: "192.168.1.5:8080"
    }
    InfoText { text: "User" }
    InfoInput {
        id: ti_user
        placeholder: "osmc"
    }
    InfoText { text: "Password" }
    InfoInput {
        id: ti_password
        placeholder: "osmc"
        echoMode: TextInput.Password
    }
    // ...
}
Requests results are processed with this callback function:
function processResults(o)
{
    if (o.status === 200)
    {
        var jsn = JSON.parse(o.responseText);
        // if there was no error, return JSON result
        if (!jsn.hasOwnProperty("error")) { return jsn; }
        else // set message text and show the dialog window
        {
            dialogError.textMain = "Some error has occurred<br/>Code: "
                + jsn["error"]["code"] + "<br/>Error: "
                + jsn["error"]["message"];
            //console.log(dialogError.textMain.replace(/<br\/>/g, " | "));
            dialogError.show();
        }
    }
    else
    {
        dialogError.textMain = "Some error has occurred<br/>Code: "
            + o.status + "<br/>Status: " + o.statusText;
        console.log(dialogError.textMain.replace(/<br\/>/g, " | "));
        dialogError.show();
    }
}
Finally, here’s how btn_stop.clicked() handler looks like:
ControlButton {
    id: btn_stop
    // ...
    onClicked: {
        request(
            prepateRequest("\"Player.Stop\",\"params\":{\"playerid\":1}"),
            function (o) { processResults(o); }
        );
    }
}
That’s all the basics, so now you know enough to implement your own remote control for Kodi.
Get active player
As you might have noticed, Kodi has 2 “modes”:
- When you are browsing the main UI/menu, choosing movies to watch and changing the settings;
- When you are watching a movie, so there is an actual player on the screen.
Naturally, some commands are only available in one mode and others are available in another. So if you’ll send a Player.Stop command while browsing the menu - nothing will happen.
To prevent the execution of irrelevant commands there is a special method Player.GetActivePlayers, which returns a positive ID (playerid) if Kodi is in player mode. Using this ID you can then query that player with commands.
But I decided that it is safe enough to assume that usually this ID is always 1, so I just send my requests with "playerid":1. And if there is an active player, then it works, and if not, then so what, let it fail.
However, in some cases it actually might be a good idea to execute this request before sending a command. For example, the arrow keys are used for navigation (Input.Left/Input.Right) while in browsing-the-menu mode, but you can reuse them in player mode so they would become Player.Seek commands.
Set subtitles
Subtitles are set by index, so first you need to get the list of available subtitles by calling the Player.GetProperties method and passing subtitles value among its properties:
{"jsonrpc":"2.0","method":"Player.GetProperties","id":1,"params":{"properties":["subtitles"],"playerid":1}}Result can look something like that:
{
    "id": 1,
    "jsonrpc": "2.0",
    "result": {
        "subtitles": [
            {
                "index": 0,
                "language": "",
                "name": "(External)"
            },
            {
                "index": 1,
                "language": "nor",
                "name": "no"
            },
            {
                "index": 2,
                "language": "swe",
                "name": "sv"
            },
            {
                "index": 3,
                "language": "fin",
                "name": "fi"
            },
            {
                "index": 4,
                "language": "dan",
                "name": "da"
            }
        ]
    }
}
Now, if you want to set finnish subtitles, you need to pass index 3 with the following command:
{"jsonrpc":"2.0","method":"Player.SetSubtitle","id":1,"params":{"subtitle":3,"playerid":1}}I display available subtitles in a ComboBox like this:
Shortcut {
    sequence: "Ctrl+S"
    onActivated: {
        // get the list of subtitles
        request(
            prepateRequest("\"Player.GetProperties\",\"params\":{\"playerid\":1,\"properties\":[\"subtitleenabled\",\"currentsubtitle\",\"subtitles\"]}"),
            function (o)
            {
                var rez = processResults(o)["result"];

                var subtitles = rez["subtitles"];
                subsModel.clear();
                subsModel.append({
                    "index": "-1",
                    "lang": "- no subtitles -"
                });
                subsCombo.currentIndex = 0;
                if (subtitles.length > 0)
                {
                    for(var s in subtitles)
                    {
                        var lang = subtitles[s]["language"];
                        subsModel.append({
                            "index": subtitles[s]["index"].toString(),
                            "lang": "[" + (lang.length > 0 ? lang : "unknown") + "] " + subtitles[s]["name"]
                        });
                        //console.log(subtitles[s]["index"] + ", " + subtitles[s]["language"] + ", " + subtitles[s]["name"]);
                    }

                    // if there is an active subtitle
                    if(rez["subtitleenabled"] === true)
                    {
                        // select the active subtitle
                        var currentSubtitle = rez["currentsubtitle"];
                        if (currentSubtitle !== null)
                        {
                            //console.log("not null");
                            //console.log(currentSubtitle["index"]);
                            for (var i = 0; i < subsModel.count; i++)
                            {
                                //console.log(subsModel.get(i).index + " - " + currentSubtitle["index"]);
                                if (subsModel.get(i).index === currentSubtitle["index"].toString())
                                {
                                    subsCombo.currentIndex = i;
                                    break;
                                }
                            }

                        }
                    }
                }

                subsDialog.open();
            }
        );
    }
}
If you want to disable subtitles, then… what then? I couldn’t find in the documentation what to do in this case, so I sniffed the packet that is sent by a mobile remote application:
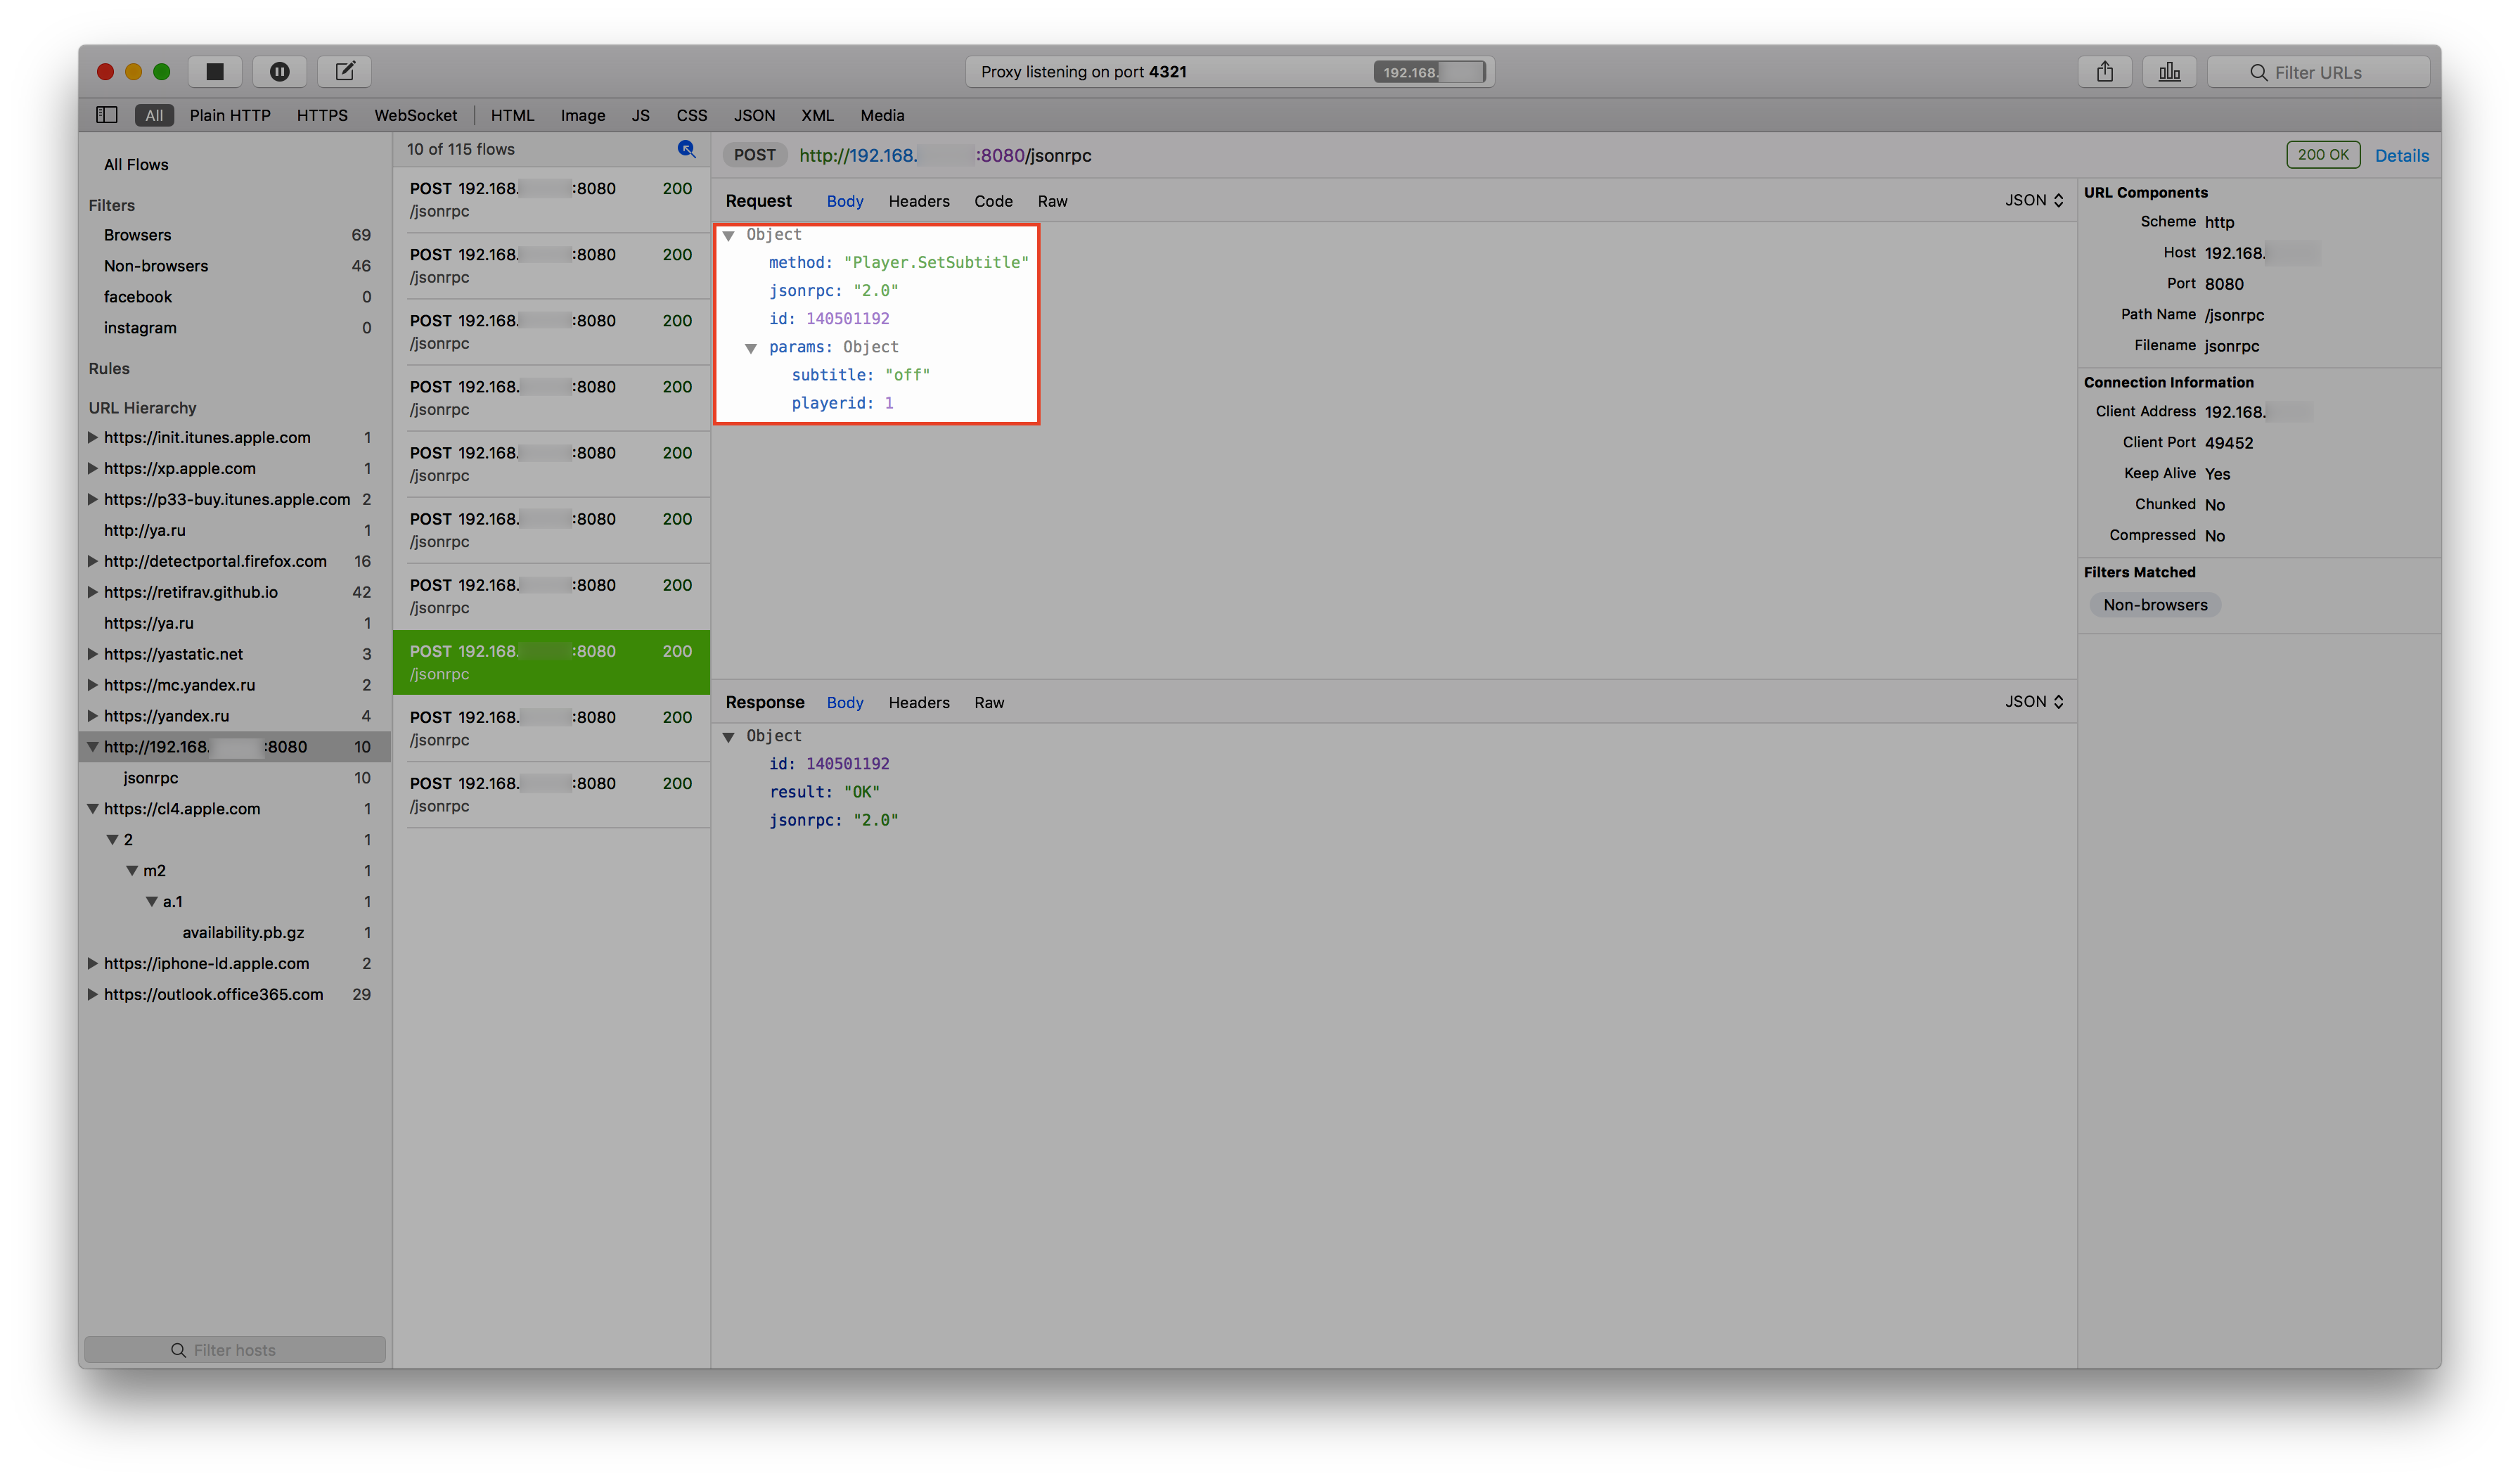
And it turned out to be that simple:
{"jsonrpc":"2.0","method":"Player.SetSubtitle","params":{"playerid":1,"subtitle":"off"},"id":1}In my opinion, dealing with subtitles was the most difficult part of the entire project, the rest is done via more or less trivial requests.
Source code
Source code is published here: https://github.com/retifrav/kodi-remote
As it turned out, I was using an old version of Kodi which I got with OSMC distribution. But when I switched to LibreELEC, I suddenly ended up with Kodi v18 Leia, and in this release GET requests were disabled for most of the API methods.
That resulted in the following error for all the functions in my remote control application:
{
  "error": {
    "code": -32099,
    "message": "Bad client permission."
  },
  "id": 1,
  "jsonrpc": "2.0"
}
Because from now on all the requests to Kodi JSON-RPC API have to be with the POST HTTP method. For my application it meant two things:
- Change from
GETtoPOST, obviously; - Move JSON commands from URL to the request body.
First thing is simple to implement but so is the second: body is simply set as a parameter of xhr.send(). Here’s a reworked request() function:
function request(method, params, callback)
{
    if (method !== "GET" && method !== "POST")
    {
        let errorText = "Unknown HTTP method: ".concat(method);
        console.log(errorText);
        dialogError.textMain = errorText;
        dialogError.show();
        return;
    }

    params = methodTemplate.replace("-=PLACEHOLDER=-", params);
    if (method === "GET")
    {
        params = "?request=".concat(encodeURIComponent(params));
    }

    var xhr = new XMLHttpRequest();
    xhr.onreadystatechange = (function(myxhr) {
        return function() {
            if(myxhr.readyState === 4) { callback(myxhr); }
        }
    })(xhr);

    xhr.open(method, method === "GET" ? playerURL.concat(params) : playerURL);
    xhr.setRequestHeader("Content-Type", "application/json");
    xhr.setRequestHeader("Authorization", "Basic " + Qt.btoa(user + ":" + password));

    if (method === "GET") { xhr.send(); }
    else { xhr.send(params); }
}
As you can see, I kept the GET option - that is because some API methods (Player.GetProperties) still support GET (although they work with POST as well).
You also might have noticed that I merged prepareRequest() (formerly prepateRequest) into request().
An example of calling the function from the button click:
ControlButton {
    id: btn_space
    // ...
    onClicked: {
        request(
            "POST",
            "\"Player.PlayPause\",\"params\":{\"playerid\":1}",
            function (o) { processResults(o); }
        );
    }
}
All the changes are reflected in this commit.